Top new arrivals

-
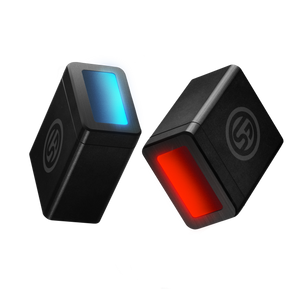
{"id":7865767329931,"title":"Shooters Global SG Pulse – Electronic Level","handle":"shooters-global-sg-pulse-electronic-level","description":"\u003cp class=\"MsoNormal\"\u003eThe Shooters Global (SG) Pulse is a compact, high-performance electronic level designed for precision shooters who demand accuracy without distraction. Featuring real-time LED indicators, it provides instant anti-cant feedback directly in your peripheral vision—keeping your scope level and your shots on target. With built-in stability tracking, shot timing analysis, and vertical angle display, the SG Pulse goes far beyond a traditional bubble level. Seamlessly integrated with the Shooters Global Drills app via Bluetooth, it offers video overlays, muzzle movement tracking, and performance logging to refine your shooting like never before. Rugged, lightweight, and easy to mount, the SG Pulse delivers pro-level features at an unbeatable price point.\u003c\/p\u003e","published_at":"2025-08-02T10:34:18+10:00","created_at":"2025-08-02T10:34:15+10:00","vendor":"Australian Tactical","type":"","tags":["Electronic","Level"],"price":29900,"price_min":29900,"price_max":29900,"available":true,"price_varies":false,"compare_at_price":0,"compare_at_price_min":0,"compare_at_price_max":0,"compare_at_price_varies":false,"variants":[{"id":43690808770699,"title":"Default Title","option1":"Default Title","option2":null,"option3":null,"sku":"SGPulse","requires_shipping":true,"taxable":true,"featured_image":null,"available":true,"name":"Shooters Global SG Pulse – Electronic Level","public_title":null,"options":["Default Title"],"price":29900,"weight":1000,"compare_at_price":0,"inventory_management":"shopify","barcode":"","requires_selling_plan":false,"selling_plan_allocations":[]}],"images":["\/\/australiantactical.com.au\/cdn\/shop\/files\/Main2devices.png?v=1754094715","\/\/australiantactical.com.au\/cdn\/shop\/files\/A024_02130323_S030.jpg?v=1754094699","\/\/australiantactical.com.au\/cdn\/shop\/files\/A024_02130323_S032.jpg?v=1754094699","\/\/australiantactical.com.au\/cdn\/shop\/files\/DSC02130-Edit.jpg?v=1754094702","\/\/australiantactical.com.au\/cdn\/shop\/files\/A024_02130323_S029.jpg?v=1754094699"],"featured_image":"\/\/australiantactical.com.au\/cdn\/shop\/files\/Main2devices.png?v=1754094715","options":["Title"],"media":[{"alt":null,"id":29770844274827,"position":1,"preview_image":{"aspect_ratio":1.0,"height":3050,"width":3050,"src":"\/\/australiantactical.com.au\/cdn\/shop\/files\/Main2devices.png?v=1754094715"},"aspect_ratio":1.0,"height":3050,"media_type":"image","src":"\/\/australiantactical.com.au\/cdn\/shop\/files\/Main2devices.png?v=1754094715","width":3050},{"alt":null,"id":29770843685003,"position":2,"preview_image":{"aspect_ratio":1.896,"height":1080,"width":2048,"src":"\/\/australiantactical.com.au\/cdn\/shop\/files\/A024_02130323_S030.jpg?v=1754094699"},"aspect_ratio":1.896,"height":1080,"media_type":"image","src":"\/\/australiantactical.com.au\/cdn\/shop\/files\/A024_02130323_S030.jpg?v=1754094699","width":2048},{"alt":null,"id":29770843717771,"position":3,"preview_image":{"aspect_ratio":1.896,"height":1080,"width":2048,"src":"\/\/australiantactical.com.au\/cdn\/shop\/files\/A024_02130323_S032.jpg?v=1754094699"},"aspect_ratio":1.896,"height":1080,"media_type":"image","src":"\/\/australiantactical.com.au\/cdn\/shop\/files\/A024_02130323_S032.jpg?v=1754094699","width":2048},{"alt":null,"id":29770843750539,"position":4,"preview_image":{"aspect_ratio":1.5,"height":4000,"width":6000,"src":"\/\/australiantactical.com.au\/cdn\/shop\/files\/DSC02130-Edit.jpg?v=1754094702"},"aspect_ratio":1.5,"height":4000,"media_type":"image","src":"\/\/australiantactical.com.au\/cdn\/shop\/files\/DSC02130-Edit.jpg?v=1754094702","width":6000},{"alt":null,"id":29770843783307,"position":5,"preview_image":{"aspect_ratio":1.896,"height":1080,"width":2048,"src":"\/\/australiantactical.com.au\/cdn\/shop\/files\/A024_02130323_S029.jpg?v=1754094699"},"aspect_ratio":1.896,"height":1080,"media_type":"image","src":"\/\/australiantactical.com.au\/cdn\/shop\/files\/A024_02130323_S029.jpg?v=1754094699","width":2048}],"requires_selling_plan":false,"selling_plan_groups":[],"content":"\u003cp class=\"MsoNormal\"\u003eThe Shooters Global (SG) Pulse is a compact, high-performance electronic level designed for precision shooters who demand accuracy without distraction. Featuring real-time LED indicators, it provides instant anti-cant feedback directly in your peripheral vision—keeping your scope level and your shots on target. With built-in stability tracking, shot timing analysis, and vertical angle display, the SG Pulse goes far beyond a traditional bubble level. Seamlessly integrated with the Shooters Global Drills app via Bluetooth, it offers video overlays, muzzle movement tracking, and performance logging to refine your shooting like never before. Rugged, lightweight, and easy to mount, the SG Pulse delivers pro-level features at an unbeatable price point.\u003c\/p\u003e"}
Translation missing: en.products.product.regular_price
$299.00
-
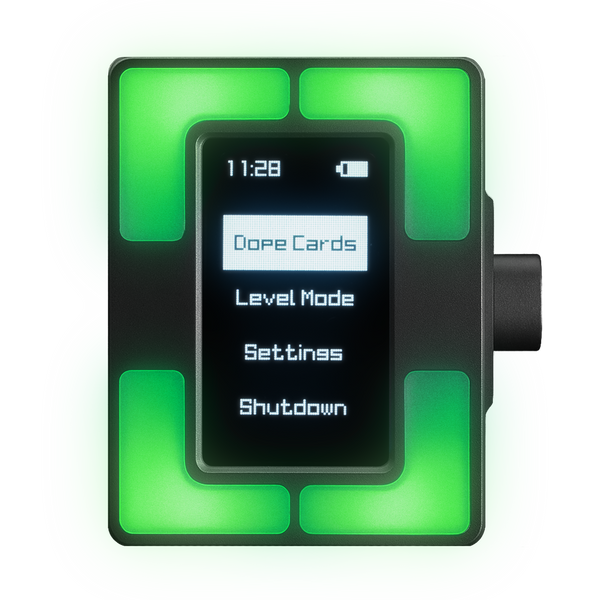
{"id":7887681126539,"title":"Shooters Global SG Pulse PRO – Electronic Level","handle":"shooters-global-sg-pulse-pro-electronic-level","description":"\u003cp data-end=\"1217\" data-start=\"929\"\u003eSG Pulse Pro — Your compact, rugged, and versatile 7-in-1 long-range shooting assistant\u003c\/p\u003e\n\u003cp data-end=\"450\" data-start=\"204\"\u003eThe \u003cstrong data-end=\"224\" data-start=\"208\"\u003eSG Pulse Pro\u003c\/strong\u003e is a rugged, compact, and feature-packed tool designed to give shooters an edge on the range and in competition. Combining seven essential functions in one lightweight device, it streamlines your setup and boosts precision.\u003c\/p\u003e\n\u003cp data-end=\"471\" data-start=\"452\"\u003e\u003cstrong data-end=\"469\" data-start=\"452\"\u003eKey Features:\u003c\/strong\u003e\u003c\/p\u003e\n\u003cul data-end=\"916\" data-start=\"472\"\u003e\n\u003cli data-end=\"551\" data-start=\"472\"\u003e\n\u003cp data-end=\"551\" data-start=\"474\"\u003e\u003cstrong data-end=\"495\" data-start=\"474\"\u003eDigital DOPE card\u003c\/strong\u003e with remote button control for fast stage transitions\u003c\/p\u003e\n\u003c\/li\u003e\n\u003cli data-end=\"620\" data-start=\"552\"\u003e\n\u003cp data-end=\"620\" data-start=\"554\"\u003e\u003cstrong data-end=\"580\" data-start=\"554\"\u003eIntegrated stage timer\u003c\/strong\u003e displayed right in your sight picture\u003c\/p\u003e\n\u003c\/li\u003e\n\u003cli data-end=\"682\" data-start=\"621\"\u003e\n\u003cp data-end=\"682\" data-start=\"623\"\u003e\u003cstrong data-end=\"648\" data-start=\"623\"\u003eMuzzle trace analysis\u003c\/strong\u003e to spot and fix shooting errors\u003c\/p\u003e\n\u003c\/li\u003e\n\u003cli data-end=\"742\" data-start=\"683\"\u003e\n\u003cp data-end=\"742\" data-start=\"685\"\u003e\u003cstrong data-end=\"714\" data-start=\"685\"\u003eElectronic rifle leveling\u003c\/strong\u003e with instant LED feedback\u003c\/p\u003e\n\u003c\/li\u003e\n\u003cli data-end=\"802\" data-start=\"743\"\u003e\n\u003cp data-end=\"802\" data-start=\"745\"\u003e\u003cstrong data-end=\"775\" data-start=\"745\"\u003eAccessory \u0026amp; remote support\u003c\/strong\u003e for hands-free operation\u003c\/p\u003e\n\u003c\/li\u003e\n\u003cli data-end=\"853\" data-start=\"803\"\u003e\n\u003cp data-end=\"853\" data-start=\"805\"\u003e\u003cstrong data-end=\"825\" data-start=\"805\"\u003eModular mounting\u003c\/strong\u003e (Picatinny, M-LOK, SPUHR)\u003c\/p\u003e\n\u003c\/li\u003e\n\u003cli data-end=\"916\" data-start=\"854\"\u003e\n\u003cp data-end=\"916\" data-start=\"856\"\u003e\u003cstrong data-end=\"878\" data-start=\"856\"\u003eRugged \u0026amp; efficient\u003c\/strong\u003e with up to 50 hours of battery life\u003c\/p\u003e\n\u003c\/li\u003e\n\u003c\/ul\u003e\n\u003cp data-end=\"1092\" data-start=\"918\"\u003eSeamlessly integrates with the \u003cstrong data-end=\"979\" data-start=\"949\"\u003eShooters Global Drills App\u003c\/strong\u003e, connecting data from timing, positioning, and video overlays to give you real insights into your performance.\u003c\/p\u003e\n\u003cp data-end=\"1092\" data-start=\"918\"\u003e \u003c\/p\u003e\n\u003cp\u003e\u003ciframe title=\"YouTube video player\" src=\"https:\/\/www.youtube.com\/embed\/FCdxEXbhl1w?si=d__93QWBzxISefDn\" height=\"315\" width=\"560\"\u003e\u003c\/iframe\u003e\u003c\/p\u003e","published_at":"2025-09-03T09:10:28+10:00","created_at":"2025-08-22T13:14:20+10:00","vendor":"Australian Tactical","type":"","tags":["bubble","data","DOPE","Level","pulse"],"price":57000,"price_min":57000,"price_max":57000,"available":true,"price_varies":false,"compare_at_price":null,"compare_at_price_min":0,"compare_at_price_max":0,"compare_at_price_varies":false,"variants":[{"id":43843725688971,"title":"Default Title","option1":"Default Title","option2":null,"option3":null,"sku":"59026006 83537","requires_shipping":true,"taxable":true,"featured_image":null,"available":true,"name":"Shooters Global SG Pulse PRO – Electronic Level","public_title":null,"options":["Default Title"],"price":57000,"weight":1000,"compare_at_price":null,"inventory_management":"shopify","barcode":"","requires_selling_plan":false,"selling_plan_allocations":[]}],"images":["\/\/australiantactical.com.au\/cdn\/shop\/files\/front.png?v=1755832203","\/\/australiantactical.com.au\/cdn\/shop\/files\/back.png?v=1755832203","\/\/australiantactical.com.au\/cdn\/shop\/files\/side2.png?v=1755832206","\/\/australiantactical.com.au\/cdn\/shop\/files\/Still2025-07-03124732_1.17.12-Edit2.png?v=1755832203","\/\/australiantactical.com.au\/cdn\/shop\/files\/Still2025-07-031247322_1.17.1-Edit.png?v=1755832203","\/\/australiantactical.com.au\/cdn\/shop\/files\/ec651a9b3212e9224810937698f4c831.png?v=1755832203"],"featured_image":"\/\/australiantactical.com.au\/cdn\/shop\/files\/front.png?v=1755832203","options":["Title"],"media":[{"alt":null,"id":29994847436939,"position":1,"preview_image":{"aspect_ratio":1.0,"height":1191,"width":1191,"src":"\/\/australiantactical.com.au\/cdn\/shop\/files\/front.png?v=1755832203"},"aspect_ratio":1.0,"height":1191,"media_type":"image","src":"\/\/australiantactical.com.au\/cdn\/shop\/files\/front.png?v=1755832203","width":1191},{"alt":null,"id":29994847404171,"position":2,"preview_image":{"aspect_ratio":1.0,"height":1191,"width":1191,"src":"\/\/australiantactical.com.au\/cdn\/shop\/files\/back.png?v=1755832203"},"aspect_ratio":1.0,"height":1191,"media_type":"image","src":"\/\/australiantactical.com.au\/cdn\/shop\/files\/back.png?v=1755832203","width":1191},{"alt":null,"id":29994847633547,"position":3,"preview_image":{"aspect_ratio":1.0,"height":1103,"width":1103,"src":"\/\/australiantactical.com.au\/cdn\/shop\/files\/side2.png?v=1755832206"},"aspect_ratio":1.0,"height":1103,"media_type":"image","src":"\/\/australiantactical.com.au\/cdn\/shop\/files\/side2.png?v=1755832206","width":1103},{"alt":null,"id":29994847666315,"position":4,"preview_image":{"aspect_ratio":1.0,"height":1103,"width":1103,"src":"\/\/australiantactical.com.au\/cdn\/shop\/files\/Still2025-07-03124732_1.17.12-Edit2.png?v=1755832203"},"aspect_ratio":1.0,"height":1103,"media_type":"image","src":"\/\/australiantactical.com.au\/cdn\/shop\/files\/Still2025-07-03124732_1.17.12-Edit2.png?v=1755832203","width":1103},{"alt":null,"id":29994847699083,"position":5,"preview_image":{"aspect_ratio":1.0,"height":1191,"width":1191,"src":"\/\/australiantactical.com.au\/cdn\/shop\/files\/Still2025-07-031247322_1.17.1-Edit.png?v=1755832203"},"aspect_ratio":1.0,"height":1191,"media_type":"image","src":"\/\/australiantactical.com.au\/cdn\/shop\/files\/Still2025-07-031247322_1.17.1-Edit.png?v=1755832203","width":1191},{"alt":null,"id":29994847731851,"position":6,"preview_image":{"aspect_ratio":1.0,"height":1148,"width":1148,"src":"\/\/australiantactical.com.au\/cdn\/shop\/files\/ec651a9b3212e9224810937698f4c831.png?v=1755832203"},"aspect_ratio":1.0,"height":1148,"media_type":"image","src":"\/\/australiantactical.com.au\/cdn\/shop\/files\/ec651a9b3212e9224810937698f4c831.png?v=1755832203","width":1148}],"requires_selling_plan":false,"selling_plan_groups":[],"content":"\u003cp data-end=\"1217\" data-start=\"929\"\u003eSG Pulse Pro — Your compact, rugged, and versatile 7-in-1 long-range shooting assistant\u003c\/p\u003e\n\u003cp data-end=\"450\" data-start=\"204\"\u003eThe \u003cstrong data-end=\"224\" data-start=\"208\"\u003eSG Pulse Pro\u003c\/strong\u003e is a rugged, compact, and feature-packed tool designed to give shooters an edge on the range and in competition. Combining seven essential functions in one lightweight device, it streamlines your setup and boosts precision.\u003c\/p\u003e\n\u003cp data-end=\"471\" data-start=\"452\"\u003e\u003cstrong data-end=\"469\" data-start=\"452\"\u003eKey Features:\u003c\/strong\u003e\u003c\/p\u003e\n\u003cul data-end=\"916\" data-start=\"472\"\u003e\n\u003cli data-end=\"551\" data-start=\"472\"\u003e\n\u003cp data-end=\"551\" data-start=\"474\"\u003e\u003cstrong data-end=\"495\" data-start=\"474\"\u003eDigital DOPE card\u003c\/strong\u003e with remote button control for fast stage transitions\u003c\/p\u003e\n\u003c\/li\u003e\n\u003cli data-end=\"620\" data-start=\"552\"\u003e\n\u003cp data-end=\"620\" data-start=\"554\"\u003e\u003cstrong data-end=\"580\" data-start=\"554\"\u003eIntegrated stage timer\u003c\/strong\u003e displayed right in your sight picture\u003c\/p\u003e\n\u003c\/li\u003e\n\u003cli data-end=\"682\" data-start=\"621\"\u003e\n\u003cp data-end=\"682\" data-start=\"623\"\u003e\u003cstrong data-end=\"648\" data-start=\"623\"\u003eMuzzle trace analysis\u003c\/strong\u003e to spot and fix shooting errors\u003c\/p\u003e\n\u003c\/li\u003e\n\u003cli data-end=\"742\" data-start=\"683\"\u003e\n\u003cp data-end=\"742\" data-start=\"685\"\u003e\u003cstrong data-end=\"714\" data-start=\"685\"\u003eElectronic rifle leveling\u003c\/strong\u003e with instant LED feedback\u003c\/p\u003e\n\u003c\/li\u003e\n\u003cli data-end=\"802\" data-start=\"743\"\u003e\n\u003cp data-end=\"802\" data-start=\"745\"\u003e\u003cstrong data-end=\"775\" data-start=\"745\"\u003eAccessory \u0026amp; remote support\u003c\/strong\u003e for hands-free operation\u003c\/p\u003e\n\u003c\/li\u003e\n\u003cli data-end=\"853\" data-start=\"803\"\u003e\n\u003cp data-end=\"853\" data-start=\"805\"\u003e\u003cstrong data-end=\"825\" data-start=\"805\"\u003eModular mounting\u003c\/strong\u003e (Picatinny, M-LOK, SPUHR)\u003c\/p\u003e\n\u003c\/li\u003e\n\u003cli data-end=\"916\" data-start=\"854\"\u003e\n\u003cp data-end=\"916\" data-start=\"856\"\u003e\u003cstrong data-end=\"878\" data-start=\"856\"\u003eRugged \u0026amp; efficient\u003c\/strong\u003e with up to 50 hours of battery life\u003c\/p\u003e\n\u003c\/li\u003e\n\u003c\/ul\u003e\n\u003cp data-end=\"1092\" data-start=\"918\"\u003eSeamlessly integrates with the \u003cstrong data-end=\"979\" data-start=\"949\"\u003eShooters Global Drills App\u003c\/strong\u003e, connecting data from timing, positioning, and video overlays to give you real insights into your performance.\u003c\/p\u003e\n\u003cp data-end=\"1092\" data-start=\"918\"\u003e \u003c\/p\u003e\n\u003cp\u003e\u003ciframe title=\"YouTube video player\" src=\"https:\/\/www.youtube.com\/embed\/FCdxEXbhl1w?si=d__93QWBzxISefDn\" height=\"315\" width=\"560\"\u003e\u003c\/iframe\u003e\u003c\/p\u003e"}
Translation missing: en.products.product.regular_price
$570.00
-
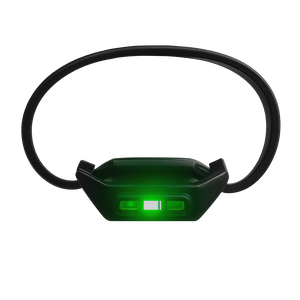
{"id":7895331143819,"title":"SG Pulse Pro Ocular LED + Remote Kit","handle":"sg-pulse-pro-ocular-led-remote-kit-pre-order-only","description":"\u003cp class=\"MsoNormal\"\u003e\u003cb\u003eSG Pulse Pro Ocular LED + Remote Kit – Precision \u0026amp; Control, All in One Go\u003c\/b\u003e\u003c\/p\u003e\n\u003cp class=\"MsoNormal\"\u003eElevate your stage performance—no more shifting eyes, fumbling with buttons, or losing zeroed position. The \u003cb\u003eSG Pulse Pro Ocular LED + Remote Kit\u003c\/b\u003e brings swift, seamless control right into your line of sight and at your reach.\u003c\/p\u003e\n\u003cul type=\"disc\" style=\"margin-top: 0cm;\"\u003e\n\u003cli style=\"mso-list: l0 level1 lfo1; tab-stops: list 36.0pt;\" class=\"MsoNormal\"\u003e\n\u003cb\u003eEyes Never Leave the Crosshair\u003c\/b\u003e\u003cbr\u003eThe bright \u003cb\u003eOcular LED\u003c\/b\u003e projects digital level data to your ocular bell, giving you instant cant feedback without taking your focus off the reticle—even under sunlight.\u003c\/li\u003e\n\u003cli style=\"mso-list: l0 level1 lfo1; tab-stops: list 36.0pt;\" class=\"MsoNormal\"\u003e\n\u003cb\u003eControl Without Movement\u003c\/b\u003e\u003cbr\u003eThe \u003cb\u003eRemote Button\u003c\/b\u003e lets you start your stage timer, advance through DOPE cards, or trigger alerts without breaking cheek weld—keeping your aim steady and your performance uninterrupted.\u003c\/li\u003e\n\u003cli style=\"mso-list: l0 level1 lfo1; tab-stops: list 36.0pt;\" class=\"MsoNormal\"\u003e\n\u003cb\u003eStreamlined, Rugged, Ready for Anything\u003c\/b\u003e\u003cbr\u003eDesigned with a modular connector, this kit plugs neatly into the SG\u003cspan style=\"font-family: 'Arial',sans-serif;\"\u003e \u003c\/span\u003ePulse\u003cspan style=\"font-family: 'Arial',sans-serif;\"\u003e \u003c\/span\u003ePro\u003cspan style=\"mso-ascii-font-family: Aptos; mso-hansi-font-family: Aptos; mso-bidi-font-family: Aptos;\"\u003e’\u003c\/span\u003es accessory port. Built from resilient aluminium, it\u003cspan style=\"mso-ascii-font-family: Aptos; mso-hansi-font-family: Aptos; mso-bidi-font-family: Aptos;\"\u003e’\u003c\/span\u003es weather-resistant, compact, and mounts easily via Picatinny or M-LOK.\u003c\/li\u003e\n\u003cli style=\"mso-list: l0 level1 lfo1; tab-stops: list 36.0pt;\" class=\"MsoNormal\"\u003e\n\u003cb\u003eBuilt for Accuracy and Speed\u003c\/b\u003e\u003cbr\u003eWhether you're managing the stage timer, navigating between target corrections, or maintaining perfect leveling, this kit keeps your focus where it should be: downrange.\u003c\/li\u003e\n\u003c\/ul\u003e\n\u003cdiv style=\"text-align: center;\" align=\"center\" class=\"MsoNormal\"\u003e\u003chr align=\"center\" width=\"100%\" size=\"2\"\u003e\u003c\/div\u003e\n\u003cp class=\"MsoNormal\"\u003e\u003cb\u003eWhy This Kit Wins\u003c\/b\u003e\u003c\/p\u003e\n\u003cp class=\"MsoNormal\"\u003eTogether, the ocular LED and remote create a \u003cb\u003eseamless, distraction-free experience\u003c\/b\u003e:\u003c\/p\u003e\n\u003cul type=\"disc\" style=\"margin-top: 0cm;\"\u003e\n\u003cli style=\"mso-list: l1 level1 lfo2; tab-stops: list 36.0pt;\" class=\"MsoNormal\"\u003e\n\u003cb\u003eFaster response, fewer errors\u003c\/b\u003e—the LED keeps you aware, the remote keeps you in control.\u003c\/li\u003e\n\u003cli style=\"mso-list: l1 level1 lfo2; tab-stops: list 36.0pt;\" class=\"MsoNormal\"\u003e\n\u003cb\u003ePerfect for competition and training\u003c\/b\u003e—stay locked on target and race the clock with confidence.\u003c\/li\u003e\n\u003cli style=\"mso-list: l1 level1 lfo2; tab-stops: list 36.0pt;\" class=\"MsoNormal\"\u003e\n\u003cb\u003ePlug-and-play modularity\u003c\/b\u003e—set up your ideal configuration, mount it, and you're in business.\u003c\/li\u003e\n\u003c\/ul\u003e","published_at":"2025-09-03T09:10:30+10:00","created_at":"2025-09-01T15:57:02+10:00","vendor":"Australian Tactical","type":"","tags":["LED","Level","push","remote"],"price":14000,"price_min":14000,"price_max":14000,"available":true,"price_varies":false,"compare_at_price":null,"compare_at_price_min":0,"compare_at_price_max":0,"compare_at_price_varies":false,"variants":[{"id":43911522058379,"title":"Default Title","option1":"Default Title","option2":null,"option3":null,"sku":"59026006 83575","requires_shipping":true,"taxable":true,"featured_image":null,"available":true,"name":"SG Pulse Pro Ocular LED + Remote Kit","public_title":null,"options":["Default Title"],"price":14000,"weight":1000,"compare_at_price":null,"inventory_management":"shopify","barcode":"","requires_selling_plan":false,"selling_plan_allocations":[]}],"images":["\/\/australiantactical.com.au\/cdn\/shop\/files\/ocularled1_9072fd88-5c40-4a7d-a0f3-5ede2536416b.png?v=1756706157","\/\/australiantactical.com.au\/cdn\/shop\/files\/ocularled2_dc27064f-58d5-4300-849f-7dd45aad402a.png?v=1756706157","\/\/australiantactical.com.au\/cdn\/shop\/files\/ocularled3_94a10037-38b2-4fdb-b5bf-1900f42bcff2.png?v=1756706158","\/\/australiantactical.com.au\/cdn\/shop\/files\/remotebutton1_fb0b82e4-d1b6-432e-bcdd-cf63cb9288f1.png?v=1756706157","\/\/australiantactical.com.au\/cdn\/shop\/files\/remotebutton2_a6cf9305-cddb-41c8-9be0-60cb6efba6a7.png?v=1756706157"],"featured_image":"\/\/australiantactical.com.au\/cdn\/shop\/files\/ocularled1_9072fd88-5c40-4a7d-a0f3-5ede2536416b.png?v=1756706157","options":["Title"],"media":[{"alt":null,"id":30058905796747,"position":1,"preview_image":{"aspect_ratio":1.0,"height":1191,"width":1191,"src":"\/\/australiantactical.com.au\/cdn\/shop\/files\/ocularled1_9072fd88-5c40-4a7d-a0f3-5ede2536416b.png?v=1756706157"},"aspect_ratio":1.0,"height":1191,"media_type":"image","src":"\/\/australiantactical.com.au\/cdn\/shop\/files\/ocularled1_9072fd88-5c40-4a7d-a0f3-5ede2536416b.png?v=1756706157","width":1191},{"alt":null,"id":30058905829515,"position":2,"preview_image":{"aspect_ratio":1.0,"height":2277,"width":2278,"src":"\/\/australiantactical.com.au\/cdn\/shop\/files\/ocularled2_dc27064f-58d5-4300-849f-7dd45aad402a.png?v=1756706157"},"aspect_ratio":1.0,"height":2277,"media_type":"image","src":"\/\/australiantactical.com.au\/cdn\/shop\/files\/ocularled2_dc27064f-58d5-4300-849f-7dd45aad402a.png?v=1756706157","width":2278},{"alt":null,"id":30058905862283,"position":3,"preview_image":{"aspect_ratio":1.0,"height":2984,"width":2984,"src":"\/\/australiantactical.com.au\/cdn\/shop\/files\/ocularled3_94a10037-38b2-4fdb-b5bf-1900f42bcff2.png?v=1756706158"},"aspect_ratio":1.0,"height":2984,"media_type":"image","src":"\/\/australiantactical.com.au\/cdn\/shop\/files\/ocularled3_94a10037-38b2-4fdb-b5bf-1900f42bcff2.png?v=1756706158","width":2984},{"alt":null,"id":30058905895051,"position":4,"preview_image":{"aspect_ratio":1.0,"height":2277,"width":2278,"src":"\/\/australiantactical.com.au\/cdn\/shop\/files\/remotebutton1_fb0b82e4-d1b6-432e-bcdd-cf63cb9288f1.png?v=1756706157"},"aspect_ratio":1.0,"height":2277,"media_type":"image","src":"\/\/australiantactical.com.au\/cdn\/shop\/files\/remotebutton1_fb0b82e4-d1b6-432e-bcdd-cf63cb9288f1.png?v=1756706157","width":2278},{"alt":null,"id":30058905927819,"position":5,"preview_image":{"aspect_ratio":1.0,"height":1024,"width":1024,"src":"\/\/australiantactical.com.au\/cdn\/shop\/files\/remotebutton2_a6cf9305-cddb-41c8-9be0-60cb6efba6a7.png?v=1756706157"},"aspect_ratio":1.0,"height":1024,"media_type":"image","src":"\/\/australiantactical.com.au\/cdn\/shop\/files\/remotebutton2_a6cf9305-cddb-41c8-9be0-60cb6efba6a7.png?v=1756706157","width":1024}],"requires_selling_plan":false,"selling_plan_groups":[],"content":"\u003cp class=\"MsoNormal\"\u003e\u003cb\u003eSG Pulse Pro Ocular LED + Remote Kit – Precision \u0026amp; Control, All in One Go\u003c\/b\u003e\u003c\/p\u003e\n\u003cp class=\"MsoNormal\"\u003eElevate your stage performance—no more shifting eyes, fumbling with buttons, or losing zeroed position. The \u003cb\u003eSG Pulse Pro Ocular LED + Remote Kit\u003c\/b\u003e brings swift, seamless control right into your line of sight and at your reach.\u003c\/p\u003e\n\u003cul type=\"disc\" style=\"margin-top: 0cm;\"\u003e\n\u003cli style=\"mso-list: l0 level1 lfo1; tab-stops: list 36.0pt;\" class=\"MsoNormal\"\u003e\n\u003cb\u003eEyes Never Leave the Crosshair\u003c\/b\u003e\u003cbr\u003eThe bright \u003cb\u003eOcular LED\u003c\/b\u003e projects digital level data to your ocular bell, giving you instant cant feedback without taking your focus off the reticle—even under sunlight.\u003c\/li\u003e\n\u003cli style=\"mso-list: l0 level1 lfo1; tab-stops: list 36.0pt;\" class=\"MsoNormal\"\u003e\n\u003cb\u003eControl Without Movement\u003c\/b\u003e\u003cbr\u003eThe \u003cb\u003eRemote Button\u003c\/b\u003e lets you start your stage timer, advance through DOPE cards, or trigger alerts without breaking cheek weld—keeping your aim steady and your performance uninterrupted.\u003c\/li\u003e\n\u003cli style=\"mso-list: l0 level1 lfo1; tab-stops: list 36.0pt;\" class=\"MsoNormal\"\u003e\n\u003cb\u003eStreamlined, Rugged, Ready for Anything\u003c\/b\u003e\u003cbr\u003eDesigned with a modular connector, this kit plugs neatly into the SG\u003cspan style=\"font-family: 'Arial',sans-serif;\"\u003e \u003c\/span\u003ePulse\u003cspan style=\"font-family: 'Arial',sans-serif;\"\u003e \u003c\/span\u003ePro\u003cspan style=\"mso-ascii-font-family: Aptos; mso-hansi-font-family: Aptos; mso-bidi-font-family: Aptos;\"\u003e’\u003c\/span\u003es accessory port. Built from resilient aluminium, it\u003cspan style=\"mso-ascii-font-family: Aptos; mso-hansi-font-family: Aptos; mso-bidi-font-family: Aptos;\"\u003e’\u003c\/span\u003es weather-resistant, compact, and mounts easily via Picatinny or M-LOK.\u003c\/li\u003e\n\u003cli style=\"mso-list: l0 level1 lfo1; tab-stops: list 36.0pt;\" class=\"MsoNormal\"\u003e\n\u003cb\u003eBuilt for Accuracy and Speed\u003c\/b\u003e\u003cbr\u003eWhether you're managing the stage timer, navigating between target corrections, or maintaining perfect leveling, this kit keeps your focus where it should be: downrange.\u003c\/li\u003e\n\u003c\/ul\u003e\n\u003cdiv style=\"text-align: center;\" align=\"center\" class=\"MsoNormal\"\u003e\u003chr align=\"center\" width=\"100%\" size=\"2\"\u003e\u003c\/div\u003e\n\u003cp class=\"MsoNormal\"\u003e\u003cb\u003eWhy This Kit Wins\u003c\/b\u003e\u003c\/p\u003e\n\u003cp class=\"MsoNormal\"\u003eTogether, the ocular LED and remote create a \u003cb\u003eseamless, distraction-free experience\u003c\/b\u003e:\u003c\/p\u003e\n\u003cul type=\"disc\" style=\"margin-top: 0cm;\"\u003e\n\u003cli style=\"mso-list: l1 level1 lfo2; tab-stops: list 36.0pt;\" class=\"MsoNormal\"\u003e\n\u003cb\u003eFaster response, fewer errors\u003c\/b\u003e—the LED keeps you aware, the remote keeps you in control.\u003c\/li\u003e\n\u003cli style=\"mso-list: l1 level1 lfo2; tab-stops: list 36.0pt;\" class=\"MsoNormal\"\u003e\n\u003cb\u003ePerfect for competition and training\u003c\/b\u003e—stay locked on target and race the clock with confidence.\u003c\/li\u003e\n\u003cli style=\"mso-list: l1 level1 lfo2; tab-stops: list 36.0pt;\" class=\"MsoNormal\"\u003e\n\u003cb\u003ePlug-and-play modularity\u003c\/b\u003e—set up your ideal configuration, mount it, and you're in business.\u003c\/li\u003e\n\u003c\/ul\u003e"}
Translation missing: en.products.product.regular_price
$140.00
-
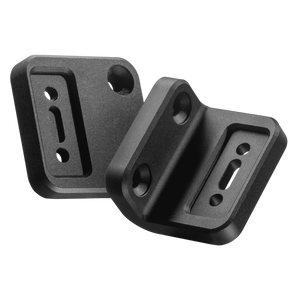
{"id":7865767624843,"title":"Spuhr attachment for SG Pulse","handle":"spuhr-attachment-for-sg-pulse","description":"\u003cp class=\"MsoNormal\"\u003eThe Shooters Global Spuhr Mount Adapter is specifically designed to securely attach the SG Pulse electronic level to any Spuhr scope mount with minimal effort. Precision-machined for a perfect fit, this low-profile adapter integrates seamlessly with the Spuhr interface, allowing you to position the SG Pulse exactly where you need it for optimal visibility and function. Built from durable, lightweight materials, it ensures a rock-solid connection without adding unnecessary bulk—ideal for maintaining a clean, streamlined setup on your precision rifle. Whether for competition or training, this adapter makes running the SG Pulse on Spuhr mounts simple and reliable.\u003c\/p\u003e","published_at":"2025-08-02T10:42:24+10:00","created_at":"2025-08-02T10:42:21+10:00","vendor":"Australian Tactical","type":"","tags":["Mount"],"price":8000,"price_min":8000,"price_max":8000,"available":true,"price_varies":false,"compare_at_price":null,"compare_at_price_min":0,"compare_at_price_max":0,"compare_at_price_varies":false,"variants":[{"id":43690810736779,"title":"Default Title","option1":"Default Title","option2":null,"option3":null,"sku":"SGPulse-Spuhr","requires_shipping":true,"taxable":true,"featured_image":null,"available":true,"name":"Spuhr attachment for SG Pulse","public_title":null,"options":["Default Title"],"price":8000,"weight":1000,"compare_at_price":null,"inventory_management":"shopify","barcode":"","requires_selling_plan":false,"selling_plan_allocations":[]}],"images":["\/\/australiantactical.com.au\/cdn\/shop\/files\/sphur5.png?v=1754095298","\/\/australiantactical.com.au\/cdn\/shop\/files\/sphur1.png?v=1754095298","\/\/australiantactical.com.au\/cdn\/shop\/files\/sphur2.png?v=1754095299","\/\/australiantactical.com.au\/cdn\/shop\/files\/sphur3.png?v=1754095298","\/\/australiantactical.com.au\/cdn\/shop\/files\/sphur4.png?v=1754095298"],"featured_image":"\/\/australiantactical.com.au\/cdn\/shop\/files\/sphur5.png?v=1754095298","options":["Title"],"media":[{"alt":null,"id":29770852270219,"position":1,"preview_image":{"aspect_ratio":1.0,"height":2248,"width":2248,"src":"\/\/australiantactical.com.au\/cdn\/shop\/files\/sphur5.png?v=1754095298"},"aspect_ratio":1.0,"height":2248,"media_type":"image","src":"\/\/australiantactical.com.au\/cdn\/shop\/files\/sphur5.png?v=1754095298","width":2248},{"alt":null,"id":29770852139147,"position":2,"preview_image":{"aspect_ratio":1.0,"height":2248,"width":2248,"src":"\/\/australiantactical.com.au\/cdn\/shop\/files\/sphur1.png?v=1754095298"},"aspect_ratio":1.0,"height":2248,"media_type":"image","src":"\/\/australiantactical.com.au\/cdn\/shop\/files\/sphur1.png?v=1754095298","width":2248},{"alt":null,"id":29770852171915,"position":3,"preview_image":{"aspect_ratio":1.0,"height":2248,"width":2248,"src":"\/\/australiantactical.com.au\/cdn\/shop\/files\/sphur2.png?v=1754095299"},"aspect_ratio":1.0,"height":2248,"media_type":"image","src":"\/\/australiantactical.com.au\/cdn\/shop\/files\/sphur2.png?v=1754095299","width":2248},{"alt":null,"id":29770852204683,"position":4,"preview_image":{"aspect_ratio":1.0,"height":2248,"width":2248,"src":"\/\/australiantactical.com.au\/cdn\/shop\/files\/sphur3.png?v=1754095298"},"aspect_ratio":1.0,"height":2248,"media_type":"image","src":"\/\/australiantactical.com.au\/cdn\/shop\/files\/sphur3.png?v=1754095298","width":2248},{"alt":null,"id":29770852237451,"position":5,"preview_image":{"aspect_ratio":1.0,"height":2248,"width":2248,"src":"\/\/australiantactical.com.au\/cdn\/shop\/files\/sphur4.png?v=1754095298"},"aspect_ratio":1.0,"height":2248,"media_type":"image","src":"\/\/australiantactical.com.au\/cdn\/shop\/files\/sphur4.png?v=1754095298","width":2248}],"requires_selling_plan":false,"selling_plan_groups":[],"content":"\u003cp class=\"MsoNormal\"\u003eThe Shooters Global Spuhr Mount Adapter is specifically designed to securely attach the SG Pulse electronic level to any Spuhr scope mount with minimal effort. Precision-machined for a perfect fit, this low-profile adapter integrates seamlessly with the Spuhr interface, allowing you to position the SG Pulse exactly where you need it for optimal visibility and function. Built from durable, lightweight materials, it ensures a rock-solid connection without adding unnecessary bulk—ideal for maintaining a clean, streamlined setup on your precision rifle. Whether for competition or training, this adapter makes running the SG Pulse on Spuhr mounts simple and reliable.\u003c\/p\u003e"}
Translation missing: en.products.product.regular_price
$80.00

-
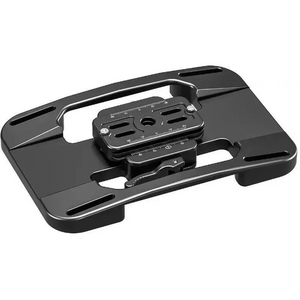
{"id":7563862835339,"title":"Leofoto Binocular Rangefinder Rail Kit - With Sliding 2nd mount ","handle":"fdm-02","description":"\u003cp\u003eThe Leofoto FDM-02 Binocular Rangefinder Rail Kit is a universal accessory rail kit with two mounting systems. This product is designed for rifle sport users to mount optics and telemetry equipment, but it can be used for a wide variety of industries and applications.\u003c\/p\u003e","published_at":"2024-10-11T17:08:09+11:00","created_at":"2024-10-11T17:08:10+11:00","vendor":"My Store","type":"","tags":[],"price":14500,"price_min":14500,"price_max":14500,"available":true,"price_varies":false,"compare_at_price":null,"compare_at_price_min":0,"compare_at_price_max":0,"compare_at_price_varies":false,"variants":[{"id":42811551514763,"title":"Default Title","option1":"Default Title","option2":null,"option3":null,"sku":"FDM-02","requires_shipping":true,"taxable":true,"featured_image":null,"available":true,"name":"Leofoto Binocular Rangefinder Rail Kit - With Sliding 2nd mount ","public_title":null,"options":["Default Title"],"price":14500,"weight":5000,"compare_at_price":null,"inventory_management":"shopify","barcode":null,"requires_selling_plan":false,"selling_plan_allocations":[]}],"images":["\/\/australiantactical.com.au\/cdn\/shop\/files\/Leofoto_Binocular_Rangefinder_Rail_Kit_-_With_Sliding_2nd_mount.png?v=1728888099","\/\/australiantactical.com.au\/cdn\/shop\/files\/Leofoto_Binocular_Rangefinder_Rail_Kit_-_With_Sliding_2nd_mount_1.png?v=1728888099","\/\/australiantactical.com.au\/cdn\/shop\/files\/Leofoto_Binocular_Rangefinder_Rail_Kit_-_With_Sliding_2nd_mount_2.png?v=1728888099","\/\/australiantactical.com.au\/cdn\/shop\/files\/Leofoto_Binocular_Rangefinder_Rail_Kit_-_With_Sliding_2nd_mount_3.png?v=1728888099","\/\/australiantactical.com.au\/cdn\/shop\/files\/Leofoto_Binocular_Rangefinder_Rail_Kit_-_With_Sliding_2nd_mount_4.png?v=1728888099"],"featured_image":"\/\/australiantactical.com.au\/cdn\/shop\/files\/Leofoto_Binocular_Rangefinder_Rail_Kit_-_With_Sliding_2nd_mount.png?v=1728888099","options":["Title"],"media":[{"alt":null,"id":27613440180363,"position":1,"preview_image":{"aspect_ratio":1.006,"height":1018,"width":1024,"src":"\/\/australiantactical.com.au\/cdn\/shop\/files\/Leofoto_Binocular_Rangefinder_Rail_Kit_-_With_Sliding_2nd_mount.png?v=1728888099"},"aspect_ratio":1.006,"height":1018,"media_type":"image","src":"\/\/australiantactical.com.au\/cdn\/shop\/files\/Leofoto_Binocular_Rangefinder_Rail_Kit_-_With_Sliding_2nd_mount.png?v=1728888099","width":1024},{"alt":null,"id":27613440082059,"position":2,"preview_image":{"aspect_ratio":1.177,"height":870,"width":1024,"src":"\/\/australiantactical.com.au\/cdn\/shop\/files\/Leofoto_Binocular_Rangefinder_Rail_Kit_-_With_Sliding_2nd_mount_1.png?v=1728888099"},"aspect_ratio":1.177,"height":870,"media_type":"image","src":"\/\/australiantactical.com.au\/cdn\/shop\/files\/Leofoto_Binocular_Rangefinder_Rail_Kit_-_With_Sliding_2nd_mount_1.png?v=1728888099","width":1024},{"alt":null,"id":27613440213131,"position":3,"preview_image":{"aspect_ratio":0.988,"height":1024,"width":1012,"src":"\/\/australiantactical.com.au\/cdn\/shop\/files\/Leofoto_Binocular_Rangefinder_Rail_Kit_-_With_Sliding_2nd_mount_2.png?v=1728888099"},"aspect_ratio":0.988,"height":1024,"media_type":"image","src":"\/\/australiantactical.com.au\/cdn\/shop\/files\/Leofoto_Binocular_Rangefinder_Rail_Kit_-_With_Sliding_2nd_mount_2.png?v=1728888099","width":1012},{"alt":null,"id":27613440147595,"position":4,"preview_image":{"aspect_ratio":0.945,"height":1024,"width":968,"src":"\/\/australiantactical.com.au\/cdn\/shop\/files\/Leofoto_Binocular_Rangefinder_Rail_Kit_-_With_Sliding_2nd_mount_3.png?v=1728888099"},"aspect_ratio":0.945,"height":1024,"media_type":"image","src":"\/\/australiantactical.com.au\/cdn\/shop\/files\/Leofoto_Binocular_Rangefinder_Rail_Kit_-_With_Sliding_2nd_mount_3.png?v=1728888099","width":968},{"alt":null,"id":27613440114827,"position":5,"preview_image":{"aspect_ratio":1.01,"height":1014,"width":1024,"src":"\/\/australiantactical.com.au\/cdn\/shop\/files\/Leofoto_Binocular_Rangefinder_Rail_Kit_-_With_Sliding_2nd_mount_4.png?v=1728888099"},"aspect_ratio":1.01,"height":1014,"media_type":"image","src":"\/\/australiantactical.com.au\/cdn\/shop\/files\/Leofoto_Binocular_Rangefinder_Rail_Kit_-_With_Sliding_2nd_mount_4.png?v=1728888099","width":1024}],"requires_selling_plan":false,"selling_plan_groups":[],"content":"\u003cp\u003eThe Leofoto FDM-02 Binocular Rangefinder Rail Kit is a universal accessory rail kit with two mounting systems. This product is designed for rifle sport users to mount optics and telemetry equipment, but it can be used for a wide variety of industries and applications.\u003c\/p\u003e"}
Translation missing: en.products.product.regular_price
$145.00
-
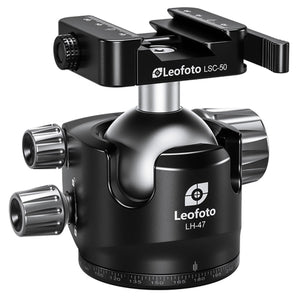
{"id":7608179392651,"title":"Leofoto LH-47LR 47mm Low Profile Ball Head with LR-60 Quick Release Lever Clamp and QP-70N Plate","handle":"leofoto-lh-47lr-47mm-low-profile-ball-head-with-lr-60-quick-release-lever-clamp-and-qp-70n-plate","description":"\u003cp class=\"MsoNormal\"\u003eThe \u003cb\u003eLeofoto LH-47SC 47mm Low Profile Ball Head\u003c\/b\u003e is a high-performance, compact ball head designed for photographers and shooters. It features a durable, low-profile design for added stability and smooth operation. The ball head includes dual \u003cb\u003ePicatinny\u003c\/b\u003e and \u003cb\u003eARCA Swiss\u003c\/b\u003e clamps, offering versatile mounting options for cameras and rifles. With precise locking mechanisms and strong construction, the LH-47SC ensures secure mounting and easy adjustments, making it an essential tool for both creative and tactical use.\u003c\/p\u003e","published_at":"2024-12-22T11:47:46+11:00","created_at":"2024-12-22T11:47:46+11:00","vendor":"Australian Tactical","type":"","tags":[],"price":29900,"price_min":29900,"price_max":29900,"available":true,"price_varies":false,"compare_at_price":null,"compare_at_price_min":0,"compare_at_price_max":0,"compare_at_price_varies":false,"variants":[{"id":42963638255755,"title":"Default Title","option1":"Default Title","option2":null,"option3":null,"sku":"LH-47SC","requires_shipping":true,"taxable":true,"featured_image":null,"available":true,"name":"Leofoto LH-47LR 47mm Low Profile Ball Head with LR-60 Quick Release Lever Clamp and QP-70N Plate","public_title":null,"options":["Default Title"],"price":29900,"weight":3000,"compare_at_price":null,"inventory_management":"shopify","barcode":"","requires_selling_plan":false,"selling_plan_allocations":[]}],"images":["\/\/australiantactical.com.au\/cdn\/shop\/files\/1__35812.jpg?v=1734828417","\/\/australiantactical.com.au\/cdn\/shop\/files\/202205221828592__98263.jpg?v=1734828417","\/\/australiantactical.com.au\/cdn\/shop\/files\/202205221829003__30769.jpg?v=1734828417","\/\/australiantactical.com.au\/cdn\/shop\/files\/202205221829004__74285.jpg?v=1734828417"],"featured_image":"\/\/australiantactical.com.au\/cdn\/shop\/files\/1__35812.jpg?v=1734828417","options":["Title"],"media":[{"alt":null,"id":27993172639883,"position":1,"preview_image":{"aspect_ratio":1.0,"height":1280,"width":1280,"src":"\/\/australiantactical.com.au\/cdn\/shop\/files\/1__35812.jpg?v=1734828417"},"aspect_ratio":1.0,"height":1280,"media_type":"image","src":"\/\/australiantactical.com.au\/cdn\/shop\/files\/1__35812.jpg?v=1734828417","width":1280},{"alt":null,"id":27993172672651,"position":2,"preview_image":{"aspect_ratio":1.0,"height":1280,"width":1280,"src":"\/\/australiantactical.com.au\/cdn\/shop\/files\/202205221828592__98263.jpg?v=1734828417"},"aspect_ratio":1.0,"height":1280,"media_type":"image","src":"\/\/australiantactical.com.au\/cdn\/shop\/files\/202205221828592__98263.jpg?v=1734828417","width":1280},{"alt":null,"id":27993172705419,"position":3,"preview_image":{"aspect_ratio":1.0,"height":1280,"width":1280,"src":"\/\/australiantactical.com.au\/cdn\/shop\/files\/202205221829003__30769.jpg?v=1734828417"},"aspect_ratio":1.0,"height":1280,"media_type":"image","src":"\/\/australiantactical.com.au\/cdn\/shop\/files\/202205221829003__30769.jpg?v=1734828417","width":1280},{"alt":null,"id":27993172738187,"position":4,"preview_image":{"aspect_ratio":1.0,"height":1280,"width":1280,"src":"\/\/australiantactical.com.au\/cdn\/shop\/files\/202205221829004__74285.jpg?v=1734828417"},"aspect_ratio":1.0,"height":1280,"media_type":"image","src":"\/\/australiantactical.com.au\/cdn\/shop\/files\/202205221829004__74285.jpg?v=1734828417","width":1280}],"requires_selling_plan":false,"selling_plan_groups":[],"content":"\u003cp class=\"MsoNormal\"\u003eThe \u003cb\u003eLeofoto LH-47SC 47mm Low Profile Ball Head\u003c\/b\u003e is a high-performance, compact ball head designed for photographers and shooters. It features a durable, low-profile design for added stability and smooth operation. The ball head includes dual \u003cb\u003ePicatinny\u003c\/b\u003e and \u003cb\u003eARCA Swiss\u003c\/b\u003e clamps, offering versatile mounting options for cameras and rifles. With precise locking mechanisms and strong construction, the LH-47SC ensures secure mounting and easy adjustments, making it an essential tool for both creative and tactical use.\u003c\/p\u003e"}
Translation missing: en.products.product.regular_price
$299.00
-
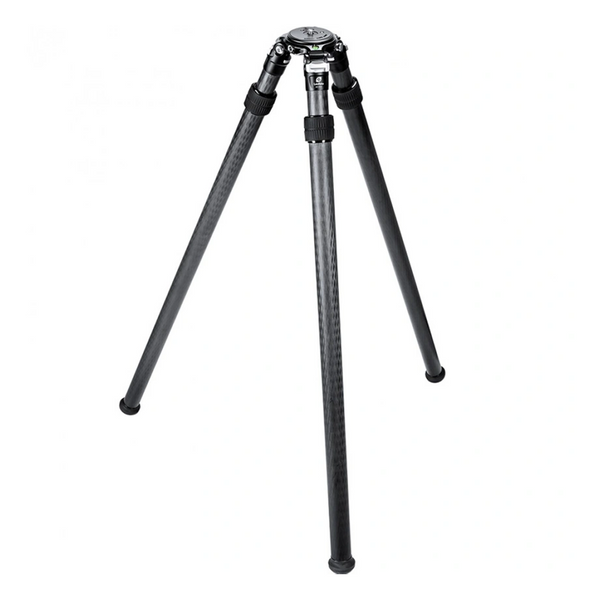
{"id":7563862966411,"title":"Leofoto SO-362C 2-Section Inverted Carbon Fiber Tripod","handle":"so-362c","description":"\u003cp\u003eThe Leofoto SO-362C Carbon Fibre Inverted Tripod is a perfect choice for heavy cameras and lenses, full-size firearm combos, large spotting scopes, and large format surveillance equipment.\u003c\/p\u003e","published_at":"2024-10-11T17:08:14+11:00","created_at":"2024-10-11T17:08:15+11:00","vendor":"My Store","type":"","tags":[],"price":89900,"price_min":89900,"price_max":89900,"available":true,"price_varies":false,"compare_at_price":null,"compare_at_price_min":0,"compare_at_price_max":0,"compare_at_price_varies":false,"variants":[{"id":42811551678603,"title":"Default Title","option1":"Default Title","option2":null,"option3":null,"sku":"SO-362C","requires_shipping":true,"taxable":true,"featured_image":null,"available":true,"name":"Leofoto SO-362C 2-Section Inverted Carbon Fiber Tripod","public_title":null,"options":["Default Title"],"price":89900,"weight":10000,"compare_at_price":null,"inventory_management":"shopify","barcode":null,"requires_selling_plan":false,"selling_plan_allocations":[]}],"images":["\/\/australiantactical.com.au\/cdn\/shop\/files\/Leofoto_SO-362C_2-Section_Inverted_Carbon_Fiber_Tripod_563e7692-5b95-4013-8d88-ba28d8cae4b9.png?v=1728961053","\/\/australiantactical.com.au\/cdn\/shop\/files\/Leofoto_SO-362C_2-Section_Inverted_Carbon_Fiber_Tripod_1_ab73e68a-2701-4add-8efe-eb0fc69fa821.png?v=1728961062","\/\/australiantactical.com.au\/cdn\/shop\/files\/Leofoto_SO-362C_2-Section_Inverted_Carbon_Fiber_Tripod_2_57741b7f-fc66-4b9f-85de-b56c0635e038.png?v=1728961062","\/\/australiantactical.com.au\/cdn\/shop\/files\/Leofoto_SO-362C_2-Section_Inverted_Carbon_Fiber_Tripod_3_fcdc69a2-6de5-4af6-b566-fa5f47a52d20.png?v=1728961062","\/\/australiantactical.com.au\/cdn\/shop\/files\/Leofoto_SO-362C_2-Section_Inverted_Carbon_Fiber_Tripod_4_e1b4da66-8a44-47b9-8259-5e6fd66c219c.png?v=1728961062"],"featured_image":"\/\/australiantactical.com.au\/cdn\/shop\/files\/Leofoto_SO-362C_2-Section_Inverted_Carbon_Fiber_Tripod_563e7692-5b95-4013-8d88-ba28d8cae4b9.png?v=1728961053","options":["Title"],"media":[{"alt":null,"id":27618182463627,"position":1,"preview_image":{"aspect_ratio":1.0,"height":1024,"width":1024,"src":"\/\/australiantactical.com.au\/cdn\/shop\/files\/Leofoto_SO-362C_2-Section_Inverted_Carbon_Fiber_Tripod_563e7692-5b95-4013-8d88-ba28d8cae4b9.png?v=1728961053"},"aspect_ratio":1.0,"height":1024,"media_type":"image","src":"\/\/australiantactical.com.au\/cdn\/shop\/files\/Leofoto_SO-362C_2-Section_Inverted_Carbon_Fiber_Tripod_563e7692-5b95-4013-8d88-ba28d8cae4b9.png?v=1728961053","width":1024},{"alt":null,"id":27618182987915,"position":2,"preview_image":{"aspect_ratio":1.0,"height":1024,"width":1024,"src":"\/\/australiantactical.com.au\/cdn\/shop\/files\/Leofoto_SO-362C_2-Section_Inverted_Carbon_Fiber_Tripod_1_ab73e68a-2701-4add-8efe-eb0fc69fa821.png?v=1728961062"},"aspect_ratio":1.0,"height":1024,"media_type":"image","src":"\/\/australiantactical.com.au\/cdn\/shop\/files\/Leofoto_SO-362C_2-Section_Inverted_Carbon_Fiber_Tripod_1_ab73e68a-2701-4add-8efe-eb0fc69fa821.png?v=1728961062","width":1024},{"alt":null,"id":27618183020683,"position":3,"preview_image":{"aspect_ratio":1.0,"height":1024,"width":1024,"src":"\/\/australiantactical.com.au\/cdn\/shop\/files\/Leofoto_SO-362C_2-Section_Inverted_Carbon_Fiber_Tripod_2_57741b7f-fc66-4b9f-85de-b56c0635e038.png?v=1728961062"},"aspect_ratio":1.0,"height":1024,"media_type":"image","src":"\/\/australiantactical.com.au\/cdn\/shop\/files\/Leofoto_SO-362C_2-Section_Inverted_Carbon_Fiber_Tripod_2_57741b7f-fc66-4b9f-85de-b56c0635e038.png?v=1728961062","width":1024},{"alt":null,"id":27618183053451,"position":4,"preview_image":{"aspect_ratio":1.0,"height":1024,"width":1024,"src":"\/\/australiantactical.com.au\/cdn\/shop\/files\/Leofoto_SO-362C_2-Section_Inverted_Carbon_Fiber_Tripod_3_fcdc69a2-6de5-4af6-b566-fa5f47a52d20.png?v=1728961062"},"aspect_ratio":1.0,"height":1024,"media_type":"image","src":"\/\/australiantactical.com.au\/cdn\/shop\/files\/Leofoto_SO-362C_2-Section_Inverted_Carbon_Fiber_Tripod_3_fcdc69a2-6de5-4af6-b566-fa5f47a52d20.png?v=1728961062","width":1024},{"alt":null,"id":27618183118987,"position":5,"preview_image":{"aspect_ratio":1.0,"height":1024,"width":1024,"src":"\/\/australiantactical.com.au\/cdn\/shop\/files\/Leofoto_SO-362C_2-Section_Inverted_Carbon_Fiber_Tripod_4_e1b4da66-8a44-47b9-8259-5e6fd66c219c.png?v=1728961062"},"aspect_ratio":1.0,"height":1024,"media_type":"image","src":"\/\/australiantactical.com.au\/cdn\/shop\/files\/Leofoto_SO-362C_2-Section_Inverted_Carbon_Fiber_Tripod_4_e1b4da66-8a44-47b9-8259-5e6fd66c219c.png?v=1728961062","width":1024}],"requires_selling_plan":false,"selling_plan_groups":[],"content":"\u003cp\u003eThe Leofoto SO-362C Carbon Fibre Inverted Tripod is a perfect choice for heavy cameras and lenses, full-size firearm combos, large spotting scopes, and large format surveillance equipment.\u003c\/p\u003e"}
Translation missing: en.products.product.regular_price
$899.00

-
{"id":7563862442123,"title":"Leofoto LM-364CL Carbon Tripod","handle":"lm-364cl","description":"\u003cp\u003eThis Leofoto LM-364CL Summit Series Carbon Fibre 4-Section Tripod has 10x carbon fibre tubes that make the tripod a 2.05kg lightweight support, with a strong load capacity of 30kg. The 6061 aluminum parts are CNC machined and hard anodized, making the surface tough against scratches. The twist leg lock system is easily opened with a simple quarter turn, which enables you to extend all the sections to a maximum height of 1700mm.With the tripod's three variable leg angles, it allows you to splay the legs completely out, so the support can drop to a minimum height of 96mm. At the tripod's apex, the spider is hollow making it light weight. Additionally, the mounting platform is removable, so you can exchange it with the included 75mm video bowl to install a fluid head. An integrated 3\/8\"-16 socket is located on the side of the spider for photo or video accessories. To store or travel with the tripod it folds down to a length of 598mm.\n\u003c\/p\u003e","published_at":"2024-10-11T17:07:43+11:00","created_at":"2024-10-11T17:07:45+11:00","vendor":"My Store","type":"","tags":[],"price":95500,"price_min":95500,"price_max":95500,"available":true,"price_varies":false,"compare_at_price":null,"compare_at_price_min":0,"compare_at_price_max":0,"compare_at_price_varies":false,"variants":[{"id":42811551056011,"title":"Default Title","option1":"Default Title","option2":null,"option3":null,"sku":"LM-364CL","requires_shipping":true,"taxable":true,"featured_image":null,"available":true,"name":"Leofoto LM-364CL Carbon Tripod","public_title":null,"options":["Default Title"],"price":95500,"weight":10000,"compare_at_price":null,"inventory_management":"shopify","barcode":null,"requires_selling_plan":false,"selling_plan_allocations":[]}],"images":["\/\/australiantactical.com.au\/cdn\/shop\/files\/Leofoto_LM-364CL_Carbon_Tripod.png?v=1728889470","\/\/australiantactical.com.au\/cdn\/shop\/files\/Leofoto_LM-364CL_Carbon_Tripod_1.png?v=1728889471","\/\/australiantactical.com.au\/cdn\/shop\/files\/Leofoto_LM-364CL_Carbon_Tripod_2.png?v=1728889472","\/\/australiantactical.com.au\/cdn\/shop\/files\/Leofoto_LM-364CL_Carbon_Tripod_3.png?v=1728889472"],"featured_image":"\/\/australiantactical.com.au\/cdn\/shop\/files\/Leofoto_LM-364CL_Carbon_Tripod.png?v=1728889470","options":["Title"],"media":[{"alt":null,"id":27613583868043,"position":1,"preview_image":{"aspect_ratio":1.0,"height":1024,"width":1024,"src":"\/\/australiantactical.com.au\/cdn\/shop\/files\/Leofoto_LM-364CL_Carbon_Tripod.png?v=1728889470"},"aspect_ratio":1.0,"height":1024,"media_type":"image","src":"\/\/australiantactical.com.au\/cdn\/shop\/files\/Leofoto_LM-364CL_Carbon_Tripod.png?v=1728889470","width":1024},{"alt":null,"id":27613583900811,"position":2,"preview_image":{"aspect_ratio":1.0,"height":1024,"width":1024,"src":"\/\/australiantactical.com.au\/cdn\/shop\/files\/Leofoto_LM-364CL_Carbon_Tripod_1.png?v=1728889471"},"aspect_ratio":1.0,"height":1024,"media_type":"image","src":"\/\/australiantactical.com.au\/cdn\/shop\/files\/Leofoto_LM-364CL_Carbon_Tripod_1.png?v=1728889471","width":1024},{"alt":null,"id":27613583933579,"position":3,"preview_image":{"aspect_ratio":1.0,"height":1024,"width":1024,"src":"\/\/australiantactical.com.au\/cdn\/shop\/files\/Leofoto_LM-364CL_Carbon_Tripod_2.png?v=1728889472"},"aspect_ratio":1.0,"height":1024,"media_type":"image","src":"\/\/australiantactical.com.au\/cdn\/shop\/files\/Leofoto_LM-364CL_Carbon_Tripod_2.png?v=1728889472","width":1024},{"alt":null,"id":27613584162955,"position":4,"preview_image":{"aspect_ratio":1.0,"height":1024,"width":1024,"src":"\/\/australiantactical.com.au\/cdn\/shop\/files\/Leofoto_LM-364CL_Carbon_Tripod_3.png?v=1728889472"},"aspect_ratio":1.0,"height":1024,"media_type":"image","src":"\/\/australiantactical.com.au\/cdn\/shop\/files\/Leofoto_LM-364CL_Carbon_Tripod_3.png?v=1728889472","width":1024}],"requires_selling_plan":false,"selling_plan_groups":[],"content":"\u003cp\u003eThis Leofoto LM-364CL Summit Series Carbon Fibre 4-Section Tripod has 10x carbon fibre tubes that make the tripod a 2.05kg lightweight support, with a strong load capacity of 30kg. The 6061 aluminum parts are CNC machined and hard anodized, making the surface tough against scratches. The twist leg lock system is easily opened with a simple quarter turn, which enables you to extend all the sections to a maximum height of 1700mm.With the tripod's three variable leg angles, it allows you to splay the legs completely out, so the support can drop to a minimum height of 96mm. At the tripod's apex, the spider is hollow making it light weight. Additionally, the mounting platform is removable, so you can exchange it with the included 75mm video bowl to install a fluid head. An integrated 3\/8\"-16 socket is located on the side of the spider for photo or video accessories. To store or travel with the tripod it folds down to a length of 598mm.\n\u003c\/p\u003e"}
Translation missing: en.products.product.regular_price
$955.00
-
{"id":7563862900875,"title":"Leofoto SMP-01 Rifle Shooting Plate with Tripod QD Adapter Plate","handle":"smp-01","description":"\u003cp\u003eThe Leofoto SMP-01 platform is a compact and multifunctional shooting platform suitable for use with various types of weapons and accessories. This is an accessory for high-altitude shooters with an ARCA Swiss mount for mounting the rifle on a platform or platform on a tripod. The product is made of aircraft-grade aluminium alloy 6061-T6 with Type II anodising\u003c\/p\u003e","published_at":"2024-10-11T17:08:11+11:00","created_at":"2024-10-11T17:08:13+11:00","vendor":"My Store","type":"","tags":[],"price":24500,"price_min":24500,"price_max":24500,"available":true,"price_varies":false,"compare_at_price":null,"compare_at_price_min":0,"compare_at_price_max":0,"compare_at_price_varies":false,"variants":[{"id":42811551613067,"title":"Default Title","option1":"Default Title","option2":null,"option3":null,"sku":"SMP-01","requires_shipping":true,"taxable":true,"featured_image":null,"available":true,"name":"Leofoto SMP-01 Rifle Shooting Plate with Tripod QD Adapter Plate","public_title":null,"options":["Default Title"],"price":24500,"weight":5000,"compare_at_price":null,"inventory_management":"shopify","barcode":null,"requires_selling_plan":false,"selling_plan_allocations":[]}],"images":["\/\/australiantactical.com.au\/cdn\/shop\/files\/Leofoto_SMP-01_Rifle_Shooting_Plate_with_Tripod_QD_Adapter_Plate.png?v=1728889862","\/\/australiantactical.com.au\/cdn\/shop\/files\/Leofoto_SMP-01_Rifle_Shooting_Plate_with_Tripod_QD_Adapter_Plate_1.png?v=1728889866","\/\/australiantactical.com.au\/cdn\/shop\/files\/Leofoto_SMP-01_Rifle_Shooting_Plate_with_Tripod_QD_Adapter_Plate_2.png?v=1728889866","\/\/australiantactical.com.au\/cdn\/shop\/files\/Leofoto_SMP-01_Rifle_Shooting_Plate_with_Tripod_QD_Adapter_Plate_3.png?v=1728889866","\/\/australiantactical.com.au\/cdn\/shop\/files\/Leofoto_SMP-01_Rifle_Shooting_Plate_with_Tripod_QD_Adapter_Plate_4.png?v=1728889866"],"featured_image":"\/\/australiantactical.com.au\/cdn\/shop\/files\/Leofoto_SMP-01_Rifle_Shooting_Plate_with_Tripod_QD_Adapter_Plate.png?v=1728889862","options":["Title"],"media":[{"alt":null,"id":27613612671115,"position":1,"preview_image":{"aspect_ratio":1.0,"height":1024,"width":1024,"src":"\/\/australiantactical.com.au\/cdn\/shop\/files\/Leofoto_SMP-01_Rifle_Shooting_Plate_with_Tripod_QD_Adapter_Plate.png?v=1728889862"},"aspect_ratio":1.0,"height":1024,"media_type":"image","src":"\/\/australiantactical.com.au\/cdn\/shop\/files\/Leofoto_SMP-01_Rifle_Shooting_Plate_with_Tripod_QD_Adapter_Plate.png?v=1728889862","width":1024},{"alt":null,"id":27613612802187,"position":2,"preview_image":{"aspect_ratio":1.0,"height":1024,"width":1024,"src":"\/\/australiantactical.com.au\/cdn\/shop\/files\/Leofoto_SMP-01_Rifle_Shooting_Plate_with_Tripod_QD_Adapter_Plate_1.png?v=1728889866"},"aspect_ratio":1.0,"height":1024,"media_type":"image","src":"\/\/australiantactical.com.au\/cdn\/shop\/files\/Leofoto_SMP-01_Rifle_Shooting_Plate_with_Tripod_QD_Adapter_Plate_1.png?v=1728889866","width":1024},{"alt":null,"id":27613612867723,"position":3,"preview_image":{"aspect_ratio":1.0,"height":1024,"width":1024,"src":"\/\/australiantactical.com.au\/cdn\/shop\/files\/Leofoto_SMP-01_Rifle_Shooting_Plate_with_Tripod_QD_Adapter_Plate_2.png?v=1728889866"},"aspect_ratio":1.0,"height":1024,"media_type":"image","src":"\/\/australiantactical.com.au\/cdn\/shop\/files\/Leofoto_SMP-01_Rifle_Shooting_Plate_with_Tripod_QD_Adapter_Plate_2.png?v=1728889866","width":1024},{"alt":null,"id":27613612834955,"position":4,"preview_image":{"aspect_ratio":1.0,"height":1024,"width":1024,"src":"\/\/australiantactical.com.au\/cdn\/shop\/files\/Leofoto_SMP-01_Rifle_Shooting_Plate_with_Tripod_QD_Adapter_Plate_3.png?v=1728889866"},"aspect_ratio":1.0,"height":1024,"media_type":"image","src":"\/\/australiantactical.com.au\/cdn\/shop\/files\/Leofoto_SMP-01_Rifle_Shooting_Plate_with_Tripod_QD_Adapter_Plate_3.png?v=1728889866","width":1024},{"alt":null,"id":27613612900491,"position":5,"preview_image":{"aspect_ratio":1.0,"height":1024,"width":1024,"src":"\/\/australiantactical.com.au\/cdn\/shop\/files\/Leofoto_SMP-01_Rifle_Shooting_Plate_with_Tripod_QD_Adapter_Plate_4.png?v=1728889866"},"aspect_ratio":1.0,"height":1024,"media_type":"image","src":"\/\/australiantactical.com.au\/cdn\/shop\/files\/Leofoto_SMP-01_Rifle_Shooting_Plate_with_Tripod_QD_Adapter_Plate_4.png?v=1728889866","width":1024}],"requires_selling_plan":false,"selling_plan_groups":[],"content":"\u003cp\u003eThe Leofoto SMP-01 platform is a compact and multifunctional shooting platform suitable for use with various types of weapons and accessories. This is an accessory for high-altitude shooters with an ARCA Swiss mount for mounting the rifle on a platform or platform on a tripod. The product is made of aircraft-grade aluminium alloy 6061-T6 with Type II anodising\u003c\/p\u003e"}
Translation missing: en.products.product.regular_price
$245.00


Extensive
Product Range Explore a diverse selection of premium options crafted with exceptional quality.
Product Range Explore a diverse selection of premium options crafted with exceptional quality.

Fast Shipping
Aus & NZ Wide We provide prompt and reliable shipping across Australia for a quick delivery experience.
Aus & NZ Wide We provide prompt and reliable shipping across Australia for a quick delivery experience.

Secured Payment
Methods Including ZipPay Enjoy peace of mind with our secure payment options, including the convenience of flexible payment options.
Methods Including ZipPay Enjoy peace of mind with our secure payment options, including the convenience of flexible payment options.
Featured Products

-
{"id":7563864670347,"title":"BR-4 ARCA Spec QD Bipod","handle":"br-4-qd-bipod","description":"\u003cp\u003eThe Accu-Tac BR-4 G2 Arca Spec QD bipod was designed, engineered, and manufactured in the USA. The BR-4 G2 bipod is perfect for bolt action guns, precision, target, competition, and airgun shooting. This is only a suggested use, this model is not exclusive for these applications. The BR-4 G2 Arca Spec QD is 100% billet, made from the highest quality aircraft aluminum available. This model has the versatility you want in a bipod with its 4 individual leg positions and 5 notch height options. It also has the ability to cant, which can each be locked and secured with the quick detach lever. The rail mount is simple, quick, and very secure, it attaches to a standard Arca Swiss or Arca style rail, and mounts in seconds without the need to use extra tools for tightening.\u003c\/p\u003e","published_at":"2024-10-11T17:09:41+11:00","created_at":"2024-10-11T17:09:42+11:00","vendor":"My Store","type":"","tags":[],"price":61000,"price_min":61000,"price_max":61000,"available":true,"price_varies":false,"compare_at_price":null,"compare_at_price_min":0,"compare_at_price_max":0,"compare_at_price_varies":false,"variants":[{"id":42811553349771,"title":"Default Title","option1":"Default Title","option2":null,"option3":null,"sku":"BR-4 QD Bipod","requires_shipping":true,"taxable":true,"featured_image":null,"available":true,"name":"BR-4 ARCA Spec QD Bipod","public_title":null,"options":["Default Title"],"price":61000,"weight":5000,"compare_at_price":null,"inventory_management":"shopify","barcode":null,"requires_selling_plan":false,"selling_plan_allocations":[]}],"images":["\/\/australiantactical.com.au\/cdn\/shop\/files\/BR-4_ARCA_Spec_QD_Bipod.png?v=1728891300","\/\/australiantactical.com.au\/cdn\/shop\/files\/BR-4_ARCA_Spec_QD_Bipod_1.png?v=1728891309","\/\/australiantactical.com.au\/cdn\/shop\/files\/BR-4_ARCA_Spec_QD_Bipod_2.png?v=1728891310","\/\/australiantactical.com.au\/cdn\/shop\/files\/BR-4_ARCA_Spec_QD_Bipod_3.png?v=1728891310"],"featured_image":"\/\/australiantactical.com.au\/cdn\/shop\/files\/BR-4_ARCA_Spec_QD_Bipod.png?v=1728891300","options":["Title"],"media":[{"alt":null,"id":27613692362891,"position":1,"preview_image":{"aspect_ratio":1.0,"height":1024,"width":1024,"src":"\/\/australiantactical.com.au\/cdn\/shop\/files\/BR-4_ARCA_Spec_QD_Bipod.png?v=1728891300"},"aspect_ratio":1.0,"height":1024,"media_type":"image","src":"\/\/australiantactical.com.au\/cdn\/shop\/files\/BR-4_ARCA_Spec_QD_Bipod.png?v=1728891300","width":1024},{"alt":null,"id":27613692690571,"position":2,"preview_image":{"aspect_ratio":1.0,"height":1024,"width":1024,"src":"\/\/australiantactical.com.au\/cdn\/shop\/files\/BR-4_ARCA_Spec_QD_Bipod_1.png?v=1728891309"},"aspect_ratio":1.0,"height":1024,"media_type":"image","src":"\/\/australiantactical.com.au\/cdn\/shop\/files\/BR-4_ARCA_Spec_QD_Bipod_1.png?v=1728891309","width":1024},{"alt":null,"id":27613692756107,"position":3,"preview_image":{"aspect_ratio":1.0,"height":1024,"width":1024,"src":"\/\/australiantactical.com.au\/cdn\/shop\/files\/BR-4_ARCA_Spec_QD_Bipod_2.png?v=1728891310"},"aspect_ratio":1.0,"height":1024,"media_type":"image","src":"\/\/australiantactical.com.au\/cdn\/shop\/files\/BR-4_ARCA_Spec_QD_Bipod_2.png?v=1728891310","width":1024},{"alt":null,"id":27613692788875,"position":4,"preview_image":{"aspect_ratio":1.0,"height":1024,"width":1024,"src":"\/\/australiantactical.com.au\/cdn\/shop\/files\/BR-4_ARCA_Spec_QD_Bipod_3.png?v=1728891310"},"aspect_ratio":1.0,"height":1024,"media_type":"image","src":"\/\/australiantactical.com.au\/cdn\/shop\/files\/BR-4_ARCA_Spec_QD_Bipod_3.png?v=1728891310","width":1024}],"requires_selling_plan":false,"selling_plan_groups":[],"content":"\u003cp\u003eThe Accu-Tac BR-4 G2 Arca Spec QD bipod was designed, engineered, and manufactured in the USA. The BR-4 G2 bipod is perfect for bolt action guns, precision, target, competition, and airgun shooting. This is only a suggested use, this model is not exclusive for these applications. The BR-4 G2 Arca Spec QD is 100% billet, made from the highest quality aircraft aluminum available. This model has the versatility you want in a bipod with its 4 individual leg positions and 5 notch height options. It also has the ability to cant, which can each be locked and secured with the quick detach lever. The rail mount is simple, quick, and very secure, it attaches to a standard Arca Swiss or Arca style rail, and mounts in seconds without the need to use extra tools for tightening.\u003c\/p\u003e"}
Translation missing: en.products.product.regular_price
$610.00


-
{"id":7563864768651,"title":"Spike Claws","handle":"spike-claw","description":"\u003cp\u003eThe Accu-Tac Spike Claws were designed as an optional accessory for the Spiked feet. Simply screw the claw on the outer thread of the spike. It will convert the spike to a clawed foot which is perfect for sand, mud, or any soft shooting surface.\u003c\/p\u003e","published_at":"2024-10-11T17:09:46+11:00","created_at":"2024-10-11T17:09:47+11:00","vendor":"My Store","type":"","tags":[],"price":5500,"price_min":5500,"price_max":5500,"available":true,"price_varies":false,"compare_at_price":null,"compare_at_price_min":0,"compare_at_price_max":0,"compare_at_price_varies":false,"variants":[{"id":42811553415307,"title":"Default Title","option1":"Default Title","option2":null,"option3":null,"sku":"Spike claw","requires_shipping":true,"taxable":true,"featured_image":null,"available":true,"name":"Spike Claws","public_title":null,"options":["Default Title"],"price":5500,"weight":1000,"compare_at_price":null,"inventory_management":"shopify","barcode":null,"requires_selling_plan":false,"selling_plan_allocations":[]}],"images":["\/\/australiantactical.com.au\/cdn\/shop\/files\/Spike_Claws.jpg?v=1728891454","\/\/australiantactical.com.au\/cdn\/shop\/files\/Spike_Claws_1.jpg?v=1728891460","\/\/australiantactical.com.au\/cdn\/shop\/files\/Spike_Claws_2.jpg?v=1728891462","\/\/australiantactical.com.au\/cdn\/shop\/files\/Spike_Claws_3.jpg?v=1728891461","\/\/australiantactical.com.au\/cdn\/shop\/files\/Spike_Claws_4.jpg?v=1728891462","\/\/australiantactical.com.au\/cdn\/shop\/files\/Spike_Claws_5.jpg?v=1728891462"],"featured_image":"\/\/australiantactical.com.au\/cdn\/shop\/files\/Spike_Claws.jpg?v=1728891454","options":["Title"],"media":[{"alt":null,"id":27613697933451,"position":1,"preview_image":{"aspect_ratio":1.0,"height":1024,"width":1024,"src":"\/\/australiantactical.com.au\/cdn\/shop\/files\/Spike_Claws.jpg?v=1728891454"},"aspect_ratio":1.0,"height":1024,"media_type":"image","src":"\/\/australiantactical.com.au\/cdn\/shop\/files\/Spike_Claws.jpg?v=1728891454","width":1024},{"alt":null,"id":27613698130059,"position":2,"preview_image":{"aspect_ratio":1.0,"height":1024,"width":1024,"src":"\/\/australiantactical.com.au\/cdn\/shop\/files\/Spike_Claws_1.jpg?v=1728891460"},"aspect_ratio":1.0,"height":1024,"media_type":"image","src":"\/\/australiantactical.com.au\/cdn\/shop\/files\/Spike_Claws_1.jpg?v=1728891460","width":1024},{"alt":null,"id":27613698293899,"position":3,"preview_image":{"aspect_ratio":1.0,"height":1024,"width":1024,"src":"\/\/australiantactical.com.au\/cdn\/shop\/files\/Spike_Claws_2.jpg?v=1728891462"},"aspect_ratio":1.0,"height":1024,"media_type":"image","src":"\/\/australiantactical.com.au\/cdn\/shop\/files\/Spike_Claws_2.jpg?v=1728891462","width":1024},{"alt":null,"id":27613698162827,"position":4,"preview_image":{"aspect_ratio":1.0,"height":1024,"width":1024,"src":"\/\/australiantactical.com.au\/cdn\/shop\/files\/Spike_Claws_3.jpg?v=1728891461"},"aspect_ratio":1.0,"height":1024,"media_type":"image","src":"\/\/australiantactical.com.au\/cdn\/shop\/files\/Spike_Claws_3.jpg?v=1728891461","width":1024},{"alt":null,"id":27613698261131,"position":5,"preview_image":{"aspect_ratio":1.0,"height":1024,"width":1024,"src":"\/\/australiantactical.com.au\/cdn\/shop\/files\/Spike_Claws_4.jpg?v=1728891462"},"aspect_ratio":1.0,"height":1024,"media_type":"image","src":"\/\/australiantactical.com.au\/cdn\/shop\/files\/Spike_Claws_4.jpg?v=1728891462","width":1024},{"alt":null,"id":27613698195595,"position":6,"preview_image":{"aspect_ratio":1.0,"height":1024,"width":1024,"src":"\/\/australiantactical.com.au\/cdn\/shop\/files\/Spike_Claws_5.jpg?v=1728891462"},"aspect_ratio":1.0,"height":1024,"media_type":"image","src":"\/\/australiantactical.com.au\/cdn\/shop\/files\/Spike_Claws_5.jpg?v=1728891462","width":1024}],"requires_selling_plan":false,"selling_plan_groups":[],"content":"\u003cp\u003eThe Accu-Tac Spike Claws were designed as an optional accessory for the Spiked feet. Simply screw the claw on the outer thread of the spike. It will convert the spike to a clawed foot which is perfect for sand, mud, or any soft shooting surface.\u003c\/p\u003e"}
Translation missing: en.products.product.regular_price
$55.00

-
{"id":7576972296331,"title":"SR-5 ARCA Spec QD Bipod","handle":"sr-5-arca-spec-qd-bipod","description":"\u003cp\u003e\u003cspan\u003eThe Accu-Tac SR-5 G2 Arca Spec QD Bipod was designed, engineered, and manufactured in the USA. The SR-5 G2 bipod is perfect for tactical, target, competition, and airgun shooting. This is only a suggested use, this model is not exclusive for these applications.\u003c\/span\u003e\u003c\/p\u003e","published_at":"2024-11-04T19:09:46+11:00","created_at":"2024-11-04T19:09:46+11:00","vendor":"My Store","type":"","tags":[],"price":61000,"price_min":61000,"price_max":61000,"available":true,"price_varies":false,"compare_at_price":null,"compare_at_price_min":0,"compare_at_price_max":0,"compare_at_price_varies":false,"variants":[{"id":42857398993035,"title":"Default Title","option1":"Default Title","option2":null,"option3":null,"sku":"SR-5 QD Bipod","requires_shipping":true,"taxable":true,"featured_image":null,"available":true,"name":"SR-5 ARCA Spec QD Bipod","public_title":null,"options":["Default Title"],"price":61000,"weight":5000,"compare_at_price":null,"inventory_management":"shopify","barcode":"","requires_selling_plan":false,"selling_plan_allocations":[]}],"images":["\/\/australiantactical.com.au\/cdn\/shop\/files\/mainimage_2d843c5c-42a8-4845-b40b-7b982ae4f58a.png?v=1730871823","\/\/australiantactical.com.au\/cdn\/shop\/files\/2_83cfea43-08b5-427f-aad7-329e241c2dcc.png?v=1730871823","\/\/australiantactical.com.au\/cdn\/shop\/files\/3_957dacc1-2c96-4d01-a318-d58a33bef164.png?v=1730871824","\/\/australiantactical.com.au\/cdn\/shop\/files\/4_4853bc5f-9362-4705-9c26-1a3f8f407be3.png?v=1730871823","\/\/australiantactical.com.au\/cdn\/shop\/files\/5_75d44258-2611-4c04-a9dc-0a49f53e71c5.png?v=1730871823"],"featured_image":"\/\/australiantactical.com.au\/cdn\/shop\/files\/mainimage_2d843c5c-42a8-4845-b40b-7b982ae4f58a.png?v=1730871823","options":["Title"],"media":[{"alt":null,"id":27730596397195,"position":1,"preview_image":{"aspect_ratio":1.0,"height":1024,"width":1024,"src":"\/\/australiantactical.com.au\/cdn\/shop\/files\/mainimage_2d843c5c-42a8-4845-b40b-7b982ae4f58a.png?v=1730871823"},"aspect_ratio":1.0,"height":1024,"media_type":"image","src":"\/\/australiantactical.com.au\/cdn\/shop\/files\/mainimage_2d843c5c-42a8-4845-b40b-7b982ae4f58a.png?v=1730871823","width":1024},{"alt":null,"id":27730596429963,"position":2,"preview_image":{"aspect_ratio":1.001,"height":1023,"width":1024,"src":"\/\/australiantactical.com.au\/cdn\/shop\/files\/2_83cfea43-08b5-427f-aad7-329e241c2dcc.png?v=1730871823"},"aspect_ratio":1.001,"height":1023,"media_type":"image","src":"\/\/australiantactical.com.au\/cdn\/shop\/files\/2_83cfea43-08b5-427f-aad7-329e241c2dcc.png?v=1730871823","width":1024},{"alt":null,"id":27730596298891,"position":3,"preview_image":{"aspect_ratio":1.0,"height":1024,"width":1024,"src":"\/\/australiantactical.com.au\/cdn\/shop\/files\/3_957dacc1-2c96-4d01-a318-d58a33bef164.png?v=1730871824"},"aspect_ratio":1.0,"height":1024,"media_type":"image","src":"\/\/australiantactical.com.au\/cdn\/shop\/files\/3_957dacc1-2c96-4d01-a318-d58a33bef164.png?v=1730871824","width":1024},{"alt":null,"id":27730596331659,"position":4,"preview_image":{"aspect_ratio":0.999,"height":1024,"width":1023,"src":"\/\/australiantactical.com.au\/cdn\/shop\/files\/4_4853bc5f-9362-4705-9c26-1a3f8f407be3.png?v=1730871823"},"aspect_ratio":0.999,"height":1024,"media_type":"image","src":"\/\/australiantactical.com.au\/cdn\/shop\/files\/4_4853bc5f-9362-4705-9c26-1a3f8f407be3.png?v=1730871823","width":1023},{"alt":null,"id":27730596364427,"position":5,"preview_image":{"aspect_ratio":1.001,"height":1023,"width":1024,"src":"\/\/australiantactical.com.au\/cdn\/shop\/files\/5_75d44258-2611-4c04-a9dc-0a49f53e71c5.png?v=1730871823"},"aspect_ratio":1.001,"height":1023,"media_type":"image","src":"\/\/australiantactical.com.au\/cdn\/shop\/files\/5_75d44258-2611-4c04-a9dc-0a49f53e71c5.png?v=1730871823","width":1024}],"requires_selling_plan":false,"selling_plan_groups":[],"content":"\u003cp\u003e\u003cspan\u003eThe Accu-Tac SR-5 G2 Arca Spec QD Bipod was designed, engineered, and manufactured in the USA. The SR-5 G2 bipod is perfect for tactical, target, competition, and airgun shooting. This is only a suggested use, this model is not exclusive for these applications.\u003c\/span\u003e\u003c\/p\u003e"}
Translation missing: en.products.product.regular_price
$610.00

-
{"id":7839809077387,"title":"Ammo Novel - Burnt Orange","handle":"ammo-novel-burnt-orange","description":"\u003cp class=\"MsoNormal\"\u003eThe Ammo Novel from Cole-TAC is the latest ammo storage system that is designed specifically for the competition shooters in mind. Don’t worry about running out of ammo when the match director decides to stretch out the day. This can hold 120 rounds of your favorite calibers. Now you don’t have to worry about your ammo bouncing or spilling from the plastic reloading boxes. Like all of our other products, the Ammo Novel ammo storage system is made here in the USA with only the highest quality materials by a company that stands behind all of its gear.\u003c\/p\u003e\n\u003cul style=\"margin-top: 0cm;\" type=\"disc\"\u003e\n\u003cli class=\"MsoNormal\" style=\"mso-list: l0 level1 lfo1; tab-stops: list 36.0pt;\"\u003eStandard size fits the following calibers: .22-250, .243, 6mm Creedmoor, 6.5mm Creedmoor, 7mm-08, .308, .338 Federal, 7mm Rem Mag, .270 Win, .30-06, 300 Win Mag, 338 Win Mag\u003c\/li\u003e\n\u003c\/ul\u003e","published_at":"2025-06-19T19:49:39+10:00","created_at":"2025-06-19T19:49:38+10:00","vendor":"Australian Tactical","type":"","tags":[],"price":16500,"price_min":16500,"price_max":16500,"available":true,"price_varies":false,"compare_at_price":null,"compare_at_price_min":0,"compare_at_price_max":0,"compare_at_price_varies":false,"variants":[{"id":43588659642507,"title":"Default Title","option1":"Default Title","option2":null,"option3":null,"sku":"AN1009","requires_shipping":true,"taxable":true,"featured_image":null,"available":true,"name":"Ammo Novel - Burnt Orange","public_title":null,"options":["Default Title"],"price":16500,"weight":1000,"compare_at_price":null,"inventory_management":"shopify","barcode":"","requires_selling_plan":false,"selling_plan_allocations":[]}],"images":["\/\/australiantactical.com.au\/cdn\/shop\/files\/2XA5Rsj5tE0ERt_zmTDZMrcyQnd6HbAxlw_21f3a71e-1410-4521-880d-db3a9dd12149.jpg?v=1754369624","\/\/australiantactical.com.au\/cdn\/shop\/files\/IMG_4458.jpg?v=1754369624","\/\/australiantactical.com.au\/cdn\/shop\/files\/AN3004-2.jpg?v=1754369624","\/\/australiantactical.com.au\/cdn\/shop\/files\/IMG_4476.jpg?v=1754369624","\/\/australiantactical.com.au\/cdn\/shop\/files\/IMG_4478.jpg?v=1754369624","\/\/australiantactical.com.au\/cdn\/shop\/files\/IMG_4456.jpg?v=1754369624"],"featured_image":"\/\/australiantactical.com.au\/cdn\/shop\/files\/2XA5Rsj5tE0ERt_zmTDZMrcyQnd6HbAxlw_21f3a71e-1410-4521-880d-db3a9dd12149.jpg?v=1754369624","options":["Title"],"media":[{"alt":null,"id":29133746733195,"position":1,"preview_image":{"aspect_ratio":1.5,"height":1333,"width":2000,"src":"\/\/australiantactical.com.au\/cdn\/shop\/files\/2XA5Rsj5tE0ERt_zmTDZMrcyQnd6HbAxlw_21f3a71e-1410-4521-880d-db3a9dd12149.jpg?v=1754369624"},"aspect_ratio":1.5,"height":1333,"media_type":"image","src":"\/\/australiantactical.com.au\/cdn\/shop\/files\/2XA5Rsj5tE0ERt_zmTDZMrcyQnd6HbAxlw_21f3a71e-1410-4521-880d-db3a9dd12149.jpg?v=1754369624","width":2000},{"alt":null,"id":29133745356939,"position":2,"preview_image":{"aspect_ratio":1.0,"height":1382,"width":1382,"src":"\/\/australiantactical.com.au\/cdn\/shop\/files\/IMG_4458.jpg?v=1754369624"},"aspect_ratio":1.0,"height":1382,"media_type":"image","src":"\/\/australiantactical.com.au\/cdn\/shop\/files\/IMG_4458.jpg?v=1754369624","width":1382},{"alt":null,"id":29133745258635,"position":3,"preview_image":{"aspect_ratio":1.5,"height":1333,"width":2000,"src":"\/\/australiantactical.com.au\/cdn\/shop\/files\/AN3004-2.jpg?v=1754369624"},"aspect_ratio":1.5,"height":1333,"media_type":"image","src":"\/\/australiantactical.com.au\/cdn\/shop\/files\/AN3004-2.jpg?v=1754369624","width":2000},{"alt":null,"id":29133745193099,"position":4,"preview_image":{"aspect_ratio":1.0,"height":1382,"width":1382,"src":"\/\/australiantactical.com.au\/cdn\/shop\/files\/IMG_4476.jpg?v=1754369624"},"aspect_ratio":1.0,"height":1382,"media_type":"image","src":"\/\/australiantactical.com.au\/cdn\/shop\/files\/IMG_4476.jpg?v=1754369624","width":1382},{"alt":null,"id":29133745225867,"position":5,"preview_image":{"aspect_ratio":1.0,"height":1382,"width":1382,"src":"\/\/australiantactical.com.au\/cdn\/shop\/files\/IMG_4478.jpg?v=1754369624"},"aspect_ratio":1.0,"height":1382,"media_type":"image","src":"\/\/australiantactical.com.au\/cdn\/shop\/files\/IMG_4478.jpg?v=1754369624","width":1382},{"alt":null,"id":29133745324171,"position":6,"preview_image":{"aspect_ratio":1.0,"height":1382,"width":1382,"src":"\/\/australiantactical.com.au\/cdn\/shop\/files\/IMG_4456.jpg?v=1754369624"},"aspect_ratio":1.0,"height":1382,"media_type":"image","src":"\/\/australiantactical.com.au\/cdn\/shop\/files\/IMG_4456.jpg?v=1754369624","width":1382}],"requires_selling_plan":false,"selling_plan_groups":[],"content":"\u003cp class=\"MsoNormal\"\u003eThe Ammo Novel from Cole-TAC is the latest ammo storage system that is designed specifically for the competition shooters in mind. Don’t worry about running out of ammo when the match director decides to stretch out the day. This can hold 120 rounds of your favorite calibers. Now you don’t have to worry about your ammo bouncing or spilling from the plastic reloading boxes. Like all of our other products, the Ammo Novel ammo storage system is made here in the USA with only the highest quality materials by a company that stands behind all of its gear.\u003c\/p\u003e\n\u003cul style=\"margin-top: 0cm;\" type=\"disc\"\u003e\n\u003cli class=\"MsoNormal\" style=\"mso-list: l0 level1 lfo1; tab-stops: list 36.0pt;\"\u003eStandard size fits the following calibers: .22-250, .243, 6mm Creedmoor, 6.5mm Creedmoor, 7mm-08, .308, .338 Federal, 7mm Rem Mag, .270 Win, .30-06, 300 Win Mag, 338 Win Mag\u003c\/li\u003e\n\u003c\/ul\u003e"}
Translation missing: en.products.product.regular_price
$165.00

-
{"id":7867509899403,"title":"Ammo Novel - Coyote Tan","handle":"ammo-novel-coyote-tan","description":"\u003cp class=\"MsoNormal\"\u003eThe Ammo Novel from Cole-TAC is the latest ammo storage system that is designed specifically for the competition shooters in mind. Don’t worry about running out of ammo when the match director decides to stretch out the day. This can hold 120 rounds of your favorite calibers. Now you don’t have to worry about your ammo bouncing or spilling from the plastic reloading boxes. Like all of our other products, the Ammo Novel ammo storage system is made here in the USA with only the highest quality materials by a company that stands behind all of its gear.\u003c\/p\u003e\n\u003cul style=\"margin-top: 0cm;\" type=\"disc\"\u003e\n\u003cli class=\"MsoNormal\" style=\"mso-list: l0 level1 lfo1; tab-stops: list 36.0pt;\"\u003eStandard size fits the following calibers: .22-250, .243, 6mm Creedmoor, 6.5mm Creedmoor, 7mm-08, .308, .338 Federal, 7mm Rem Mag, .270 Win, .30-06, 300 Win Mag, 338 Win Mag\u003c\/li\u003e\n\u003c\/ul\u003e","published_at":"2025-08-05T14:40:46+10:00","created_at":"2025-08-05T14:38:56+10:00","vendor":"Australian Tactical","type":"","tags":[],"price":16500,"price_min":16500,"price_max":16500,"available":true,"price_varies":false,"compare_at_price":null,"compare_at_price_min":0,"compare_at_price_max":0,"compare_at_price_varies":false,"variants":[{"id":43698660868235,"title":"Default Title","option1":"Default Title","option2":null,"option3":null,"sku":"AN1002","requires_shipping":true,"taxable":true,"featured_image":null,"available":true,"name":"Ammo Novel - Coyote Tan","public_title":null,"options":["Default Title"],"price":16500,"weight":1000,"compare_at_price":null,"inventory_management":"shopify","barcode":null,"requires_selling_plan":false,"selling_plan_allocations":[]}],"images":["\/\/australiantactical.com.au\/cdn\/shop\/files\/71bnrq1ieRL._UF1000_1000_QL80_FMwebp.webp?v=1754369624","\/\/australiantactical.com.au\/cdn\/shop\/files\/IMG_4456.jpg?v=1754369624","\/\/australiantactical.com.au\/cdn\/shop\/files\/2XA5Rsj5tE0ERt_zmTDZMrcyQnd6HbAxlw_21f3a71e-1410-4521-880d-db3a9dd12149.jpg?v=1754369624","\/\/australiantactical.com.au\/cdn\/shop\/files\/IMG_4458.jpg?v=1754369624","\/\/australiantactical.com.au\/cdn\/shop\/files\/AN3004-2.jpg?v=1754369624","\/\/australiantactical.com.au\/cdn\/shop\/files\/IMG_4476.jpg?v=1754369624","\/\/australiantactical.com.au\/cdn\/shop\/files\/IMG_4478.jpg?v=1754369624"],"featured_image":"\/\/australiantactical.com.au\/cdn\/shop\/files\/71bnrq1ieRL._UF1000_1000_QL80_FMwebp.webp?v=1754369624","options":["Title"],"media":[{"alt":null,"id":29786160365707,"position":1,"preview_image":{"aspect_ratio":1.333,"height":750,"width":1000,"src":"\/\/australiantactical.com.au\/cdn\/shop\/files\/71bnrq1ieRL._UF1000_1000_QL80_FMwebp.webp?v=1754369624"},"aspect_ratio":1.333,"height":750,"media_type":"image","src":"\/\/australiantactical.com.au\/cdn\/shop\/files\/71bnrq1ieRL._UF1000_1000_QL80_FMwebp.webp?v=1754369624","width":1000},{"alt":null,"id":29133745324171,"position":2,"preview_image":{"aspect_ratio":1.0,"height":1382,"width":1382,"src":"\/\/australiantactical.com.au\/cdn\/shop\/files\/IMG_4456.jpg?v=1754369624"},"aspect_ratio":1.0,"height":1382,"media_type":"image","src":"\/\/australiantactical.com.au\/cdn\/shop\/files\/IMG_4456.jpg?v=1754369624","width":1382},{"alt":null,"id":29133746733195,"position":3,"preview_image":{"aspect_ratio":1.5,"height":1333,"width":2000,"src":"\/\/australiantactical.com.au\/cdn\/shop\/files\/2XA5Rsj5tE0ERt_zmTDZMrcyQnd6HbAxlw_21f3a71e-1410-4521-880d-db3a9dd12149.jpg?v=1754369624"},"aspect_ratio":1.5,"height":1333,"media_type":"image","src":"\/\/australiantactical.com.au\/cdn\/shop\/files\/2XA5Rsj5tE0ERt_zmTDZMrcyQnd6HbAxlw_21f3a71e-1410-4521-880d-db3a9dd12149.jpg?v=1754369624","width":2000},{"alt":null,"id":29133745356939,"position":4,"preview_image":{"aspect_ratio":1.0,"height":1382,"width":1382,"src":"\/\/australiantactical.com.au\/cdn\/shop\/files\/IMG_4458.jpg?v=1754369624"},"aspect_ratio":1.0,"height":1382,"media_type":"image","src":"\/\/australiantactical.com.au\/cdn\/shop\/files\/IMG_4458.jpg?v=1754369624","width":1382},{"alt":null,"id":29133745258635,"position":5,"preview_image":{"aspect_ratio":1.5,"height":1333,"width":2000,"src":"\/\/australiantactical.com.au\/cdn\/shop\/files\/AN3004-2.jpg?v=1754369624"},"aspect_ratio":1.5,"height":1333,"media_type":"image","src":"\/\/australiantactical.com.au\/cdn\/shop\/files\/AN3004-2.jpg?v=1754369624","width":2000},{"alt":null,"id":29133745193099,"position":6,"preview_image":{"aspect_ratio":1.0,"height":1382,"width":1382,"src":"\/\/australiantactical.com.au\/cdn\/shop\/files\/IMG_4476.jpg?v=1754369624"},"aspect_ratio":1.0,"height":1382,"media_type":"image","src":"\/\/australiantactical.com.au\/cdn\/shop\/files\/IMG_4476.jpg?v=1754369624","width":1382},{"alt":null,"id":29133745225867,"position":7,"preview_image":{"aspect_ratio":1.0,"height":1382,"width":1382,"src":"\/\/australiantactical.com.au\/cdn\/shop\/files\/IMG_4478.jpg?v=1754369624"},"aspect_ratio":1.0,"height":1382,"media_type":"image","src":"\/\/australiantactical.com.au\/cdn\/shop\/files\/IMG_4478.jpg?v=1754369624","width":1382}],"requires_selling_plan":false,"selling_plan_groups":[],"content":"\u003cp class=\"MsoNormal\"\u003eThe Ammo Novel from Cole-TAC is the latest ammo storage system that is designed specifically for the competition shooters in mind. Don’t worry about running out of ammo when the match director decides to stretch out the day. This can hold 120 rounds of your favorite calibers. Now you don’t have to worry about your ammo bouncing or spilling from the plastic reloading boxes. Like all of our other products, the Ammo Novel ammo storage system is made here in the USA with only the highest quality materials by a company that stands behind all of its gear.\u003c\/p\u003e\n\u003cul style=\"margin-top: 0cm;\" type=\"disc\"\u003e\n\u003cli class=\"MsoNormal\" style=\"mso-list: l0 level1 lfo1; tab-stops: list 36.0pt;\"\u003eStandard size fits the following calibers: .22-250, .243, 6mm Creedmoor, 6.5mm Creedmoor, 7mm-08, .308, .338 Federal, 7mm Rem Mag, .270 Win, .30-06, 300 Win Mag, 338 Win Mag\u003c\/li\u003e\n\u003c\/ul\u003e"}
Translation missing: en.products.product.regular_price
$165.00

-
{"id":7839809503371,"title":"Ammo Novel - OD Green","handle":"ammo-novel-od-green","description":"\u003cp class=\"MsoNormal\"\u003eThe Ammo Novel from Cole-TAC is the latest ammo storage system that is designed specifically for the competition shooters in mind. Don’t worry about running out of ammo when the match director decides to stretch out the day. This can hold 120 rounds of your favorite calibers. Now you don’t have to worry about your ammo bouncing or spilling from the plastic reloading boxes. Like all of our other products, the Ammo Novel ammo storage system is made here in the USA with only the highest quality materials by a company that stands behind all of its gear.\u003c\/p\u003e\n\u003cul style=\"margin-top: 0cm;\" type=\"disc\"\u003e\n\u003cli class=\"MsoNormal\" style=\"mso-list: l0 level1 lfo1; tab-stops: list 36.0pt;\"\u003eStandard size fits the following calibers: .22-250, .243, 6mm Creedmoor, 6.5mm Creedmoor, 7mm-08, .308, .338 Federal, 7mm Rem Mag, .270 Win, .30-06, 300 Win Mag, 338 Win Mag\u003c\/li\u003e\n\u003c\/ul\u003e","published_at":"2025-06-19T19:51:06+10:00","created_at":"2025-06-19T19:50:03+10:00","vendor":"Australian Tactical","type":"","tags":[],"price":16500,"price_min":16500,"price_max":16500,"available":true,"price_varies":false,"compare_at_price":null,"compare_at_price_min":0,"compare_at_price_max":0,"compare_at_price_varies":false,"variants":[{"id":43588660232331,"title":"Default Title","option1":"Default Title","option2":null,"option3":null,"sku":"AN1004","requires_shipping":true,"taxable":true,"featured_image":null,"available":true,"name":"Ammo Novel - OD Green","public_title":null,"options":["Default Title"],"price":16500,"weight":1000,"compare_at_price":null,"inventory_management":"shopify","barcode":null,"requires_selling_plan":false,"selling_plan_allocations":[]}],"images":["\/\/australiantactical.com.au\/cdn\/shop\/files\/IMG_4458.jpg?v=1754369624","\/\/australiantactical.com.au\/cdn\/shop\/files\/AN3004-2.jpg?v=1754369624","\/\/australiantactical.com.au\/cdn\/shop\/files\/IMG_4476.jpg?v=1754369624","\/\/australiantactical.com.au\/cdn\/shop\/files\/IMG_4478.jpg?v=1754369624","\/\/australiantactical.com.au\/cdn\/shop\/files\/IMG_4456.jpg?v=1754369624"],"featured_image":"\/\/australiantactical.com.au\/cdn\/shop\/files\/IMG_4458.jpg?v=1754369624","options":["Title"],"media":[{"alt":null,"id":29133745356939,"position":1,"preview_image":{"aspect_ratio":1.0,"height":1382,"width":1382,"src":"\/\/australiantactical.com.au\/cdn\/shop\/files\/IMG_4458.jpg?v=1754369624"},"aspect_ratio":1.0,"height":1382,"media_type":"image","src":"\/\/australiantactical.com.au\/cdn\/shop\/files\/IMG_4458.jpg?v=1754369624","width":1382},{"alt":null,"id":29133745258635,"position":2,"preview_image":{"aspect_ratio":1.5,"height":1333,"width":2000,"src":"\/\/australiantactical.com.au\/cdn\/shop\/files\/AN3004-2.jpg?v=1754369624"},"aspect_ratio":1.5,"height":1333,"media_type":"image","src":"\/\/australiantactical.com.au\/cdn\/shop\/files\/AN3004-2.jpg?v=1754369624","width":2000},{"alt":null,"id":29133745193099,"position":3,"preview_image":{"aspect_ratio":1.0,"height":1382,"width":1382,"src":"\/\/australiantactical.com.au\/cdn\/shop\/files\/IMG_4476.jpg?v=1754369624"},"aspect_ratio":1.0,"height":1382,"media_type":"image","src":"\/\/australiantactical.com.au\/cdn\/shop\/files\/IMG_4476.jpg?v=1754369624","width":1382},{"alt":null,"id":29133745225867,"position":4,"preview_image":{"aspect_ratio":1.0,"height":1382,"width":1382,"src":"\/\/australiantactical.com.au\/cdn\/shop\/files\/IMG_4478.jpg?v=1754369624"},"aspect_ratio":1.0,"height":1382,"media_type":"image","src":"\/\/australiantactical.com.au\/cdn\/shop\/files\/IMG_4478.jpg?v=1754369624","width":1382},{"alt":null,"id":29133745324171,"position":5,"preview_image":{"aspect_ratio":1.0,"height":1382,"width":1382,"src":"\/\/australiantactical.com.au\/cdn\/shop\/files\/IMG_4456.jpg?v=1754369624"},"aspect_ratio":1.0,"height":1382,"media_type":"image","src":"\/\/australiantactical.com.au\/cdn\/shop\/files\/IMG_4456.jpg?v=1754369624","width":1382}],"requires_selling_plan":false,"selling_plan_groups":[],"content":"\u003cp class=\"MsoNormal\"\u003eThe Ammo Novel from Cole-TAC is the latest ammo storage system that is designed specifically for the competition shooters in mind. Don’t worry about running out of ammo when the match director decides to stretch out the day. This can hold 120 rounds of your favorite calibers. Now you don’t have to worry about your ammo bouncing or spilling from the plastic reloading boxes. Like all of our other products, the Ammo Novel ammo storage system is made here in the USA with only the highest quality materials by a company that stands behind all of its gear.\u003c\/p\u003e\n\u003cul style=\"margin-top: 0cm;\" type=\"disc\"\u003e\n\u003cli class=\"MsoNormal\" style=\"mso-list: l0 level1 lfo1; tab-stops: list 36.0pt;\"\u003eStandard size fits the following calibers: .22-250, .243, 6mm Creedmoor, 6.5mm Creedmoor, 7mm-08, .308, .338 Federal, 7mm Rem Mag, .270 Win, .30-06, 300 Win Mag, 338 Win Mag\u003c\/li\u003e\n\u003c\/ul\u003e"}
Translation missing: en.products.product.regular_price
$165.00

-
{"id":7563863949451,"title":"Back bone","handle":"back-bone","description":"\u003cp\u003eThe Backbone Bag Frame represents the next revolution in support bags. The patented design eliminates the need for straps that attach the support bag over the rifle or optic. The hard-coat anodized frame attaches to the rifle with an Area 419 ArcaLock mount. Four Velcro straps keep the bags securely in place, and the wide surface area of the frame prevents the bags from twisting and shifting.\u003c\/p\u003e","published_at":"2024-10-11T17:09:00+11:00","created_at":"2024-10-11T17:09:01+11:00","vendor":"My Store","type":"","tags":[],"price":16000,"price_min":16000,"price_max":16000,"available":true,"price_varies":false,"compare_at_price":null,"compare_at_price_min":0,"compare_at_price_max":0,"compare_at_price_varies":false,"variants":[{"id":42811552694411,"title":"Default Title","option1":"Default Title","option2":null,"option3":null,"sku":null,"requires_shipping":true,"taxable":true,"featured_image":null,"available":true,"name":"Back bone","public_title":null,"options":["Default Title"],"price":16000,"weight":5000,"compare_at_price":null,"inventory_management":"shopify","barcode":null,"requires_selling_plan":false,"selling_plan_allocations":[]}],"images":["\/\/australiantactical.com.au\/cdn\/shop\/files\/Back_bone.png?v=1728951099","\/\/australiantactical.com.au\/cdn\/shop\/files\/Back_bone_2.png?v=1728951110","\/\/australiantactical.com.au\/cdn\/shop\/files\/Back_bone_1.png?v=1728951111"],"featured_image":"\/\/australiantactical.com.au\/cdn\/shop\/files\/Back_bone.png?v=1728951099","options":["Title"],"media":[{"alt":null,"id":27617297236107,"position":1,"preview_image":{"aspect_ratio":1.0,"height":1024,"width":1024,"src":"\/\/australiantactical.com.au\/cdn\/shop\/files\/Back_bone.png?v=1728951099"},"aspect_ratio":1.0,"height":1024,"media_type":"image","src":"\/\/australiantactical.com.au\/cdn\/shop\/files\/Back_bone.png?v=1728951099","width":1024},{"alt":null,"id":27617298546827,"position":2,"preview_image":{"aspect_ratio":1.0,"height":1024,"width":1024,"src":"\/\/australiantactical.com.au\/cdn\/shop\/files\/Back_bone_2.png?v=1728951110"},"aspect_ratio":1.0,"height":1024,"media_type":"image","src":"\/\/australiantactical.com.au\/cdn\/shop\/files\/Back_bone_2.png?v=1728951110","width":1024},{"alt":null,"id":27617298612363,"position":3,"preview_image":{"aspect_ratio":1.0,"height":1024,"width":1024,"src":"\/\/australiantactical.com.au\/cdn\/shop\/files\/Back_bone_1.png?v=1728951111"},"aspect_ratio":1.0,"height":1024,"media_type":"image","src":"\/\/australiantactical.com.au\/cdn\/shop\/files\/Back_bone_1.png?v=1728951111","width":1024}],"requires_selling_plan":false,"selling_plan_groups":[],"content":"\u003cp\u003eThe Backbone Bag Frame represents the next revolution in support bags. The patented design eliminates the need for straps that attach the support bag over the rifle or optic. The hard-coat anodized frame attaches to the rifle with an Area 419 ArcaLock mount. Four Velcro straps keep the bags securely in place, and the wide surface area of the frame prevents the bags from twisting and shifting.\u003c\/p\u003e"}
Translation missing: en.products.product.regular_price
$160.00

-
{"id":7616729514123,"title":"Bang-Bang Range Bag, Dry Earth","handle":"bang-bang-range-bag-dry-earth","description":"\u003cp\u003eThe Bang Bang™ was developed as a compact range bag to hold all of your essential gear and keep it protected from the elements. The polycarbonate base makes the R1 impervious to wet ground, rocks, debris and range dust. The main compartment features configurable, padded dividers to keep medical items, tools, camera gear, and range equipment safe and organized. The basement compartment on the bottom is perfect for handguns, tools, or even a compact carbine.\u003c\/p\u003e","published_at":"2025-01-10T14:26:33+11:00","created_at":"2025-01-10T14:26:33+11:00","vendor":"Australian Tactical","type":"","tags":[],"price":32400,"price_min":32400,"price_max":32400,"available":true,"price_varies":false,"compare_at_price":null,"compare_at_price_min":0,"compare_at_price_max":0,"compare_at_price_varies":false,"variants":[{"id":43002398998667,"title":"Default Title","option1":"Default Title","option2":null,"option3":null,"sku":"R1ME","requires_shipping":true,"taxable":true,"featured_image":null,"available":true,"name":"Bang-Bang Range Bag, Dry Earth","public_title":null,"options":["Default Title"],"price":32400,"weight":10000,"compare_at_price":null,"inventory_management":"shopify","barcode":"","requires_selling_plan":false,"selling_plan_allocations":[]}],"images":["\/\/australiantactical.com.au\/cdn\/shop\/files\/R1MB_WEB.jpg?v=1736479533","\/\/australiantactical.com.au\/cdn\/shop\/files\/edit-01244F32-4F74-444E-A18554EE22EE342B.jpg?v=1736479533","\/\/australiantactical.com.au\/cdn\/shop\/files\/edit-D877BC6C-3746-4A1F-8457A979831D3086.jpg?v=1736479533","\/\/australiantactical.com.au\/cdn\/shop\/files\/R1_RANGE_LOADOUT_WEB.jpg?v=1736479533"],"featured_image":"\/\/australiantactical.com.au\/cdn\/shop\/files\/R1MB_WEB.jpg?v=1736479533","options":["Title"],"media":[{"alt":null,"id":28072991621259,"position":1,"preview_image":{"aspect_ratio":1.0,"height":1080,"width":1080,"src":"\/\/australiantactical.com.au\/cdn\/shop\/files\/R1MB_WEB.jpg?v=1736479533"},"aspect_ratio":1.0,"height":1080,"media_type":"image","src":"\/\/australiantactical.com.au\/cdn\/shop\/files\/R1MB_WEB.jpg?v=1736479533","width":1080},{"alt":null,"id":28072991522955,"position":2,"preview_image":{"aspect_ratio":1.0,"height":1080,"width":1080,"src":"\/\/australiantactical.com.au\/cdn\/shop\/files\/edit-01244F32-4F74-444E-A18554EE22EE342B.jpg?v=1736479533"},"aspect_ratio":1.0,"height":1080,"media_type":"image","src":"\/\/australiantactical.com.au\/cdn\/shop\/files\/edit-01244F32-4F74-444E-A18554EE22EE342B.jpg?v=1736479533","width":1080},{"alt":null,"id":28072991555723,"position":3,"preview_image":{"aspect_ratio":1.0,"height":1080,"width":1080,"src":"\/\/australiantactical.com.au\/cdn\/shop\/files\/edit-D877BC6C-3746-4A1F-8457A979831D3086.jpg?v=1736479533"},"aspect_ratio":1.0,"height":1080,"media_type":"image","src":"\/\/australiantactical.com.au\/cdn\/shop\/files\/edit-D877BC6C-3746-4A1F-8457A979831D3086.jpg?v=1736479533","width":1080},{"alt":null,"id":28072991588491,"position":4,"preview_image":{"aspect_ratio":1.0,"height":1080,"width":1080,"src":"\/\/australiantactical.com.au\/cdn\/shop\/files\/R1_RANGE_LOADOUT_WEB.jpg?v=1736479533"},"aspect_ratio":1.0,"height":1080,"media_type":"image","src":"\/\/australiantactical.com.au\/cdn\/shop\/files\/R1_RANGE_LOADOUT_WEB.jpg?v=1736479533","width":1080}],"requires_selling_plan":false,"selling_plan_groups":[],"content":"\u003cp\u003eThe Bang Bang™ was developed as a compact range bag to hold all of your essential gear and keep it protected from the elements. The polycarbonate base makes the R1 impervious to wet ground, rocks, debris and range dust. The main compartment features configurable, padded dividers to keep medical items, tools, camera gear, and range equipment safe and organized. The basement compartment on the bottom is perfect for handguns, tools, or even a compact carbine.\u003c\/p\u003e"}
Translation missing: en.products.product.regular_price
$324.00

-
{"id":7857775640715,"title":"Eberlestock Pack out T shirt","handle":"eberlestock-pack-out-t-shirt","description":"\u003cp class=\"MsoNormal\"\u003eThe Pack Out Tee stays true to the nature of hunters worldwide and our mission as a company. After countless hours of research and preparation, it all boils down to one simple goal–go in light, and come out heavy.\u003c\/p\u003e","published_at":"2025-07-20T14:50:29+10:00","created_at":"2025-07-20T14:50:27+10:00","vendor":"Australian Tactical","type":"","tags":[],"price":5000,"price_min":5000,"price_max":5000,"available":true,"price_varies":false,"compare_at_price":null,"compare_at_price_min":0,"compare_at_price_max":0,"compare_at_price_varies":false,"variants":[{"id":43659924439179,"title":"S","option1":"S","option2":null,"option3":null,"sku":null,"requires_shipping":true,"taxable":true,"featured_image":null,"available":true,"name":"Eberlestock Pack out T shirt - S","public_title":"S","options":["S"],"price":5000,"weight":1000,"compare_at_price":null,"inventory_management":"shopify","barcode":"","requires_selling_plan":false,"selling_plan_allocations":[]},{"id":43659924471947,"title":"M","option1":"M","option2":null,"option3":null,"sku":null,"requires_shipping":true,"taxable":true,"featured_image":null,"available":true,"name":"Eberlestock Pack out T shirt - M","public_title":"M","options":["M"],"price":5000,"weight":1000,"compare_at_price":null,"inventory_management":"shopify","barcode":"","requires_selling_plan":false,"selling_plan_allocations":[]},{"id":43659924504715,"title":"L","option1":"L","option2":null,"option3":null,"sku":null,"requires_shipping":true,"taxable":true,"featured_image":null,"available":true,"name":"Eberlestock Pack out T shirt - L","public_title":"L","options":["L"],"price":5000,"weight":1000,"compare_at_price":null,"inventory_management":"shopify","barcode":"","requires_selling_plan":false,"selling_plan_allocations":[]},{"id":43659924537483,"title":"XL","option1":"XL","option2":null,"option3":null,"sku":null,"requires_shipping":true,"taxable":true,"featured_image":null,"available":true,"name":"Eberlestock Pack out T shirt - XL","public_title":"XL","options":["XL"],"price":5000,"weight":1000,"compare_at_price":null,"inventory_management":"shopify","barcode":"","requires_selling_plan":false,"selling_plan_allocations":[]},{"id":43659924570251,"title":"2XL","option1":"2XL","option2":null,"option3":null,"sku":null,"requires_shipping":true,"taxable":true,"featured_image":null,"available":true,"name":"Eberlestock Pack out T shirt - 2XL","public_title":"2XL","options":["2XL"],"price":5000,"weight":1000,"compare_at_price":null,"inventory_management":"shopify","barcode":"","requires_selling_plan":false,"selling_plan_allocations":[]}],"images":["\/\/australiantactical.com.au\/cdn\/shop\/files\/pack-out-tee-eberlestock-696272.png?v=1752986854","\/\/australiantactical.com.au\/cdn\/shop\/files\/pack-out-tee-eberlestock-769759.png?v=1752986854"],"featured_image":"\/\/australiantactical.com.au\/cdn\/shop\/files\/pack-out-tee-eberlestock-696272.png?v=1752986854","options":["Size"],"media":[{"alt":null,"id":29667403202699,"position":1,"preview_image":{"aspect_ratio":0.8,"height":1238,"width":990,"src":"\/\/australiantactical.com.au\/cdn\/shop\/files\/pack-out-tee-eberlestock-696272.png?v=1752986854"},"aspect_ratio":0.8,"height":1238,"media_type":"image","src":"\/\/australiantactical.com.au\/cdn\/shop\/files\/pack-out-tee-eberlestock-696272.png?v=1752986854","width":990},{"alt":null,"id":29667403235467,"position":2,"preview_image":{"aspect_ratio":0.8,"height":1238,"width":990,"src":"\/\/australiantactical.com.au\/cdn\/shop\/files\/pack-out-tee-eberlestock-769759.png?v=1752986854"},"aspect_ratio":0.8,"height":1238,"media_type":"image","src":"\/\/australiantactical.com.au\/cdn\/shop\/files\/pack-out-tee-eberlestock-769759.png?v=1752986854","width":990}],"requires_selling_plan":false,"selling_plan_groups":[],"content":"\u003cp class=\"MsoNormal\"\u003eThe Pack Out Tee stays true to the nature of hunters worldwide and our mission as a company. After countless hours of research and preparation, it all boils down to one simple goal–go in light, and come out heavy.\u003c\/p\u003e"}
Translation missing: en.products.product.regular_price
$50.00
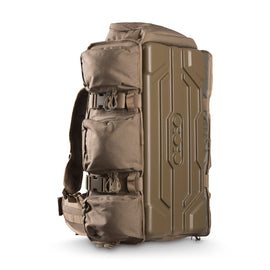
-
{"id":7616730529931,"title":"UpRanger Pack, Dry Earth","handle":"upranger-pack-dry-earth","description":"\u003cp\u003eInspired by a champion 3-Gunner who didn’t like the normal sequence of dismounting a pack face-down and rolling the straps in the dirt, the UpRanger™ changes the game. Drop the pack on its polycarbonate outer face and unzip from the harness side for quick access to everything you need without unnecessary wear or dirt. Whether you use it for the range, or a durable and secure camera bag, the UpRanger will take it all.\u003c\/p\u003e\n\u003ciframe width=\"560\" height=\"315\" src=\"https:\/\/www.youtube.com\/embed\/MfXkmSWwG0E?si=ajzI9xg-VhAiNBvA\" title=\"YouTube video player\" frameborder=\"0\" allow=\"accelerometer; autoplay; clipboard-write; encrypted-media; gyroscope; picture-in-picture; web-share\" referrerpolicy=\"strict-origin-when-cross-origin\" allowfullscreen\u003e\u003c\/iframe\u003e","published_at":"2025-01-10T14:28:51+11:00","created_at":"2025-01-10T14:28:51+11:00","vendor":"Australian Tactical","type":"","tags":[],"price":56000,"price_min":56000,"price_max":56000,"available":true,"price_varies":false,"compare_at_price":null,"compare_at_price_min":0,"compare_at_price_max":0,"compare_at_price_varies":false,"variants":[{"id":43002403487883,"title":"Default Title","option1":"Default Title","option2":null,"option3":null,"sku":"R3ME","requires_shipping":true,"taxable":true,"featured_image":null,"available":true,"name":"UpRanger Pack, Dry Earth","public_title":null,"options":["Default Title"],"price":56000,"weight":10000,"compare_at_price":null,"inventory_management":"shopify","barcode":"","requires_selling_plan":false,"selling_plan_allocations":[]}],"images":["\/\/australiantactical.com.au\/cdn\/shop\/files\/R3ME_WEB.jpg?v=1736479662","\/\/australiantactical.com.au\/cdn\/shop\/files\/DSC_4494_copy.jpg?v=1736479663","\/\/australiantactical.com.au\/cdn\/shop\/files\/R3_RANGE_LOADOUT_WEB_1.jpg?v=1736479662","\/\/australiantactical.com.au\/cdn\/shop\/files\/R3ME_SIDE_WEB_1.jpg?v=1736479662","\/\/australiantactical.com.au\/cdn\/shop\/files\/UR_4x_9da29bee-0611-4542-aead-dd03a3eb4e8e.jpg?v=1736479662","\/\/australiantactical.com.au\/cdn\/shop\/files\/UR_x1_50036c14-328d-458b-8cf3-a9dee5e4b066.jpg?v=1736479662"],"featured_image":"\/\/australiantactical.com.au\/cdn\/shop\/files\/R3ME_WEB.jpg?v=1736479662","options":["Title"],"media":[{"alt":null,"id":28072994177163,"position":1,"preview_image":{"aspect_ratio":1.0,"height":1080,"width":1080,"src":"\/\/australiantactical.com.au\/cdn\/shop\/files\/R3ME_WEB.jpg?v=1736479662"},"aspect_ratio":1.0,"height":1080,"media_type":"image","src":"\/\/australiantactical.com.au\/cdn\/shop\/files\/R3ME_WEB.jpg?v=1736479662","width":1080},{"alt":null,"id":28072994078859,"position":2,"preview_image":{"aspect_ratio":1.0,"height":1080,"width":1080,"src":"\/\/australiantactical.com.au\/cdn\/shop\/files\/DSC_4494_copy.jpg?v=1736479663"},"aspect_ratio":1.0,"height":1080,"media_type":"image","src":"\/\/australiantactical.com.au\/cdn\/shop\/files\/DSC_4494_copy.jpg?v=1736479663","width":1080},{"alt":null,"id":28072994111627,"position":3,"preview_image":{"aspect_ratio":1.0,"height":1080,"width":1080,"src":"\/\/australiantactical.com.au\/cdn\/shop\/files\/R3_RANGE_LOADOUT_WEB_1.jpg?v=1736479662"},"aspect_ratio":1.0,"height":1080,"media_type":"image","src":"\/\/australiantactical.com.au\/cdn\/shop\/files\/R3_RANGE_LOADOUT_WEB_1.jpg?v=1736479662","width":1080},{"alt":null,"id":28072994144395,"position":4,"preview_image":{"aspect_ratio":1.0,"height":1080,"width":1080,"src":"\/\/australiantactical.com.au\/cdn\/shop\/files\/R3ME_SIDE_WEB_1.jpg?v=1736479662"},"aspect_ratio":1.0,"height":1080,"media_type":"image","src":"\/\/australiantactical.com.au\/cdn\/shop\/files\/R3ME_SIDE_WEB_1.jpg?v=1736479662","width":1080},{"alt":null,"id":28072994209931,"position":5,"preview_image":{"aspect_ratio":1.0,"height":1080,"width":1080,"src":"\/\/australiantactical.com.au\/cdn\/shop\/files\/UR_4x_9da29bee-0611-4542-aead-dd03a3eb4e8e.jpg?v=1736479662"},"aspect_ratio":1.0,"height":1080,"media_type":"image","src":"\/\/australiantactical.com.au\/cdn\/shop\/files\/UR_4x_9da29bee-0611-4542-aead-dd03a3eb4e8e.jpg?v=1736479662","width":1080},{"alt":null,"id":28072994242699,"position":6,"preview_image":{"aspect_ratio":1.0,"height":1080,"width":1080,"src":"\/\/australiantactical.com.au\/cdn\/shop\/files\/UR_x1_50036c14-328d-458b-8cf3-a9dee5e4b066.jpg?v=1736479662"},"aspect_ratio":1.0,"height":1080,"media_type":"image","src":"\/\/australiantactical.com.au\/cdn\/shop\/files\/UR_x1_50036c14-328d-458b-8cf3-a9dee5e4b066.jpg?v=1736479662","width":1080}],"requires_selling_plan":false,"selling_plan_groups":[],"content":"\u003cp\u003eInspired by a champion 3-Gunner who didn’t like the normal sequence of dismounting a pack face-down and rolling the straps in the dirt, the UpRanger™ changes the game. Drop the pack on its polycarbonate outer face and unzip from the harness side for quick access to everything you need without unnecessary wear or dirt. Whether you use it for the range, or a durable and secure camera bag, the UpRanger will take it all.\u003c\/p\u003e\n\u003ciframe width=\"560\" height=\"315\" src=\"https:\/\/www.youtube.com\/embed\/MfXkmSWwG0E?si=ajzI9xg-VhAiNBvA\" title=\"YouTube video player\" frameborder=\"0\" allow=\"accelerometer; autoplay; clipboard-write; encrypted-media; gyroscope; picture-in-picture; web-share\" referrerpolicy=\"strict-origin-when-cross-origin\" allowfullscreen\u003e\u003c\/iframe\u003e"}
Translation missing: en.products.product.regular_price
$560.00
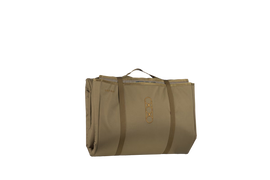
-
{"id":7582259216523,"title":"Dirt Nap Shooting Mat","handle":"dirt-nap-shooting-mat","description":"\u003cp\u003e\u003cspan\u003eThe Dirt Nap Shooting Mat is expertly designed and prioritized for the prone shooting position. It enhances your outings with superior comfort and practicality, making it an essential addition to your range day kit.\u003c\/span\u003e\u003c\/p\u003e\n\u003cp\u003e \u003c\/p\u003e\n\u003cp\u003e\u003cspan\u003eThe Dirt Nap features individually padded cells that create natural creases, allowing for effortless folding and compact storage. With full padding in the top half and extending down the center of the back half, it provides maximum comfort exactly where you need it most.\u003c\/span\u003e\u003c\/p\u003e","published_at":"2024-11-13T17:45:15+11:00","created_at":"2024-11-13T17:45:15+11:00","vendor":"Australian Tactical","type":"","tags":["Cover","Mat","Protection","Shooting"],"price":16200,"price_min":16200,"price_max":16200,"available":true,"price_varies":false,"compare_at_price":null,"compare_at_price_min":0,"compare_at_price_max":0,"compare_at_price_varies":false,"variants":[{"id":42875549548683,"title":"Default Title","option1":"Default Title","option2":null,"option3":null,"sku":"DNMC","requires_shipping":true,"taxable":true,"featured_image":null,"available":true,"name":"Dirt Nap Shooting Mat","public_title":null,"options":["Default Title"],"price":16200,"weight":10000,"compare_at_price":null,"inventory_management":"shopify","barcode":"","requires_selling_plan":false,"selling_plan_allocations":[]}],"images":["\/\/australiantactical.com.au\/cdn\/shop\/files\/hcmmw2tc.png?v=1731480250","\/\/australiantactical.com.au\/cdn\/shop\/files\/7tf4rerp.png?v=1731480250","\/\/australiantactical.com.au\/cdn\/shop\/files\/avu3ke53.png?v=1731480250"],"featured_image":"\/\/australiantactical.com.au\/cdn\/shop\/files\/hcmmw2tc.png?v=1731480250","options":["Title"],"media":[{"alt":null,"id":27766155935883,"position":1,"preview_image":{"aspect_ratio":1.5,"height":800,"width":1200,"src":"\/\/australiantactical.com.au\/cdn\/shop\/files\/hcmmw2tc.png?v=1731480250"},"aspect_ratio":1.5,"height":800,"media_type":"image","src":"\/\/australiantactical.com.au\/cdn\/shop\/files\/hcmmw2tc.png?v=1731480250","width":1200},{"alt":null,"id":27766155870347,"position":2,"preview_image":{"aspect_ratio":1.5,"height":800,"width":1200,"src":"\/\/australiantactical.com.au\/cdn\/shop\/files\/7tf4rerp.png?v=1731480250"},"aspect_ratio":1.5,"height":800,"media_type":"image","src":"\/\/australiantactical.com.au\/cdn\/shop\/files\/7tf4rerp.png?v=1731480250","width":1200},{"alt":null,"id":27766155903115,"position":3,"preview_image":{"aspect_ratio":1.5,"height":800,"width":1200,"src":"\/\/australiantactical.com.au\/cdn\/shop\/files\/avu3ke53.png?v=1731480250"},"aspect_ratio":1.5,"height":800,"media_type":"image","src":"\/\/australiantactical.com.au\/cdn\/shop\/files\/avu3ke53.png?v=1731480250","width":1200}],"requires_selling_plan":false,"selling_plan_groups":[],"content":"\u003cp\u003e\u003cspan\u003eThe Dirt Nap Shooting Mat is expertly designed and prioritized for the prone shooting position. It enhances your outings with superior comfort and practicality, making it an essential addition to your range day kit.\u003c\/span\u003e\u003c\/p\u003e\n\u003cp\u003e \u003c\/p\u003e\n\u003cp\u003e\u003cspan\u003eThe Dirt Nap features individually padded cells that create natural creases, allowing for effortless folding and compact storage. With full padding in the top half and extending down the center of the back half, it provides maximum comfort exactly where you need it most.\u003c\/span\u003e\u003c\/p\u003e"}
Translation missing: en.products.product.regular_price
$162.00
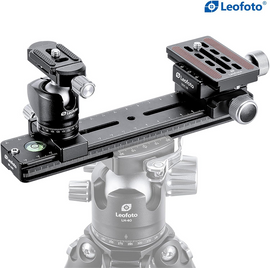
-
{"id":7563862835339,"title":"Leofoto Binocular Rangefinder Rail Kit - With Sliding 2nd mount ","handle":"fdm-02","description":"\u003cp\u003eThe Leofoto FDM-02 Binocular Rangefinder Rail Kit is a universal accessory rail kit with two mounting systems. This product is designed for rifle sport users to mount optics and telemetry equipment, but it can be used for a wide variety of industries and applications.\u003c\/p\u003e","published_at":"2024-10-11T17:08:09+11:00","created_at":"2024-10-11T17:08:10+11:00","vendor":"My Store","type":"","tags":[],"price":14500,"price_min":14500,"price_max":14500,"available":true,"price_varies":false,"compare_at_price":null,"compare_at_price_min":0,"compare_at_price_max":0,"compare_at_price_varies":false,"variants":[{"id":42811551514763,"title":"Default Title","option1":"Default Title","option2":null,"option3":null,"sku":"FDM-02","requires_shipping":true,"taxable":true,"featured_image":null,"available":true,"name":"Leofoto Binocular Rangefinder Rail Kit - With Sliding 2nd mount ","public_title":null,"options":["Default Title"],"price":14500,"weight":5000,"compare_at_price":null,"inventory_management":"shopify","barcode":null,"requires_selling_plan":false,"selling_plan_allocations":[]}],"images":["\/\/australiantactical.com.au\/cdn\/shop\/files\/Leofoto_Binocular_Rangefinder_Rail_Kit_-_With_Sliding_2nd_mount.png?v=1728888099","\/\/australiantactical.com.au\/cdn\/shop\/files\/Leofoto_Binocular_Rangefinder_Rail_Kit_-_With_Sliding_2nd_mount_1.png?v=1728888099","\/\/australiantactical.com.au\/cdn\/shop\/files\/Leofoto_Binocular_Rangefinder_Rail_Kit_-_With_Sliding_2nd_mount_2.png?v=1728888099","\/\/australiantactical.com.au\/cdn\/shop\/files\/Leofoto_Binocular_Rangefinder_Rail_Kit_-_With_Sliding_2nd_mount_3.png?v=1728888099","\/\/australiantactical.com.au\/cdn\/shop\/files\/Leofoto_Binocular_Rangefinder_Rail_Kit_-_With_Sliding_2nd_mount_4.png?v=1728888099"],"featured_image":"\/\/australiantactical.com.au\/cdn\/shop\/files\/Leofoto_Binocular_Rangefinder_Rail_Kit_-_With_Sliding_2nd_mount.png?v=1728888099","options":["Title"],"media":[{"alt":null,"id":27613440180363,"position":1,"preview_image":{"aspect_ratio":1.006,"height":1018,"width":1024,"src":"\/\/australiantactical.com.au\/cdn\/shop\/files\/Leofoto_Binocular_Rangefinder_Rail_Kit_-_With_Sliding_2nd_mount.png?v=1728888099"},"aspect_ratio":1.006,"height":1018,"media_type":"image","src":"\/\/australiantactical.com.au\/cdn\/shop\/files\/Leofoto_Binocular_Rangefinder_Rail_Kit_-_With_Sliding_2nd_mount.png?v=1728888099","width":1024},{"alt":null,"id":27613440082059,"position":2,"preview_image":{"aspect_ratio":1.177,"height":870,"width":1024,"src":"\/\/australiantactical.com.au\/cdn\/shop\/files\/Leofoto_Binocular_Rangefinder_Rail_Kit_-_With_Sliding_2nd_mount_1.png?v=1728888099"},"aspect_ratio":1.177,"height":870,"media_type":"image","src":"\/\/australiantactical.com.au\/cdn\/shop\/files\/Leofoto_Binocular_Rangefinder_Rail_Kit_-_With_Sliding_2nd_mount_1.png?v=1728888099","width":1024},{"alt":null,"id":27613440213131,"position":3,"preview_image":{"aspect_ratio":0.988,"height":1024,"width":1012,"src":"\/\/australiantactical.com.au\/cdn\/shop\/files\/Leofoto_Binocular_Rangefinder_Rail_Kit_-_With_Sliding_2nd_mount_2.png?v=1728888099"},"aspect_ratio":0.988,"height":1024,"media_type":"image","src":"\/\/australiantactical.com.au\/cdn\/shop\/files\/Leofoto_Binocular_Rangefinder_Rail_Kit_-_With_Sliding_2nd_mount_2.png?v=1728888099","width":1012},{"alt":null,"id":27613440147595,"position":4,"preview_image":{"aspect_ratio":0.945,"height":1024,"width":968,"src":"\/\/australiantactical.com.au\/cdn\/shop\/files\/Leofoto_Binocular_Rangefinder_Rail_Kit_-_With_Sliding_2nd_mount_3.png?v=1728888099"},"aspect_ratio":0.945,"height":1024,"media_type":"image","src":"\/\/australiantactical.com.au\/cdn\/shop\/files\/Leofoto_Binocular_Rangefinder_Rail_Kit_-_With_Sliding_2nd_mount_3.png?v=1728888099","width":968},{"alt":null,"id":27613440114827,"position":5,"preview_image":{"aspect_ratio":1.01,"height":1014,"width":1024,"src":"\/\/australiantactical.com.au\/cdn\/shop\/files\/Leofoto_Binocular_Rangefinder_Rail_Kit_-_With_Sliding_2nd_mount_4.png?v=1728888099"},"aspect_ratio":1.01,"height":1014,"media_type":"image","src":"\/\/australiantactical.com.au\/cdn\/shop\/files\/Leofoto_Binocular_Rangefinder_Rail_Kit_-_With_Sliding_2nd_mount_4.png?v=1728888099","width":1024}],"requires_selling_plan":false,"selling_plan_groups":[],"content":"\u003cp\u003eThe Leofoto FDM-02 Binocular Rangefinder Rail Kit is a universal accessory rail kit with two mounting systems. This product is designed for rifle sport users to mount optics and telemetry equipment, but it can be used for a wide variety of industries and applications.\u003c\/p\u003e"}
Translation missing: en.products.product.regular_price
$145.00
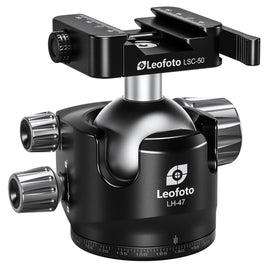
-
{"id":7608179392651,"title":"Leofoto LH-47LR 47mm Low Profile Ball Head with LR-60 Quick Release Lever Clamp and QP-70N Plate","handle":"leofoto-lh-47lr-47mm-low-profile-ball-head-with-lr-60-quick-release-lever-clamp-and-qp-70n-plate","description":"\u003cp class=\"MsoNormal\"\u003eThe \u003cb\u003eLeofoto LH-47SC 47mm Low Profile Ball Head\u003c\/b\u003e is a high-performance, compact ball head designed for photographers and shooters. It features a durable, low-profile design for added stability and smooth operation. The ball head includes dual \u003cb\u003ePicatinny\u003c\/b\u003e and \u003cb\u003eARCA Swiss\u003c\/b\u003e clamps, offering versatile mounting options for cameras and rifles. With precise locking mechanisms and strong construction, the LH-47SC ensures secure mounting and easy adjustments, making it an essential tool for both creative and tactical use.\u003c\/p\u003e","published_at":"2024-12-22T11:47:46+11:00","created_at":"2024-12-22T11:47:46+11:00","vendor":"Australian Tactical","type":"","tags":[],"price":29900,"price_min":29900,"price_max":29900,"available":true,"price_varies":false,"compare_at_price":null,"compare_at_price_min":0,"compare_at_price_max":0,"compare_at_price_varies":false,"variants":[{"id":42963638255755,"title":"Default Title","option1":"Default Title","option2":null,"option3":null,"sku":"LH-47SC","requires_shipping":true,"taxable":true,"featured_image":null,"available":true,"name":"Leofoto LH-47LR 47mm Low Profile Ball Head with LR-60 Quick Release Lever Clamp and QP-70N Plate","public_title":null,"options":["Default Title"],"price":29900,"weight":3000,"compare_at_price":null,"inventory_management":"shopify","barcode":"","requires_selling_plan":false,"selling_plan_allocations":[]}],"images":["\/\/australiantactical.com.au\/cdn\/shop\/files\/1__35812.jpg?v=1734828417","\/\/australiantactical.com.au\/cdn\/shop\/files\/202205221828592__98263.jpg?v=1734828417","\/\/australiantactical.com.au\/cdn\/shop\/files\/202205221829003__30769.jpg?v=1734828417","\/\/australiantactical.com.au\/cdn\/shop\/files\/202205221829004__74285.jpg?v=1734828417"],"featured_image":"\/\/australiantactical.com.au\/cdn\/shop\/files\/1__35812.jpg?v=1734828417","options":["Title"],"media":[{"alt":null,"id":27993172639883,"position":1,"preview_image":{"aspect_ratio":1.0,"height":1280,"width":1280,"src":"\/\/australiantactical.com.au\/cdn\/shop\/files\/1__35812.jpg?v=1734828417"},"aspect_ratio":1.0,"height":1280,"media_type":"image","src":"\/\/australiantactical.com.au\/cdn\/shop\/files\/1__35812.jpg?v=1734828417","width":1280},{"alt":null,"id":27993172672651,"position":2,"preview_image":{"aspect_ratio":1.0,"height":1280,"width":1280,"src":"\/\/australiantactical.com.au\/cdn\/shop\/files\/202205221828592__98263.jpg?v=1734828417"},"aspect_ratio":1.0,"height":1280,"media_type":"image","src":"\/\/australiantactical.com.au\/cdn\/shop\/files\/202205221828592__98263.jpg?v=1734828417","width":1280},{"alt":null,"id":27993172705419,"position":3,"preview_image":{"aspect_ratio":1.0,"height":1280,"width":1280,"src":"\/\/australiantactical.com.au\/cdn\/shop\/files\/202205221829003__30769.jpg?v=1734828417"},"aspect_ratio":1.0,"height":1280,"media_type":"image","src":"\/\/australiantactical.com.au\/cdn\/shop\/files\/202205221829003__30769.jpg?v=1734828417","width":1280},{"alt":null,"id":27993172738187,"position":4,"preview_image":{"aspect_ratio":1.0,"height":1280,"width":1280,"src":"\/\/australiantactical.com.au\/cdn\/shop\/files\/202205221829004__74285.jpg?v=1734828417"},"aspect_ratio":1.0,"height":1280,"media_type":"image","src":"\/\/australiantactical.com.au\/cdn\/shop\/files\/202205221829004__74285.jpg?v=1734828417","width":1280}],"requires_selling_plan":false,"selling_plan_groups":[],"content":"\u003cp class=\"MsoNormal\"\u003eThe \u003cb\u003eLeofoto LH-47SC 47mm Low Profile Ball Head\u003c\/b\u003e is a high-performance, compact ball head designed for photographers and shooters. It features a durable, low-profile design for added stability and smooth operation. The ball head includes dual \u003cb\u003ePicatinny\u003c\/b\u003e and \u003cb\u003eARCA Swiss\u003c\/b\u003e clamps, offering versatile mounting options for cameras and rifles. With precise locking mechanisms and strong construction, the LH-47SC ensures secure mounting and easy adjustments, making it an essential tool for both creative and tactical use.\u003c\/p\u003e"}
Translation missing: en.products.product.regular_price
$299.00

-
{"id":7563862966411,"title":"Leofoto SO-362C 2-Section Inverted Carbon Fiber Tripod","handle":"so-362c","description":"\u003cp\u003eThe Leofoto SO-362C Carbon Fibre Inverted Tripod is a perfect choice for heavy cameras and lenses, full-size firearm combos, large spotting scopes, and large format surveillance equipment.\u003c\/p\u003e","published_at":"2024-10-11T17:08:14+11:00","created_at":"2024-10-11T17:08:15+11:00","vendor":"My Store","type":"","tags":[],"price":89900,"price_min":89900,"price_max":89900,"available":true,"price_varies":false,"compare_at_price":null,"compare_at_price_min":0,"compare_at_price_max":0,"compare_at_price_varies":false,"variants":[{"id":42811551678603,"title":"Default Title","option1":"Default Title","option2":null,"option3":null,"sku":"SO-362C","requires_shipping":true,"taxable":true,"featured_image":null,"available":true,"name":"Leofoto SO-362C 2-Section Inverted Carbon Fiber Tripod","public_title":null,"options":["Default Title"],"price":89900,"weight":10000,"compare_at_price":null,"inventory_management":"shopify","barcode":null,"requires_selling_plan":false,"selling_plan_allocations":[]}],"images":["\/\/australiantactical.com.au\/cdn\/shop\/files\/Leofoto_SO-362C_2-Section_Inverted_Carbon_Fiber_Tripod_563e7692-5b95-4013-8d88-ba28d8cae4b9.png?v=1728961053","\/\/australiantactical.com.au\/cdn\/shop\/files\/Leofoto_SO-362C_2-Section_Inverted_Carbon_Fiber_Tripod_1_ab73e68a-2701-4add-8efe-eb0fc69fa821.png?v=1728961062","\/\/australiantactical.com.au\/cdn\/shop\/files\/Leofoto_SO-362C_2-Section_Inverted_Carbon_Fiber_Tripod_2_57741b7f-fc66-4b9f-85de-b56c0635e038.png?v=1728961062","\/\/australiantactical.com.au\/cdn\/shop\/files\/Leofoto_SO-362C_2-Section_Inverted_Carbon_Fiber_Tripod_3_fcdc69a2-6de5-4af6-b566-fa5f47a52d20.png?v=1728961062","\/\/australiantactical.com.au\/cdn\/shop\/files\/Leofoto_SO-362C_2-Section_Inverted_Carbon_Fiber_Tripod_4_e1b4da66-8a44-47b9-8259-5e6fd66c219c.png?v=1728961062"],"featured_image":"\/\/australiantactical.com.au\/cdn\/shop\/files\/Leofoto_SO-362C_2-Section_Inverted_Carbon_Fiber_Tripod_563e7692-5b95-4013-8d88-ba28d8cae4b9.png?v=1728961053","options":["Title"],"media":[{"alt":null,"id":27618182463627,"position":1,"preview_image":{"aspect_ratio":1.0,"height":1024,"width":1024,"src":"\/\/australiantactical.com.au\/cdn\/shop\/files\/Leofoto_SO-362C_2-Section_Inverted_Carbon_Fiber_Tripod_563e7692-5b95-4013-8d88-ba28d8cae4b9.png?v=1728961053"},"aspect_ratio":1.0,"height":1024,"media_type":"image","src":"\/\/australiantactical.com.au\/cdn\/shop\/files\/Leofoto_SO-362C_2-Section_Inverted_Carbon_Fiber_Tripod_563e7692-5b95-4013-8d88-ba28d8cae4b9.png?v=1728961053","width":1024},{"alt":null,"id":27618182987915,"position":2,"preview_image":{"aspect_ratio":1.0,"height":1024,"width":1024,"src":"\/\/australiantactical.com.au\/cdn\/shop\/files\/Leofoto_SO-362C_2-Section_Inverted_Carbon_Fiber_Tripod_1_ab73e68a-2701-4add-8efe-eb0fc69fa821.png?v=1728961062"},"aspect_ratio":1.0,"height":1024,"media_type":"image","src":"\/\/australiantactical.com.au\/cdn\/shop\/files\/Leofoto_SO-362C_2-Section_Inverted_Carbon_Fiber_Tripod_1_ab73e68a-2701-4add-8efe-eb0fc69fa821.png?v=1728961062","width":1024},{"alt":null,"id":27618183020683,"position":3,"preview_image":{"aspect_ratio":1.0,"height":1024,"width":1024,"src":"\/\/australiantactical.com.au\/cdn\/shop\/files\/Leofoto_SO-362C_2-Section_Inverted_Carbon_Fiber_Tripod_2_57741b7f-fc66-4b9f-85de-b56c0635e038.png?v=1728961062"},"aspect_ratio":1.0,"height":1024,"media_type":"image","src":"\/\/australiantactical.com.au\/cdn\/shop\/files\/Leofoto_SO-362C_2-Section_Inverted_Carbon_Fiber_Tripod_2_57741b7f-fc66-4b9f-85de-b56c0635e038.png?v=1728961062","width":1024},{"alt":null,"id":27618183053451,"position":4,"preview_image":{"aspect_ratio":1.0,"height":1024,"width":1024,"src":"\/\/australiantactical.com.au\/cdn\/shop\/files\/Leofoto_SO-362C_2-Section_Inverted_Carbon_Fiber_Tripod_3_fcdc69a2-6de5-4af6-b566-fa5f47a52d20.png?v=1728961062"},"aspect_ratio":1.0,"height":1024,"media_type":"image","src":"\/\/australiantactical.com.au\/cdn\/shop\/files\/Leofoto_SO-362C_2-Section_Inverted_Carbon_Fiber_Tripod_3_fcdc69a2-6de5-4af6-b566-fa5f47a52d20.png?v=1728961062","width":1024},{"alt":null,"id":27618183118987,"position":5,"preview_image":{"aspect_ratio":1.0,"height":1024,"width":1024,"src":"\/\/australiantactical.com.au\/cdn\/shop\/files\/Leofoto_SO-362C_2-Section_Inverted_Carbon_Fiber_Tripod_4_e1b4da66-8a44-47b9-8259-5e6fd66c219c.png?v=1728961062"},"aspect_ratio":1.0,"height":1024,"media_type":"image","src":"\/\/australiantactical.com.au\/cdn\/shop\/files\/Leofoto_SO-362C_2-Section_Inverted_Carbon_Fiber_Tripod_4_e1b4da66-8a44-47b9-8259-5e6fd66c219c.png?v=1728961062","width":1024}],"requires_selling_plan":false,"selling_plan_groups":[],"content":"\u003cp\u003eThe Leofoto SO-362C Carbon Fibre Inverted Tripod is a perfect choice for heavy cameras and lenses, full-size firearm combos, large spotting scopes, and large format surveillance equipment.\u003c\/p\u003e"}
Translation missing: en.products.product.regular_price
$899.00

-
{"id":7563862442123,"title":"Leofoto LM-364CL Carbon Tripod","handle":"lm-364cl","description":"\u003cp\u003eThis Leofoto LM-364CL Summit Series Carbon Fibre 4-Section Tripod has 10x carbon fibre tubes that make the tripod a 2.05kg lightweight support, with a strong load capacity of 30kg. The 6061 aluminum parts are CNC machined and hard anodized, making the surface tough against scratches. The twist leg lock system is easily opened with a simple quarter turn, which enables you to extend all the sections to a maximum height of 1700mm.With the tripod's three variable leg angles, it allows you to splay the legs completely out, so the support can drop to a minimum height of 96mm. At the tripod's apex, the spider is hollow making it light weight. Additionally, the mounting platform is removable, so you can exchange it with the included 75mm video bowl to install a fluid head. An integrated 3\/8\"-16 socket is located on the side of the spider for photo or video accessories. To store or travel with the tripod it folds down to a length of 598mm.\n\u003c\/p\u003e","published_at":"2024-10-11T17:07:43+11:00","created_at":"2024-10-11T17:07:45+11:00","vendor":"My Store","type":"","tags":[],"price":95500,"price_min":95500,"price_max":95500,"available":true,"price_varies":false,"compare_at_price":null,"compare_at_price_min":0,"compare_at_price_max":0,"compare_at_price_varies":false,"variants":[{"id":42811551056011,"title":"Default Title","option1":"Default Title","option2":null,"option3":null,"sku":"LM-364CL","requires_shipping":true,"taxable":true,"featured_image":null,"available":true,"name":"Leofoto LM-364CL Carbon Tripod","public_title":null,"options":["Default Title"],"price":95500,"weight":10000,"compare_at_price":null,"inventory_management":"shopify","barcode":null,"requires_selling_plan":false,"selling_plan_allocations":[]}],"images":["\/\/australiantactical.com.au\/cdn\/shop\/files\/Leofoto_LM-364CL_Carbon_Tripod.png?v=1728889470","\/\/australiantactical.com.au\/cdn\/shop\/files\/Leofoto_LM-364CL_Carbon_Tripod_1.png?v=1728889471","\/\/australiantactical.com.au\/cdn\/shop\/files\/Leofoto_LM-364CL_Carbon_Tripod_2.png?v=1728889472","\/\/australiantactical.com.au\/cdn\/shop\/files\/Leofoto_LM-364CL_Carbon_Tripod_3.png?v=1728889472"],"featured_image":"\/\/australiantactical.com.au\/cdn\/shop\/files\/Leofoto_LM-364CL_Carbon_Tripod.png?v=1728889470","options":["Title"],"media":[{"alt":null,"id":27613583868043,"position":1,"preview_image":{"aspect_ratio":1.0,"height":1024,"width":1024,"src":"\/\/australiantactical.com.au\/cdn\/shop\/files\/Leofoto_LM-364CL_Carbon_Tripod.png?v=1728889470"},"aspect_ratio":1.0,"height":1024,"media_type":"image","src":"\/\/australiantactical.com.au\/cdn\/shop\/files\/Leofoto_LM-364CL_Carbon_Tripod.png?v=1728889470","width":1024},{"alt":null,"id":27613583900811,"position":2,"preview_image":{"aspect_ratio":1.0,"height":1024,"width":1024,"src":"\/\/australiantactical.com.au\/cdn\/shop\/files\/Leofoto_LM-364CL_Carbon_Tripod_1.png?v=1728889471"},"aspect_ratio":1.0,"height":1024,"media_type":"image","src":"\/\/australiantactical.com.au\/cdn\/shop\/files\/Leofoto_LM-364CL_Carbon_Tripod_1.png?v=1728889471","width":1024},{"alt":null,"id":27613583933579,"position":3,"preview_image":{"aspect_ratio":1.0,"height":1024,"width":1024,"src":"\/\/australiantactical.com.au\/cdn\/shop\/files\/Leofoto_LM-364CL_Carbon_Tripod_2.png?v=1728889472"},"aspect_ratio":1.0,"height":1024,"media_type":"image","src":"\/\/australiantactical.com.au\/cdn\/shop\/files\/Leofoto_LM-364CL_Carbon_Tripod_2.png?v=1728889472","width":1024},{"alt":null,"id":27613584162955,"position":4,"preview_image":{"aspect_ratio":1.0,"height":1024,"width":1024,"src":"\/\/australiantactical.com.au\/cdn\/shop\/files\/Leofoto_LM-364CL_Carbon_Tripod_3.png?v=1728889472"},"aspect_ratio":1.0,"height":1024,"media_type":"image","src":"\/\/australiantactical.com.au\/cdn\/shop\/files\/Leofoto_LM-364CL_Carbon_Tripod_3.png?v=1728889472","width":1024}],"requires_selling_plan":false,"selling_plan_groups":[],"content":"\u003cp\u003eThis Leofoto LM-364CL Summit Series Carbon Fibre 4-Section Tripod has 10x carbon fibre tubes that make the tripod a 2.05kg lightweight support, with a strong load capacity of 30kg. The 6061 aluminum parts are CNC machined and hard anodized, making the surface tough against scratches. The twist leg lock system is easily opened with a simple quarter turn, which enables you to extend all the sections to a maximum height of 1700mm.With the tripod's three variable leg angles, it allows you to splay the legs completely out, so the support can drop to a minimum height of 96mm. At the tripod's apex, the spider is hollow making it light weight. Additionally, the mounting platform is removable, so you can exchange it with the included 75mm video bowl to install a fluid head. An integrated 3\/8\"-16 socket is located on the side of the spider for photo or video accessories. To store or travel with the tripod it folds down to a length of 598mm.\n\u003c\/p\u003e"}
Translation missing: en.products.product.regular_price
$955.00
-
{"id":7902718853259,"title":"OBi Stax Bar","handle":"obi-stax-bar","description":"\u003ch2 data-start=\"228\" data-end=\"245\"\u003eOBi Stax Bar\u003c\/h2\u003e\n\u003cp data-start=\"247\" data-end=\"618\"\u003e\u003cstrong data-start=\"247\" data-end=\"284\"\u003eThe backbone of your Stax system.\u003c\/strong\u003e\u003cbr data-start=\"284\" data-end=\"287\"\u003eThe \u003cstrong data-start=\"291\" data-end=\"307\"\u003eOBi Stax Bar\u003c\/strong\u003e is the foundation piece that everything else connects to. It’s designed to support Stax Blocks, Bushings, and Drops, keeping your reloading dies and tools neat, secure, and easy to access. Mount it to the wall for a clean, vertical layout or use it on the bench with Stax Drops for a stable countertop setup.\u003c\/p\u003e\n\u003ch3 data-start=\"620\" data-end=\"634\"\u003eFeatures\u003c\/h3\u003e\n\u003cul data-start=\"635\" data-end=\"855\"\u003e\n\u003cli data-start=\"635\" data-end=\"711\"\u003e\n\u003cp data-start=\"637\" data-end=\"711\"\u003e\u003cstrong data-start=\"637\" data-end=\"658\"\u003eStrong foundation\u003c\/strong\u003e – The core mounting rail for the full Stax system.\u003c\/p\u003e\n\u003c\/li\u003e\n\u003cli data-start=\"712\" data-end=\"776\"\u003e\n\u003cp data-start=\"714\" data-end=\"776\"\u003e\u003cstrong data-start=\"714\" data-end=\"732\"\u003eFlexible setup\u003c\/strong\u003e – Mount to a wall or use on a countertop.\u003c\/p\u003e\n\u003c\/li\u003e\n\u003cli data-start=\"777\" data-end=\"855\"\u003e\n\u003cp data-start=\"779\" data-end=\"855\"\u003e\u003cstrong data-start=\"779\" data-end=\"793\"\u003eExpandable\u003c\/strong\u003e – Add Blocks, Drops, and Bushings as your collection grows.\u003c\/p\u003e\n\u003c\/li\u003e\n\u003c\/ul\u003e\n\u003ch3 data-start=\"857\" data-end=\"875\"\u003eRequirements\u003c\/h3\u003e\n\u003cul data-start=\"876\" data-end=\"960\"\u003e\n\u003cli data-start=\"876\" data-end=\"960\"\u003e\n\u003cp data-start=\"878\" data-end=\"960\"\u003eAt least one \u003cstrong data-start=\"891\" data-end=\"905\"\u003eStax Block\u003c\/strong\u003e or \u003cstrong data-start=\"909\" data-end=\"925\"\u003eStax Bushing\u003c\/strong\u003e is needed to hold dies or tools.\u003c\/p\u003e\n\u003c\/li\u003e\n\u003c\/ul\u003e\n\u003ch3 data-start=\"962\" data-end=\"978\"\u003eIn the box\u003c\/h3\u003e\n\u003cul data-start=\"979\" data-end=\"1050\"\u003e\n\u003cli data-start=\"979\" data-end=\"1050\"\u003e\n\u003cp data-start=\"981\" data-end=\"1050\"\u003e1 × \u003cstrong data-start=\"985\" data-end=\"1001\"\u003eOBi Stax Bar\u003c\/strong\u003e (Blocks, Bushings, and Drops sold separately).\u003c\/p\u003e\n\u003c\/li\u003e\n\u003c\/ul\u003e","published_at":"2025-09-12T08:05:30+10:00","created_at":"2025-09-12T07:53:22+10:00","vendor":"Australian Tactical","type":"","tags":["OBi","Old balls inc","Reloading"],"price":6995,"price_min":6995,"price_max":6995,"available":true,"price_varies":false,"compare_at_price":null,"compare_at_price_min":0,"compare_at_price_max":0,"compare_at_price_varies":false,"variants":[{"id":43996320366731,"title":"Default Title","option1":"Default Title","option2":null,"option3":null,"sku":"StaxBar","requires_shipping":true,"taxable":true,"featured_image":null,"available":true,"name":"OBi Stax Bar","public_title":null,"options":["Default Title"],"price":6995,"weight":1000,"compare_at_price":null,"inventory_management":"shopify","barcode":"","requires_selling_plan":false,"selling_plan_allocations":[]}],"images":["\/\/australiantactical.com.au\/cdn\/shop\/files\/PhotoRoom_20231005_0844492_1400x_f56d4387-c979-452d-8321-6564f60be181.jpg?v=1757627469","\/\/australiantactical.com.au\/cdn\/shop\/files\/images_17_023ec17c-4adc-4a77-814d-9d8d18380712.jpg?v=1757627477","\/\/australiantactical.com.au\/cdn\/shop\/files\/PhotoRoom_20231005_084349_1f0e8d0a-f923-4bab-b8f7-1d4d70112907.jpg?v=1757627487","\/\/australiantactical.com.au\/cdn\/shop\/files\/images_18_22db0daf-7a62-4fe7-a42d-ac51c56dcfad.jpg?v=1757627532"],"featured_image":"\/\/australiantactical.com.au\/cdn\/shop\/files\/PhotoRoom_20231005_0844492_1400x_f56d4387-c979-452d-8321-6564f60be181.jpg?v=1757627469","options":["Title"],"media":[{"alt":null,"id":30111482642571,"position":1,"preview_image":{"aspect_ratio":0.996,"height":1406,"width":1400,"src":"\/\/australiantactical.com.au\/cdn\/shop\/files\/PhotoRoom_20231005_0844492_1400x_f56d4387-c979-452d-8321-6564f60be181.jpg?v=1757627469"},"aspect_ratio":0.996,"height":1406,"media_type":"image","src":"\/\/australiantactical.com.au\/cdn\/shop\/files\/PhotoRoom_20231005_0844492_1400x_f56d4387-c979-452d-8321-6564f60be181.jpg?v=1757627469","width":1400},{"alt":null,"id":30111483854987,"position":2,"preview_image":{"aspect_ratio":1.0,"height":554,"width":554,"src":"\/\/australiantactical.com.au\/cdn\/shop\/files\/images_17_023ec17c-4adc-4a77-814d-9d8d18380712.jpg?v=1757627477"},"aspect_ratio":1.0,"height":554,"media_type":"image","src":"\/\/australiantactical.com.au\/cdn\/shop\/files\/images_17_023ec17c-4adc-4a77-814d-9d8d18380712.jpg?v=1757627477","width":554},{"alt":null,"id":30111484706955,"position":3,"preview_image":{"aspect_ratio":1.003,"height":1500,"width":1504,"src":"\/\/australiantactical.com.au\/cdn\/shop\/files\/PhotoRoom_20231005_084349_1f0e8d0a-f923-4bab-b8f7-1d4d70112907.jpg?v=1757627487"},"aspect_ratio":1.003,"height":1500,"media_type":"image","src":"\/\/australiantactical.com.au\/cdn\/shop\/files\/PhotoRoom_20231005_084349_1f0e8d0a-f923-4bab-b8f7-1d4d70112907.jpg?v=1757627487","width":1504},{"alt":null,"id":30111494668427,"position":4,"preview_image":{"aspect_ratio":1.0,"height":554,"width":554,"src":"\/\/australiantactical.com.au\/cdn\/shop\/files\/images_18_22db0daf-7a62-4fe7-a42d-ac51c56dcfad.jpg?v=1757627532"},"aspect_ratio":1.0,"height":554,"media_type":"image","src":"\/\/australiantactical.com.au\/cdn\/shop\/files\/images_18_22db0daf-7a62-4fe7-a42d-ac51c56dcfad.jpg?v=1757627532","width":554}],"requires_selling_plan":false,"selling_plan_groups":[],"content":"\u003ch2 data-start=\"228\" data-end=\"245\"\u003eOBi Stax Bar\u003c\/h2\u003e\n\u003cp data-start=\"247\" data-end=\"618\"\u003e\u003cstrong data-start=\"247\" data-end=\"284\"\u003eThe backbone of your Stax system.\u003c\/strong\u003e\u003cbr data-start=\"284\" data-end=\"287\"\u003eThe \u003cstrong data-start=\"291\" data-end=\"307\"\u003eOBi Stax Bar\u003c\/strong\u003e is the foundation piece that everything else connects to. It’s designed to support Stax Blocks, Bushings, and Drops, keeping your reloading dies and tools neat, secure, and easy to access. Mount it to the wall for a clean, vertical layout or use it on the bench with Stax Drops for a stable countertop setup.\u003c\/p\u003e\n\u003ch3 data-start=\"620\" data-end=\"634\"\u003eFeatures\u003c\/h3\u003e\n\u003cul data-start=\"635\" data-end=\"855\"\u003e\n\u003cli data-start=\"635\" data-end=\"711\"\u003e\n\u003cp data-start=\"637\" data-end=\"711\"\u003e\u003cstrong data-start=\"637\" data-end=\"658\"\u003eStrong foundation\u003c\/strong\u003e – The core mounting rail for the full Stax system.\u003c\/p\u003e\n\u003c\/li\u003e\n\u003cli data-start=\"712\" data-end=\"776\"\u003e\n\u003cp data-start=\"714\" data-end=\"776\"\u003e\u003cstrong data-start=\"714\" data-end=\"732\"\u003eFlexible setup\u003c\/strong\u003e – Mount to a wall or use on a countertop.\u003c\/p\u003e\n\u003c\/li\u003e\n\u003cli data-start=\"777\" data-end=\"855\"\u003e\n\u003cp data-start=\"779\" data-end=\"855\"\u003e\u003cstrong data-start=\"779\" data-end=\"793\"\u003eExpandable\u003c\/strong\u003e – Add Blocks, Drops, and Bushings as your collection grows.\u003c\/p\u003e\n\u003c\/li\u003e\n\u003c\/ul\u003e\n\u003ch3 data-start=\"857\" data-end=\"875\"\u003eRequirements\u003c\/h3\u003e\n\u003cul data-start=\"876\" data-end=\"960\"\u003e\n\u003cli data-start=\"876\" data-end=\"960\"\u003e\n\u003cp data-start=\"878\" data-end=\"960\"\u003eAt least one \u003cstrong data-start=\"891\" data-end=\"905\"\u003eStax Block\u003c\/strong\u003e or \u003cstrong data-start=\"909\" data-end=\"925\"\u003eStax Bushing\u003c\/strong\u003e is needed to hold dies or tools.\u003c\/p\u003e\n\u003c\/li\u003e\n\u003c\/ul\u003e\n\u003ch3 data-start=\"962\" data-end=\"978\"\u003eIn the box\u003c\/h3\u003e\n\u003cul data-start=\"979\" data-end=\"1050\"\u003e\n\u003cli data-start=\"979\" data-end=\"1050\"\u003e\n\u003cp data-start=\"981\" data-end=\"1050\"\u003e1 × \u003cstrong data-start=\"985\" data-end=\"1001\"\u003eOBi Stax Bar\u003c\/strong\u003e (Blocks, Bushings, and Drops sold separately).\u003c\/p\u003e\n\u003c\/li\u003e\n\u003c\/ul\u003e"}
Translation missing: en.products.product.regular_price
$69.95

-
{"id":7902722850955,"title":"OBi Stax Bushing","handle":"obi-stax-bushing","description":"\u003ch2 data-start=\"2581\" data-end=\"2602\"\u003eOBi Stax Bushing\u003c\/h2\u003e\n\u003cp data-start=\"2604\" data-end=\"2882\"\u003e\u003cstrong data-start=\"2604\" data-end=\"2638\"\u003eSmall parts, perfectly stored.\u003c\/strong\u003e\u003cbr data-start=\"2638\" data-end=\"2641\"\u003eThe \u003cstrong data-start=\"2645\" data-end=\"2665\"\u003eOBi Stax Bushing\u003c\/strong\u003e is purpose-built for the precision pieces that often go missing. It neatly holds \u003cstrong data-start=\"2747\" data-end=\"2827\"\u003etwo neck bushings, one expander ball, and up to two Allen keys or decap pins\u003c\/strong\u003e, keeping them visible and right where you need them.\u003c\/p\u003e\n\u003ch3 data-start=\"2884\" data-end=\"2898\"\u003eFeatures\u003c\/h3\u003e\n\u003cul data-start=\"2899\" data-end=\"3115\"\u003e\n\u003cli data-start=\"2899\" data-end=\"2969\"\u003e\n\u003cp data-start=\"2901\" data-end=\"2969\"\u003e\u003cstrong data-start=\"2901\" data-end=\"2922\"\u003eDedicated storage\u003c\/strong\u003e – Prevents small parts from being misplaced.\u003c\/p\u003e\n\u003c\/li\u003e\n\u003cli data-start=\"2970\" data-end=\"3046\"\u003e\n\u003cp data-start=\"2972\" data-end=\"3046\"\u003e\u003cstrong data-start=\"2972\" data-end=\"2988\"\u003eSystem ready\u003c\/strong\u003e – Mounts to the Stax Bar or sits on a bench with Drops.\u003c\/p\u003e\n\u003c\/li\u003e\n\u003cli data-start=\"3047\" data-end=\"3115\"\u003e\n\u003cp data-start=\"3049\" data-end=\"3115\"\u003e\u003cstrong data-start=\"3049\" data-end=\"3070\"\u003eCompact \u0026amp; modular\u003c\/strong\u003e – Fits seamlessly beside Blocks and Drops.\u003c\/p\u003e\n\u003c\/li\u003e\n\u003c\/ul\u003e\n\u003ch3 data-start=\"3117\" data-end=\"3135\"\u003eRequirements\u003c\/h3\u003e\n\u003cul data-start=\"3136\" data-end=\"3253\"\u003e\n\u003cli data-start=\"3136\" data-end=\"3199\"\u003e\n\u003cp data-start=\"3138\" data-end=\"3199\"\u003eAt least one \u003cstrong data-start=\"3151\" data-end=\"3163\"\u003eStax Bar\u003c\/strong\u003e is required to mount the Bushing.\u003c\/p\u003e\n\u003c\/li\u003e\n\u003cli data-start=\"3200\" data-end=\"3253\"\u003e\n\u003cp data-start=\"3202\" data-end=\"3253\"\u003e\u003cstrong data-start=\"3202\" data-end=\"3216\"\u003eStax Drops\u003c\/strong\u003e recommended for countertop setups.\u003c\/p\u003e\n\u003c\/li\u003e\n\u003c\/ul\u003e\n\u003ch3 data-start=\"3255\" data-end=\"3271\"\u003eIn the box\u003c\/h3\u003e\n\u003cul data-start=\"3272\" data-end=\"3342\"\u003e\n\u003cli data-start=\"3272\" data-end=\"3342\"\u003e\n\u003cp data-start=\"3274\" data-end=\"3342\"\u003e1 × \u003cstrong data-start=\"3278\" data-end=\"3298\"\u003eOBi Stax Bushing\u003c\/strong\u003e (Bar, Blocks, and Drops sold separately).\u003c\/p\u003e\n\u003c\/li\u003e\n\u003c\/ul\u003e","published_at":"2025-09-12T08:05:31+10:00","created_at":"2025-09-12T07:58:58+10:00","vendor":"Australian Tactical","type":"","tags":["OBi","old balls inc","Reloading"],"price":5995,"price_min":5995,"price_max":5995,"available":true,"price_varies":false,"compare_at_price":null,"compare_at_price_min":0,"compare_at_price_max":0,"compare_at_price_varies":false,"variants":[{"id":43996331704459,"title":"Default Title","option1":"Default Title","option2":null,"option3":null,"sku":"StaxBushing","requires_shipping":true,"taxable":true,"featured_image":null,"available":true,"name":"OBi Stax Bushing","public_title":null,"options":["Default Title"],"price":5995,"weight":1000,"compare_at_price":null,"inventory_management":"shopify","barcode":"","requires_selling_plan":false,"selling_plan_allocations":[]}],"images":["\/\/australiantactical.com.au\/cdn\/shop\/files\/Newdiestaxbushing_1080x_f7a45646-1d70-45ee-8002-c0600e3f4cea.png?v=1757627910","\/\/australiantactical.com.au\/cdn\/shop\/files\/Screenshot2023-10-05105900_1080x_28f8f05d-b6c4-4306-bac5-7edb2871b99b.png?v=1757627920","\/\/australiantactical.com.au\/cdn\/shop\/files\/images_17_5756778b-aaf9-488b-9a60-55fda2ef8da8.jpg?v=1757627924","\/\/australiantactical.com.au\/cdn\/shop\/files\/PhotoRoom_20231005_084349_774a1151-0063-491b-826c-78528f3caf65.jpg?v=1757627931","\/\/australiantactical.com.au\/cdn\/shop\/files\/images_18_5055402d-cba2-41be-a021-e19c091b2982.jpg?v=1757627932"],"featured_image":"\/\/australiantactical.com.au\/cdn\/shop\/files\/Newdiestaxbushing_1080x_f7a45646-1d70-45ee-8002-c0600e3f4cea.png?v=1757627910","options":["Title"],"media":[{"alt":null,"id":30111546441867,"position":1,"preview_image":{"aspect_ratio":0.983,"height":1099,"width":1080,"src":"\/\/australiantactical.com.au\/cdn\/shop\/files\/Newdiestaxbushing_1080x_f7a45646-1d70-45ee-8002-c0600e3f4cea.png?v=1757627910"},"aspect_ratio":0.983,"height":1099,"media_type":"image","src":"\/\/australiantactical.com.au\/cdn\/shop\/files\/Newdiestaxbushing_1080x_f7a45646-1d70-45ee-8002-c0600e3f4cea.png?v=1757627910","width":1080},{"alt":null,"id":30111546998923,"position":2,"preview_image":{"aspect_ratio":0.979,"height":804,"width":787,"src":"\/\/australiantactical.com.au\/cdn\/shop\/files\/Screenshot2023-10-05105900_1080x_28f8f05d-b6c4-4306-bac5-7edb2871b99b.png?v=1757627920"},"aspect_ratio":0.979,"height":804,"media_type":"image","src":"\/\/australiantactical.com.au\/cdn\/shop\/files\/Screenshot2023-10-05105900_1080x_28f8f05d-b6c4-4306-bac5-7edb2871b99b.png?v=1757627920","width":787},{"alt":null,"id":30111547457675,"position":3,"preview_image":{"aspect_ratio":1.0,"height":554,"width":554,"src":"\/\/australiantactical.com.au\/cdn\/shop\/files\/images_17_5756778b-aaf9-488b-9a60-55fda2ef8da8.jpg?v=1757627924"},"aspect_ratio":1.0,"height":554,"media_type":"image","src":"\/\/australiantactical.com.au\/cdn\/shop\/files\/images_17_5756778b-aaf9-488b-9a60-55fda2ef8da8.jpg?v=1757627924","width":554},{"alt":null,"id":30111548440715,"position":4,"preview_image":{"aspect_ratio":1.003,"height":1500,"width":1504,"src":"\/\/australiantactical.com.au\/cdn\/shop\/files\/PhotoRoom_20231005_084349_774a1151-0063-491b-826c-78528f3caf65.jpg?v=1757627931"},"aspect_ratio":1.003,"height":1500,"media_type":"image","src":"\/\/australiantactical.com.au\/cdn\/shop\/files\/PhotoRoom_20231005_084349_774a1151-0063-491b-826c-78528f3caf65.jpg?v=1757627931","width":1504},{"alt":null,"id":30111548473483,"position":5,"preview_image":{"aspect_ratio":1.0,"height":554,"width":554,"src":"\/\/australiantactical.com.au\/cdn\/shop\/files\/images_18_5055402d-cba2-41be-a021-e19c091b2982.jpg?v=1757627932"},"aspect_ratio":1.0,"height":554,"media_type":"image","src":"\/\/australiantactical.com.au\/cdn\/shop\/files\/images_18_5055402d-cba2-41be-a021-e19c091b2982.jpg?v=1757627932","width":554}],"requires_selling_plan":false,"selling_plan_groups":[],"content":"\u003ch2 data-start=\"2581\" data-end=\"2602\"\u003eOBi Stax Bushing\u003c\/h2\u003e\n\u003cp data-start=\"2604\" data-end=\"2882\"\u003e\u003cstrong data-start=\"2604\" data-end=\"2638\"\u003eSmall parts, perfectly stored.\u003c\/strong\u003e\u003cbr data-start=\"2638\" data-end=\"2641\"\u003eThe \u003cstrong data-start=\"2645\" data-end=\"2665\"\u003eOBi Stax Bushing\u003c\/strong\u003e is purpose-built for the precision pieces that often go missing. It neatly holds \u003cstrong data-start=\"2747\" data-end=\"2827\"\u003etwo neck bushings, one expander ball, and up to two Allen keys or decap pins\u003c\/strong\u003e, keeping them visible and right where you need them.\u003c\/p\u003e\n\u003ch3 data-start=\"2884\" data-end=\"2898\"\u003eFeatures\u003c\/h3\u003e\n\u003cul data-start=\"2899\" data-end=\"3115\"\u003e\n\u003cli data-start=\"2899\" data-end=\"2969\"\u003e\n\u003cp data-start=\"2901\" data-end=\"2969\"\u003e\u003cstrong data-start=\"2901\" data-end=\"2922\"\u003eDedicated storage\u003c\/strong\u003e – Prevents small parts from being misplaced.\u003c\/p\u003e\n\u003c\/li\u003e\n\u003cli data-start=\"2970\" data-end=\"3046\"\u003e\n\u003cp data-start=\"2972\" data-end=\"3046\"\u003e\u003cstrong data-start=\"2972\" data-end=\"2988\"\u003eSystem ready\u003c\/strong\u003e – Mounts to the Stax Bar or sits on a bench with Drops.\u003c\/p\u003e\n\u003c\/li\u003e\n\u003cli data-start=\"3047\" data-end=\"3115\"\u003e\n\u003cp data-start=\"3049\" data-end=\"3115\"\u003e\u003cstrong data-start=\"3049\" data-end=\"3070\"\u003eCompact \u0026amp; modular\u003c\/strong\u003e – Fits seamlessly beside Blocks and Drops.\u003c\/p\u003e\n\u003c\/li\u003e\n\u003c\/ul\u003e\n\u003ch3 data-start=\"3117\" data-end=\"3135\"\u003eRequirements\u003c\/h3\u003e\n\u003cul data-start=\"3136\" data-end=\"3253\"\u003e\n\u003cli data-start=\"3136\" data-end=\"3199\"\u003e\n\u003cp data-start=\"3138\" data-end=\"3199\"\u003eAt least one \u003cstrong data-start=\"3151\" data-end=\"3163\"\u003eStax Bar\u003c\/strong\u003e is required to mount the Bushing.\u003c\/p\u003e\n\u003c\/li\u003e\n\u003cli data-start=\"3200\" data-end=\"3253\"\u003e\n\u003cp data-start=\"3202\" data-end=\"3253\"\u003e\u003cstrong data-start=\"3202\" data-end=\"3216\"\u003eStax Drops\u003c\/strong\u003e recommended for countertop setups.\u003c\/p\u003e\n\u003c\/li\u003e\n\u003c\/ul\u003e\n\u003ch3 data-start=\"3255\" data-end=\"3271\"\u003eIn the box\u003c\/h3\u003e\n\u003cul data-start=\"3272\" data-end=\"3342\"\u003e\n\u003cli data-start=\"3272\" data-end=\"3342\"\u003e\n\u003cp data-start=\"3274\" data-end=\"3342\"\u003e1 × \u003cstrong data-start=\"3278\" data-end=\"3298\"\u003eOBi Stax Bushing\u003c\/strong\u003e (Bar, Blocks, and Drops sold separately).\u003c\/p\u003e\n\u003c\/li\u003e\n\u003c\/ul\u003e"}
Translation missing: en.products.product.regular_price
$59.95
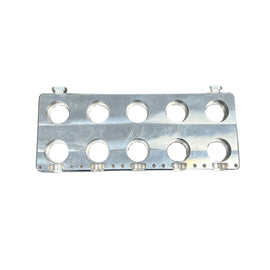
-
{"id":7902720393355,"title":"OBi Block 10","handle":"obi-block-10","description":"\u003ch2 data-start=\"1763\" data-end=\"1785\"\u003eOBi Stax Block 10\u003c\/h2\u003e\n\u003cp data-start=\"1787\" data-end=\"2119\"\u003e\u003cstrong data-start=\"1787\" data-end=\"1818\"\u003eRoom for serious reloaders.\u003c\/strong\u003e\u003cbr data-start=\"1818\" data-end=\"1821\"\u003eThe \u003cstrong data-start=\"1825\" data-end=\"1846\"\u003eOBi Stax Block 10\u003c\/strong\u003e is designed to handle larger die collections with space for up to \u003cstrong data-start=\"1913\" data-end=\"1934\"\u003e10 reloading dies\u003c\/strong\u003e plus accessories like Allen keys or decap pins. It connects directly to the Stax Bar or can rest on a countertop when paired with Stax Drops, keeping everything stable and organised.\u003c\/p\u003e\n\u003ch3 data-start=\"2121\" data-end=\"2135\"\u003eFeatures\u003c\/h3\u003e\n\u003cul data-start=\"2136\" data-end=\"2343\"\u003e\n\u003cli data-start=\"2136\" data-end=\"2198\"\u003e\n\u003cp data-start=\"2138\" data-end=\"2198\"\u003e\u003cstrong data-start=\"2138\" data-end=\"2155\"\u003eHigh capacity\u003c\/strong\u003e – Stores up to 10 dies plus accessories.\u003c\/p\u003e\n\u003c\/li\u003e\n\u003cli data-start=\"2199\" data-end=\"2271\"\u003e\n\u003cp data-start=\"2201\" data-end=\"2271\"\u003e\u003cstrong data-start=\"2201\" data-end=\"2216\"\u003eModular fit\u003c\/strong\u003e – Works with the Stax Bar and Drops for flexibility.\u003c\/p\u003e\n\u003c\/li\u003e\n\u003cli data-start=\"2272\" data-end=\"2343\"\u003e\n\u003cp data-start=\"2274\" data-end=\"2343\"\u003e\u003cstrong data-start=\"2274\" data-end=\"2294\"\u003eEfficient layout\u003c\/strong\u003e – Keeps your tools tidy and within easy reach.\u003c\/p\u003e\n\u003c\/li\u003e\n\u003c\/ul\u003e\n\u003ch3 data-start=\"2345\" data-end=\"2363\"\u003eRequirements\u003c\/h3\u003e\n\u003cul data-start=\"2364\" data-end=\"2479\"\u003e\n\u003cli data-start=\"2364\" data-end=\"2428\"\u003e\n\u003cp data-start=\"2366\" data-end=\"2428\"\u003eAt least one \u003cstrong data-start=\"2379\" data-end=\"2391\"\u003eStax Bar\u003c\/strong\u003e is required to mount the Block 10.\u003c\/p\u003e\n\u003c\/li\u003e\n\u003cli data-start=\"2429\" data-end=\"2479\"\u003e\n\u003cp data-start=\"2431\" data-end=\"2479\"\u003e\u003cstrong data-start=\"2431\" data-end=\"2445\"\u003eStax Drops\u003c\/strong\u003e recommended for countertop use.\u003c\/p\u003e\n\u003c\/li\u003e\n\u003c\/ul\u003e\n\u003ch3 data-start=\"2481\" data-end=\"2497\"\u003eIn the box\u003c\/h3\u003e\n\u003cul data-start=\"2498\" data-end=\"2574\"\u003e\n\u003cli data-start=\"2498\" data-end=\"2574\"\u003e\n\u003cp data-start=\"2500\" data-end=\"2574\"\u003e1 × \u003cstrong data-start=\"2504\" data-end=\"2525\"\u003eOBi Stax Block 10\u003c\/strong\u003e (Bar, Drops, and accessories sold separately).\u003c\/p\u003e\n\u003c\/li\u003e\n\u003c\/ul\u003e","published_at":"2025-09-12T08:05:30+10:00","created_at":"2025-09-12T07:55:24+10:00","vendor":"Australian Tactical","type":"","tags":["OBi","old balls inc","Reloading"],"price":19995,"price_min":19995,"price_max":19995,"available":true,"price_varies":false,"compare_at_price":null,"compare_at_price_min":0,"compare_at_price_max":0,"compare_at_price_varies":false,"variants":[{"id":43996325773451,"title":"Default Title","option1":"Default Title","option2":null,"option3":null,"sku":"StaxBar10","requires_shipping":true,"taxable":true,"featured_image":null,"available":true,"name":"OBi Block 10","public_title":null,"options":["Default Title"],"price":19995,"weight":1000,"compare_at_price":null,"inventory_management":"shopify","barcode":"","requires_selling_plan":false,"selling_plan_allocations":[]}],"images":["\/\/australiantactical.com.au\/cdn\/shop\/files\/NewDiestax10_1400x_f5cab621-4145-427e-bf1b-96977d8eb94c.jpg?v=1757627634","\/\/australiantactical.com.au\/cdn\/shop\/files\/images_17_34acf5bf-b42c-4474-90be-e4b0fece0c0d.jpg?v=1757627637","\/\/australiantactical.com.au\/cdn\/shop\/files\/images_18_2f34bef2-f369-4045-968d-ccbca415cd97.jpg?v=1757627639"],"featured_image":"\/\/australiantactical.com.au\/cdn\/shop\/files\/NewDiestax10_1400x_f5cab621-4145-427e-bf1b-96977d8eb94c.jpg?v=1757627634","options":["Title"],"media":[{"alt":null,"id":30111509446795,"position":1,"preview_image":{"aspect_ratio":1.0,"height":1400,"width":1400,"src":"\/\/australiantactical.com.au\/cdn\/shop\/files\/NewDiestax10_1400x_f5cab621-4145-427e-bf1b-96977d8eb94c.jpg?v=1757627634"},"aspect_ratio":1.0,"height":1400,"media_type":"image","src":"\/\/australiantactical.com.au\/cdn\/shop\/files\/NewDiestax10_1400x_f5cab621-4145-427e-bf1b-96977d8eb94c.jpg?v=1757627634","width":1400},{"alt":null,"id":30111509741707,"position":2,"preview_image":{"aspect_ratio":1.0,"height":554,"width":554,"src":"\/\/australiantactical.com.au\/cdn\/shop\/files\/images_17_34acf5bf-b42c-4474-90be-e4b0fece0c0d.jpg?v=1757627637"},"aspect_ratio":1.0,"height":554,"media_type":"image","src":"\/\/australiantactical.com.au\/cdn\/shop\/files\/images_17_34acf5bf-b42c-4474-90be-e4b0fece0c0d.jpg?v=1757627637","width":554},{"alt":null,"id":30111509840011,"position":3,"preview_image":{"aspect_ratio":1.0,"height":554,"width":554,"src":"\/\/australiantactical.com.au\/cdn\/shop\/files\/images_18_2f34bef2-f369-4045-968d-ccbca415cd97.jpg?v=1757627639"},"aspect_ratio":1.0,"height":554,"media_type":"image","src":"\/\/australiantactical.com.au\/cdn\/shop\/files\/images_18_2f34bef2-f369-4045-968d-ccbca415cd97.jpg?v=1757627639","width":554}],"requires_selling_plan":false,"selling_plan_groups":[],"content":"\u003ch2 data-start=\"1763\" data-end=\"1785\"\u003eOBi Stax Block 10\u003c\/h2\u003e\n\u003cp data-start=\"1787\" data-end=\"2119\"\u003e\u003cstrong data-start=\"1787\" data-end=\"1818\"\u003eRoom for serious reloaders.\u003c\/strong\u003e\u003cbr data-start=\"1818\" data-end=\"1821\"\u003eThe \u003cstrong data-start=\"1825\" data-end=\"1846\"\u003eOBi Stax Block 10\u003c\/strong\u003e is designed to handle larger die collections with space for up to \u003cstrong data-start=\"1913\" data-end=\"1934\"\u003e10 reloading dies\u003c\/strong\u003e plus accessories like Allen keys or decap pins. It connects directly to the Stax Bar or can rest on a countertop when paired with Stax Drops, keeping everything stable and organised.\u003c\/p\u003e\n\u003ch3 data-start=\"2121\" data-end=\"2135\"\u003eFeatures\u003c\/h3\u003e\n\u003cul data-start=\"2136\" data-end=\"2343\"\u003e\n\u003cli data-start=\"2136\" data-end=\"2198\"\u003e\n\u003cp data-start=\"2138\" data-end=\"2198\"\u003e\u003cstrong data-start=\"2138\" data-end=\"2155\"\u003eHigh capacity\u003c\/strong\u003e – Stores up to 10 dies plus accessories.\u003c\/p\u003e\n\u003c\/li\u003e\n\u003cli data-start=\"2199\" data-end=\"2271\"\u003e\n\u003cp data-start=\"2201\" data-end=\"2271\"\u003e\u003cstrong data-start=\"2201\" data-end=\"2216\"\u003eModular fit\u003c\/strong\u003e – Works with the Stax Bar and Drops for flexibility.\u003c\/p\u003e\n\u003c\/li\u003e\n\u003cli data-start=\"2272\" data-end=\"2343\"\u003e\n\u003cp data-start=\"2274\" data-end=\"2343\"\u003e\u003cstrong data-start=\"2274\" data-end=\"2294\"\u003eEfficient layout\u003c\/strong\u003e – Keeps your tools tidy and within easy reach.\u003c\/p\u003e\n\u003c\/li\u003e\n\u003c\/ul\u003e\n\u003ch3 data-start=\"2345\" data-end=\"2363\"\u003eRequirements\u003c\/h3\u003e\n\u003cul data-start=\"2364\" data-end=\"2479\"\u003e\n\u003cli data-start=\"2364\" data-end=\"2428\"\u003e\n\u003cp data-start=\"2366\" data-end=\"2428\"\u003eAt least one \u003cstrong data-start=\"2379\" data-end=\"2391\"\u003eStax Bar\u003c\/strong\u003e is required to mount the Block 10.\u003c\/p\u003e\n\u003c\/li\u003e\n\u003cli data-start=\"2429\" data-end=\"2479\"\u003e\n\u003cp data-start=\"2431\" data-end=\"2479\"\u003e\u003cstrong data-start=\"2431\" data-end=\"2445\"\u003eStax Drops\u003c\/strong\u003e recommended for countertop use.\u003c\/p\u003e\n\u003c\/li\u003e\n\u003c\/ul\u003e\n\u003ch3 data-start=\"2481\" data-end=\"2497\"\u003eIn the box\u003c\/h3\u003e\n\u003cul data-start=\"2498\" data-end=\"2574\"\u003e\n\u003cli data-start=\"2498\" data-end=\"2574\"\u003e\n\u003cp data-start=\"2500\" data-end=\"2574\"\u003e1 × \u003cstrong data-start=\"2504\" data-end=\"2525\"\u003eOBi Stax Block 10\u003c\/strong\u003e (Bar, Drops, and accessories sold separately).\u003c\/p\u003e\n\u003c\/li\u003e\n\u003c\/ul\u003e"}
Translation missing: en.products.product.regular_price
$199.95
-
{"id":7902724456587,"title":"OBi Stax Block","handle":"obi-stax-block","description":"\u003ch2 data-start=\"1057\" data-end=\"1076\"\u003eOBi Stax Block\u003c\/h2\u003e\n\u003cp data-start=\"1078\" data-end=\"1349\"\u003e\u003cstrong data-start=\"1078\" data-end=\"1112\"\u003eThe heart of die organisation.\u003c\/strong\u003e\u003cbr data-start=\"1112\" data-end=\"1115\"\u003eThe \u003cstrong data-start=\"1119\" data-end=\"1137\"\u003eOBi Stax Block\u003c\/strong\u003e is the core module of the system, holding your reloading dies neatly in place. Each Block connects to the Stax Bar and can be combined with other Blocks, Bushings, or Drops for a clean and modular bench setup.\u003c\/p\u003e\n\u003ch3 data-start=\"1351\" data-end=\"1365\"\u003eFeatures\u003c\/h3\u003e\n\u003cul data-start=\"1366\" data-end=\"1585\"\u003e\n\u003cli data-start=\"1366\" data-end=\"1437\"\u003e\n\u003cp data-start=\"1368\" data-end=\"1437\"\u003e\u003cstrong data-start=\"1368\" data-end=\"1386\"\u003eSecure storage\u003c\/strong\u003e – Keeps dies aligned, visible, and ready to use.\u003c\/p\u003e\n\u003c\/li\u003e\n\u003cli data-start=\"1438\" data-end=\"1509\"\u003e\n\u003cp data-start=\"1440\" data-end=\"1509\"\u003e\u003cstrong data-start=\"1440\" data-end=\"1461\"\u003eSystem compatible\u003c\/strong\u003e – Connects to the Stax Bar and scales easily.\u003c\/p\u003e\n\u003c\/li\u003e\n\u003cli data-start=\"1510\" data-end=\"1585\"\u003e\n\u003cp data-start=\"1512\" data-end=\"1585\"\u003e\u003cstrong data-start=\"1512\" data-end=\"1530\"\u003eCompact design\u003c\/strong\u003e – Takes up minimal space while adding maximum order.\u003c\/p\u003e\n\u003c\/li\u003e\n\u003c\/ul\u003e\n\u003ch3 data-start=\"1587\" data-end=\"1605\"\u003eRequirements\u003c\/h3\u003e\n\u003cul data-start=\"1606\" data-end=\"1667\"\u003e\n\u003cli data-start=\"1606\" data-end=\"1667\"\u003e\n\u003cp data-start=\"1608\" data-end=\"1667\"\u003eAt least one \u003cstrong data-start=\"1621\" data-end=\"1633\"\u003eStax Bar\u003c\/strong\u003e is required to mount the Block.\u003c\/p\u003e\n\u003c\/li\u003e\n\u003c\/ul\u003e\n\u003ch3 data-start=\"1669\" data-end=\"1685\"\u003eIn the box\u003c\/h3\u003e\n\u003cul data-start=\"1686\" data-end=\"1756\"\u003e\n\u003cli data-start=\"1686\" data-end=\"1756\"\u003e\n\u003cp data-start=\"1688\" data-end=\"1756\"\u003e1 × \u003cstrong data-start=\"1692\" data-end=\"1710\"\u003eOBi Stax Block\u003c\/strong\u003e (Bar, Bushings, and Drops sold separately).\u003c\/p\u003e\n\u003c\/li\u003e\n\u003c\/ul\u003e","published_at":"2025-09-12T08:05:31+10:00","created_at":"2025-09-12T08:01:01+10:00","vendor":"Australian Tactical","type":"","tags":["OBi","old balls inc","Reloading"],"price":6995,"price_min":6995,"price_max":6995,"available":true,"price_varies":false,"compare_at_price":null,"compare_at_price_min":0,"compare_at_price_max":0,"compare_at_price_varies":false,"variants":[{"id":43996334653579,"title":"Default Title","option1":"Default Title","option2":null,"option3":null,"sku":"StaxBlock","requires_shipping":true,"taxable":true,"featured_image":null,"available":true,"name":"OBi Stax Block","public_title":null,"options":["Default Title"],"price":6995,"weight":1000,"compare_at_price":null,"inventory_management":"shopify","barcode":"","requires_selling_plan":false,"selling_plan_allocations":[]}],"images":["\/\/australiantactical.com.au\/cdn\/shop\/files\/NewDiestax_1080x_9a6e32cb-2f10-4c48-8a41-9d5a9dab8fca.jpg?v=1757628003","\/\/australiantactical.com.au\/cdn\/shop\/files\/images_17_cbc11851-5926-40d6-89b2-3a9b910d59cf.jpg?v=1757628015","\/\/australiantactical.com.au\/cdn\/shop\/files\/images_18_f59b3d49-363f-43ed-b813-ad429258a196.jpg?v=1757628015","\/\/australiantactical.com.au\/cdn\/shop\/files\/PhotoRoom_20231005_084349_d473ebb8-75bf-47a0-b2d4-0e2ddf9a3da3.jpg?v=1757628015"],"featured_image":"\/\/australiantactical.com.au\/cdn\/shop\/files\/NewDiestax_1080x_9a6e32cb-2f10-4c48-8a41-9d5a9dab8fca.jpg?v=1757628003","options":["Title"],"media":[{"alt":null,"id":30111553355915,"position":1,"preview_image":{"aspect_ratio":1.0,"height":1080,"width":1080,"src":"\/\/australiantactical.com.au\/cdn\/shop\/files\/NewDiestax_1080x_9a6e32cb-2f10-4c48-8a41-9d5a9dab8fca.jpg?v=1757628003"},"aspect_ratio":1.0,"height":1080,"media_type":"image","src":"\/\/australiantactical.com.au\/cdn\/shop\/files\/NewDiestax_1080x_9a6e32cb-2f10-4c48-8a41-9d5a9dab8fca.jpg?v=1757628003","width":1080},{"alt":null,"id":30111554306187,"position":2,"preview_image":{"aspect_ratio":1.0,"height":554,"width":554,"src":"\/\/australiantactical.com.au\/cdn\/shop\/files\/images_17_cbc11851-5926-40d6-89b2-3a9b910d59cf.jpg?v=1757628015"},"aspect_ratio":1.0,"height":554,"media_type":"image","src":"\/\/australiantactical.com.au\/cdn\/shop\/files\/images_17_cbc11851-5926-40d6-89b2-3a9b910d59cf.jpg?v=1757628015","width":554},{"alt":null,"id":30111554338955,"position":3,"preview_image":{"aspect_ratio":1.0,"height":554,"width":554,"src":"\/\/australiantactical.com.au\/cdn\/shop\/files\/images_18_f59b3d49-363f-43ed-b813-ad429258a196.jpg?v=1757628015"},"aspect_ratio":1.0,"height":554,"media_type":"image","src":"\/\/australiantactical.com.au\/cdn\/shop\/files\/images_18_f59b3d49-363f-43ed-b813-ad429258a196.jpg?v=1757628015","width":554},{"alt":null,"id":30111554371723,"position":4,"preview_image":{"aspect_ratio":1.003,"height":1500,"width":1504,"src":"\/\/australiantactical.com.au\/cdn\/shop\/files\/PhotoRoom_20231005_084349_d473ebb8-75bf-47a0-b2d4-0e2ddf9a3da3.jpg?v=1757628015"},"aspect_ratio":1.003,"height":1500,"media_type":"image","src":"\/\/australiantactical.com.au\/cdn\/shop\/files\/PhotoRoom_20231005_084349_d473ebb8-75bf-47a0-b2d4-0e2ddf9a3da3.jpg?v=1757628015","width":1504}],"requires_selling_plan":false,"selling_plan_groups":[],"content":"\u003ch2 data-start=\"1057\" data-end=\"1076\"\u003eOBi Stax Block\u003c\/h2\u003e\n\u003cp data-start=\"1078\" data-end=\"1349\"\u003e\u003cstrong data-start=\"1078\" data-end=\"1112\"\u003eThe heart of die organisation.\u003c\/strong\u003e\u003cbr data-start=\"1112\" data-end=\"1115\"\u003eThe \u003cstrong data-start=\"1119\" data-end=\"1137\"\u003eOBi Stax Block\u003c\/strong\u003e is the core module of the system, holding your reloading dies neatly in place. Each Block connects to the Stax Bar and can be combined with other Blocks, Bushings, or Drops for a clean and modular bench setup.\u003c\/p\u003e\n\u003ch3 data-start=\"1351\" data-end=\"1365\"\u003eFeatures\u003c\/h3\u003e\n\u003cul data-start=\"1366\" data-end=\"1585\"\u003e\n\u003cli data-start=\"1366\" data-end=\"1437\"\u003e\n\u003cp data-start=\"1368\" data-end=\"1437\"\u003e\u003cstrong data-start=\"1368\" data-end=\"1386\"\u003eSecure storage\u003c\/strong\u003e – Keeps dies aligned, visible, and ready to use.\u003c\/p\u003e\n\u003c\/li\u003e\n\u003cli data-start=\"1438\" data-end=\"1509\"\u003e\n\u003cp data-start=\"1440\" data-end=\"1509\"\u003e\u003cstrong data-start=\"1440\" data-end=\"1461\"\u003eSystem compatible\u003c\/strong\u003e – Connects to the Stax Bar and scales easily.\u003c\/p\u003e\n\u003c\/li\u003e\n\u003cli data-start=\"1510\" data-end=\"1585\"\u003e\n\u003cp data-start=\"1512\" data-end=\"1585\"\u003e\u003cstrong data-start=\"1512\" data-end=\"1530\"\u003eCompact design\u003c\/strong\u003e – Takes up minimal space while adding maximum order.\u003c\/p\u003e\n\u003c\/li\u003e\n\u003c\/ul\u003e\n\u003ch3 data-start=\"1587\" data-end=\"1605\"\u003eRequirements\u003c\/h3\u003e\n\u003cul data-start=\"1606\" data-end=\"1667\"\u003e\n\u003cli data-start=\"1606\" data-end=\"1667\"\u003e\n\u003cp data-start=\"1608\" data-end=\"1667\"\u003eAt least one \u003cstrong data-start=\"1621\" data-end=\"1633\"\u003eStax Bar\u003c\/strong\u003e is required to mount the Block.\u003c\/p\u003e\n\u003c\/li\u003e\n\u003c\/ul\u003e\n\u003ch3 data-start=\"1669\" data-end=\"1685\"\u003eIn the box\u003c\/h3\u003e\n\u003cul data-start=\"1686\" data-end=\"1756\"\u003e\n\u003cli data-start=\"1686\" data-end=\"1756\"\u003e\n\u003cp data-start=\"1688\" data-end=\"1756\"\u003e1 × \u003cstrong data-start=\"1692\" data-end=\"1710\"\u003eOBi Stax Block\u003c\/strong\u003e (Bar, Bushings, and Drops sold separately).\u003c\/p\u003e\n\u003c\/li\u003e\n\u003c\/ul\u003e"}
Translation missing: en.products.product.regular_price
$69.95

Translation missing: en.products.product.regular_price
$310.00
Sold Out

-
{"id":7563864834187,"title":"4 Bolt rings 34mm Tube 28mm High","handle":"30-28","description":"\u003cp\u003eEngineered and made in Australia by Porter Machine Works. CNC machined from 7075-T651 Aluminium plate and anodised in Sydney. Our rings are designed to mount to MIL STD 1913 picatinny rail.\u003c\/p\u003e","published_at":"2024-10-11T17:09:50+11:00","created_at":"2024-10-11T17:09:51+11:00","vendor":"My Store","type":"","tags":[],"price":31000,"price_min":31000,"price_max":31000,"available":true,"price_varies":false,"compare_at_price":null,"compare_at_price_min":0,"compare_at_price_max":0,"compare_at_price_varies":false,"variants":[{"id":42811553480843,"title":"Default Title","option1":"Default Title","option2":null,"option3":null,"sku":"34-28","requires_shipping":true,"taxable":true,"featured_image":null,"available":true,"name":"4 Bolt rings 34mm Tube 28mm High","public_title":null,"options":["Default Title"],"price":31000,"weight":5000,"compare_at_price":null,"inventory_management":"shopify","barcode":null,"requires_selling_plan":false,"selling_plan_allocations":[]}],"images":["\/\/australiantactical.com.au\/cdn\/shop\/files\/4_Bolt_rings_34mm_Tube_28mm_High_b41398ce-8804-4d6c-b9f1-14e6f6e2ba09.png?v=1728959186","\/\/australiantactical.com.au\/cdn\/shop\/files\/4_Bolt_rings_34mm_Tube_28mm_High_1_dc05c8fc-02e7-4326-9b23-8361882b4cc1.png?v=1728959311","\/\/australiantactical.com.au\/cdn\/shop\/files\/4_Bolt_rings_34mm_Tube_28mm_High_2_cb7df7c1-4cb1-4e5d-a9ba-bd01121e1d67.png?v=1728959311","\/\/australiantactical.com.au\/cdn\/shop\/files\/4_Bolt_rings_34mm_Tube_28mm_High_3_36423e05-7603-44cb-87a2-922f6d311e3e.png?v=1728959311"],"featured_image":"\/\/australiantactical.com.au\/cdn\/shop\/files\/4_Bolt_rings_34mm_Tube_28mm_High_b41398ce-8804-4d6c-b9f1-14e6f6e2ba09.png?v=1728959186","options":["Title"],"media":[{"alt":null,"id":27618062073995,"position":1,"preview_image":{"aspect_ratio":1.0,"height":1024,"width":1024,"src":"\/\/australiantactical.com.au\/cdn\/shop\/files\/4_Bolt_rings_34mm_Tube_28mm_High_b41398ce-8804-4d6c-b9f1-14e6f6e2ba09.png?v=1728959186"},"aspect_ratio":1.0,"height":1024,"media_type":"image","src":"\/\/australiantactical.com.au\/cdn\/shop\/files\/4_Bolt_rings_34mm_Tube_28mm_High_b41398ce-8804-4d6c-b9f1-14e6f6e2ba09.png?v=1728959186","width":1024},{"alt":null,"id":27618074263691,"position":2,"preview_image":{"aspect_ratio":1.0,"height":1024,"width":1024,"src":"\/\/australiantactical.com.au\/cdn\/shop\/files\/4_Bolt_rings_34mm_Tube_28mm_High_1_dc05c8fc-02e7-4326-9b23-8361882b4cc1.png?v=1728959311"},"aspect_ratio":1.0,"height":1024,"media_type":"image","src":"\/\/australiantactical.com.au\/cdn\/shop\/files\/4_Bolt_rings_34mm_Tube_28mm_High_1_dc05c8fc-02e7-4326-9b23-8361882b4cc1.png?v=1728959311","width":1024},{"alt":null,"id":27618074198155,"position":3,"preview_image":{"aspect_ratio":1.0,"height":1024,"width":1024,"src":"\/\/australiantactical.com.au\/cdn\/shop\/files\/4_Bolt_rings_34mm_Tube_28mm_High_2_cb7df7c1-4cb1-4e5d-a9ba-bd01121e1d67.png?v=1728959311"},"aspect_ratio":1.0,"height":1024,"media_type":"image","src":"\/\/australiantactical.com.au\/cdn\/shop\/files\/4_Bolt_rings_34mm_Tube_28mm_High_2_cb7df7c1-4cb1-4e5d-a9ba-bd01121e1d67.png?v=1728959311","width":1024},{"alt":null,"id":27618074165387,"position":4,"preview_image":{"aspect_ratio":1.0,"height":1024,"width":1024,"src":"\/\/australiantactical.com.au\/cdn\/shop\/files\/4_Bolt_rings_34mm_Tube_28mm_High_3_36423e05-7603-44cb-87a2-922f6d311e3e.png?v=1728959311"},"aspect_ratio":1.0,"height":1024,"media_type":"image","src":"\/\/australiantactical.com.au\/cdn\/shop\/files\/4_Bolt_rings_34mm_Tube_28mm_High_3_36423e05-7603-44cb-87a2-922f6d311e3e.png?v=1728959311","width":1024}],"requires_selling_plan":false,"selling_plan_groups":[],"content":"\u003cp\u003eEngineered and made in Australia by Porter Machine Works. CNC machined from 7075-T651 Aluminium plate and anodised in Sydney. Our rings are designed to mount to MIL STD 1913 picatinny rail.\u003c\/p\u003e"}
Translation missing: en.products.product.regular_price
$310.00

-
{"id":7563864801419,"title":"4 Bolt rings 34mm Tube 33mm High","handle":"34-33","description":"\u003cp\u003eEngineered and made in Australia by Porter Machine Works. CNC machined from 7075-T651 Aluminium plate and anodised in Sydney. Our rings are designed to mount to MIL STD 1913 picatinny rail.\u003c\/p\u003e","published_at":"2024-10-11T17:09:48+11:00","created_at":"2024-10-11T17:09:49+11:00","vendor":"My Store","type":"","tags":[],"price":31000,"price_min":31000,"price_max":31000,"available":true,"price_varies":false,"compare_at_price":null,"compare_at_price_min":0,"compare_at_price_max":0,"compare_at_price_varies":false,"variants":[{"id":42811553448075,"title":"Default Title","option1":"Default Title","option2":null,"option3":null,"sku":"34-33","requires_shipping":true,"taxable":true,"featured_image":null,"available":true,"name":"4 Bolt rings 34mm Tube 33mm High","public_title":null,"options":["Default Title"],"price":31000,"weight":5000,"compare_at_price":null,"inventory_management":"shopify","barcode":null,"requires_selling_plan":false,"selling_plan_allocations":[]}],"images":["\/\/australiantactical.com.au\/cdn\/shop\/files\/4_Bolt_rings_34mm_Tube_33mm_High_1ff49e3e-ce48-4a99-9451-61e306928efd.png?v=1728959464","\/\/australiantactical.com.au\/cdn\/shop\/files\/4_Bolt_rings_34mm_Tube_33mm_High_2_c8b1290f-a440-46b9-9918-638ff9759c9e.png?v=1728959489","\/\/australiantactical.com.au\/cdn\/shop\/files\/4_Bolt_rings_34mm_Tube_33mm_High_1_b5abecdf-8b47-4f17-8e44-b32a558e568e.png?v=1728959489","\/\/australiantactical.com.au\/cdn\/shop\/files\/4_Bolt_rings_34mm_Tube_33mm_High_3_05f1cf45-40bd-486d-817c-9c0191a919ec.png?v=1728959489"],"featured_image":"\/\/australiantactical.com.au\/cdn\/shop\/files\/4_Bolt_rings_34mm_Tube_33mm_High_1ff49e3e-ce48-4a99-9451-61e306928efd.png?v=1728959464","options":["Title"],"media":[{"alt":null,"id":27618087698571,"position":1,"preview_image":{"aspect_ratio":1.0,"height":1024,"width":1024,"src":"\/\/australiantactical.com.au\/cdn\/shop\/files\/4_Bolt_rings_34mm_Tube_33mm_High_1ff49e3e-ce48-4a99-9451-61e306928efd.png?v=1728959464"},"aspect_ratio":1.0,"height":1024,"media_type":"image","src":"\/\/australiantactical.com.au\/cdn\/shop\/files\/4_Bolt_rings_34mm_Tube_33mm_High_1ff49e3e-ce48-4a99-9451-61e306928efd.png?v=1728959464","width":1024},{"alt":null,"id":27618089140363,"position":2,"preview_image":{"aspect_ratio":1.0,"height":1024,"width":1024,"src":"\/\/australiantactical.com.au\/cdn\/shop\/files\/4_Bolt_rings_34mm_Tube_33mm_High_2_c8b1290f-a440-46b9-9918-638ff9759c9e.png?v=1728959489"},"aspect_ratio":1.0,"height":1024,"media_type":"image","src":"\/\/australiantactical.com.au\/cdn\/shop\/files\/4_Bolt_rings_34mm_Tube_33mm_High_2_c8b1290f-a440-46b9-9918-638ff9759c9e.png?v=1728959489","width":1024},{"alt":null,"id":27618089173131,"position":3,"preview_image":{"aspect_ratio":1.0,"height":1024,"width":1024,"src":"\/\/australiantactical.com.au\/cdn\/shop\/files\/4_Bolt_rings_34mm_Tube_33mm_High_1_b5abecdf-8b47-4f17-8e44-b32a558e568e.png?v=1728959489"},"aspect_ratio":1.0,"height":1024,"media_type":"image","src":"\/\/australiantactical.com.au\/cdn\/shop\/files\/4_Bolt_rings_34mm_Tube_33mm_High_1_b5abecdf-8b47-4f17-8e44-b32a558e568e.png?v=1728959489","width":1024},{"alt":null,"id":27618089205899,"position":4,"preview_image":{"aspect_ratio":1.0,"height":1024,"width":1024,"src":"\/\/australiantactical.com.au\/cdn\/shop\/files\/4_Bolt_rings_34mm_Tube_33mm_High_3_05f1cf45-40bd-486d-817c-9c0191a919ec.png?v=1728959489"},"aspect_ratio":1.0,"height":1024,"media_type":"image","src":"\/\/australiantactical.com.au\/cdn\/shop\/files\/4_Bolt_rings_34mm_Tube_33mm_High_3_05f1cf45-40bd-486d-817c-9c0191a919ec.png?v=1728959489","width":1024}],"requires_selling_plan":false,"selling_plan_groups":[],"content":"\u003cp\u003eEngineered and made in Australia by Porter Machine Works. CNC machined from 7075-T651 Aluminium plate and anodised in Sydney. Our rings are designed to mount to MIL STD 1913 picatinny rail.\u003c\/p\u003e"}
Translation missing: en.products.product.regular_price
$310.00

-
{"id":7576972525707,"title":"4 Bolt Unimount 30mm Tube 30mm High 0 Cant","handle":"4-bolt-unimount-30mm-tube-30mm-high-0-cant","description":"\u003cp\u003e\u003cspan\u003eEngineered and made in Australia by Porter Machine Works. CNC machined from 7075-T651 Aluminium plate and anodised in Sydney. Our rings are designed to mount to MIL STD 1913 picatinny rail.\u003c\/span\u003e\u003c\/p\u003e","published_at":"2024-11-04T19:10:44+11:00","created_at":"2024-11-04T19:10:44+11:00","vendor":"My Store","type":"","tags":[],"price":39000,"price_min":39000,"price_max":39000,"available":true,"price_varies":false,"compare_at_price":null,"compare_at_price_min":0,"compare_at_price_max":0,"compare_at_price_varies":false,"variants":[{"id":42857399124107,"title":"Default Title","option1":"Default Title","option2":null,"option3":null,"sku":"30-30-0","requires_shipping":true,"taxable":true,"featured_image":null,"available":true,"name":"4 Bolt Unimount 30mm Tube 30mm High 0 Cant","public_title":null,"options":["Default Title"],"price":39000,"weight":5000,"compare_at_price":null,"inventory_management":"shopify","barcode":"","requires_selling_plan":false,"selling_plan_allocations":[]}],"images":["\/\/australiantactical.com.au\/cdn\/shop\/files\/1.webp?v=1730871981","\/\/australiantactical.com.au\/cdn\/shop\/files\/2.webp?v=1730871981","\/\/australiantactical.com.au\/cdn\/shop\/files\/3.webp?v=1730871981"],"featured_image":"\/\/australiantactical.com.au\/cdn\/shop\/files\/1.webp?v=1730871981","options":["Title"],"media":[{"alt":null,"id":27730601803915,"position":1,"preview_image":{"aspect_ratio":1.0,"height":1946,"width":1946,"src":"\/\/australiantactical.com.au\/cdn\/shop\/files\/1.webp?v=1730871981"},"aspect_ratio":1.0,"height":1946,"media_type":"image","src":"\/\/australiantactical.com.au\/cdn\/shop\/files\/1.webp?v=1730871981","width":1946},{"alt":null,"id":27730601869451,"position":2,"preview_image":{"aspect_ratio":1.269,"height":1533,"width":1946,"src":"\/\/australiantactical.com.au\/cdn\/shop\/files\/2.webp?v=1730871981"},"aspect_ratio":1.269,"height":1533,"media_type":"image","src":"\/\/australiantactical.com.au\/cdn\/shop\/files\/2.webp?v=1730871981","width":1946},{"alt":null,"id":27730601836683,"position":3,"preview_image":{"aspect_ratio":1.666,"height":1168,"width":1946,"src":"\/\/australiantactical.com.au\/cdn\/shop\/files\/3.webp?v=1730871981"},"aspect_ratio":1.666,"height":1168,"media_type":"image","src":"\/\/australiantactical.com.au\/cdn\/shop\/files\/3.webp?v=1730871981","width":1946}],"requires_selling_plan":false,"selling_plan_groups":[],"content":"\u003cp\u003e\u003cspan\u003eEngineered and made in Australia by Porter Machine Works. CNC machined from 7075-T651 Aluminium plate and anodised in Sydney. Our rings are designed to mount to MIL STD 1913 picatinny rail.\u003c\/span\u003e\u003c\/p\u003e"}
Translation missing: en.products.product.regular_price
$390.00

-
{"id":7859981582475,"title":"Deadweight 315 - Brass weights","handle":"deadweight-315-brass-weights","description":"\u003cp class=\"MsoNormal\"\u003e\u003cb\u003eAustralian Tactical Deadweight 315 (Set of 2)\u003c\/b\u003e\u003c\/p\u003e\n\u003cp class=\"MsoNormal\"\u003eProudly Australian-made, these solid brass weights are built for shooters who demand performance, precision, and a premium finish. Each set weighs in at 630 grams and includes two weights, each measuring 85mm long, 30mm wide, and 17mm deep.\u003c\/p\u003e\n\u003cp class=\"MsoNormal\"\u003eDesigned to mount easily with included M-LOK fixings, these weights help balance your rifle exactly how you like it—whether you're dialing in for competition or chasing ultimate stability. Finished with the Australian Tactical logo, these weights don't just perform, they look the part too.\u003c\/p\u003e\n\u003cp class=\"MsoNormal\"\u003ePerfect for PRS, NRL22, or any precision setup where balance matters.\u003c\/p\u003e","published_at":"2025-07-24T20:04:56+10:00","created_at":"2025-07-24T20:04:53+10:00","vendor":"Australian Tactical","type":"","tags":[],"price":12900,"price_min":12900,"price_max":12900,"available":true,"price_varies":false,"compare_at_price":null,"compare_at_price_min":0,"compare_at_price_max":0,"compare_at_price_varies":false,"variants":[{"id":43669643952267,"title":"Default Title","option1":"Default Title","option2":null,"option3":null,"sku":"Deadweight315","requires_shipping":true,"taxable":true,"featured_image":null,"available":true,"name":"Deadweight 315 - Brass weights","public_title":null,"options":["Default Title"],"price":12900,"weight":1000,"compare_at_price":null,"inventory_management":"shopify","barcode":"","requires_selling_plan":false,"selling_plan_allocations":[]}],"images":["\/\/australiantactical.com.au\/cdn\/shop\/files\/Messenger_creation_E745556D-047D-4E18-A25C-09064DE25511.jpg?v=1753351399","\/\/australiantactical.com.au\/cdn\/shop\/files\/20250724_194920.jpg?v=1753351407"],"featured_image":"\/\/australiantactical.com.au\/cdn\/shop\/files\/Messenger_creation_E745556D-047D-4E18-A25C-09064DE25511.jpg?v=1753351399","options":["Title"],"media":[{"alt":null,"id":29711095267467,"position":1,"preview_image":{"aspect_ratio":0.75,"height":1024,"width":768,"src":"\/\/australiantactical.com.au\/cdn\/shop\/files\/Messenger_creation_E745556D-047D-4E18-A25C-09064DE25511.jpg?v=1753351399"},"aspect_ratio":0.75,"height":1024,"media_type":"image","src":"\/\/australiantactical.com.au\/cdn\/shop\/files\/Messenger_creation_E745556D-047D-4E18-A25C-09064DE25511.jpg?v=1753351399","width":768},{"alt":null,"id":29711095300235,"position":2,"preview_image":{"aspect_ratio":1.333,"height":3000,"width":4000,"src":"\/\/australiantactical.com.au\/cdn\/shop\/files\/20250724_194920.jpg?v=1753351407"},"aspect_ratio":1.333,"height":3000,"media_type":"image","src":"\/\/australiantactical.com.au\/cdn\/shop\/files\/20250724_194920.jpg?v=1753351407","width":4000}],"requires_selling_plan":false,"selling_plan_groups":[],"content":"\u003cp class=\"MsoNormal\"\u003e\u003cb\u003eAustralian Tactical Deadweight 315 (Set of 2)\u003c\/b\u003e\u003c\/p\u003e\n\u003cp class=\"MsoNormal\"\u003eProudly Australian-made, these solid brass weights are built for shooters who demand performance, precision, and a premium finish. Each set weighs in at 630 grams and includes two weights, each measuring 85mm long, 30mm wide, and 17mm deep.\u003c\/p\u003e\n\u003cp class=\"MsoNormal\"\u003eDesigned to mount easily with included M-LOK fixings, these weights help balance your rifle exactly how you like it—whether you're dialing in for competition or chasing ultimate stability. Finished with the Australian Tactical logo, these weights don't just perform, they look the part too.\u003c\/p\u003e\n\u003cp class=\"MsoNormal\"\u003ePerfect for PRS, NRL22, or any precision setup where balance matters.\u003c\/p\u003e"}
Translation missing: en.products.product.regular_price
$129.00

-
{"id":7843902423179,"title":"Ghost board - Data Card Holder","handle":"at-data-card-holder","description":"\u003cp\u003e\u003cstrong data-start=\"76\" data-end=\"140\"\u003eStay on Target with Precision – Aussie-Made Data Card Holder\u003c\/strong\u003e\u003cbr data-start=\"140\" data-end=\"143\"\u003eDesigned for PRS and NRL22 competitors, this rugged, resin-printed data card holder keeps your dope right where you need it. Built tough in Australia to handle the harshest conditions, each holder comes with \u003cstrong data-start=\"351\" data-end=\"376\"\u003e5 reusable data cards\u003c\/strong\u003e—perfect for stage planning and quick reference. Compact, durable, and made for shooters who don’t miss the details.\u003c\/p\u003e","published_at":"2025-06-29T18:50:14+10:00","created_at":"2025-06-29T18:50:14+10:00","vendor":"Australian Tactical","type":"","tags":[],"price":4500,"price_min":4500,"price_max":4500,"available":true,"price_varies":false,"compare_at_price":null,"compare_at_price_min":0,"compare_at_price_max":0,"compare_at_price_varies":false,"variants":[{"id":43609526141067,"title":"Default Title","option1":"Default Title","option2":null,"option3":null,"sku":"ATDCH","requires_shipping":true,"taxable":true,"featured_image":null,"available":true,"name":"Ghost board - Data Card Holder","public_title":null,"options":["Default Title"],"price":4500,"weight":1000,"compare_at_price":null,"inventory_management":"shopify","barcode":"","requires_selling_plan":false,"selling_plan_allocations":[]}],"images":["\/\/australiantactical.com.au\/cdn\/shop\/files\/20250615_151216.jpg?v=1751186931","\/\/australiantactical.com.au\/cdn\/shop\/files\/20250615_151205.jpg?v=1751186934","\/\/australiantactical.com.au\/cdn\/shop\/files\/20250615_151135.jpg?v=1751186944"],"featured_image":"\/\/australiantactical.com.au\/cdn\/shop\/files\/20250615_151216.jpg?v=1751186931","options":["Title"],"media":[{"alt":null,"id":29168425173131,"position":1,"preview_image":{"aspect_ratio":1.333,"height":3000,"width":4000,"src":"\/\/australiantactical.com.au\/cdn\/shop\/files\/20250615_151216.jpg?v=1751186931"},"aspect_ratio":1.333,"height":3000,"media_type":"image","src":"\/\/australiantactical.com.au\/cdn\/shop\/files\/20250615_151216.jpg?v=1751186931","width":4000},{"alt":null,"id":29168425205899,"position":2,"preview_image":{"aspect_ratio":1.333,"height":3000,"width":4000,"src":"\/\/australiantactical.com.au\/cdn\/shop\/files\/20250615_151205.jpg?v=1751186934"},"aspect_ratio":1.333,"height":3000,"media_type":"image","src":"\/\/australiantactical.com.au\/cdn\/shop\/files\/20250615_151205.jpg?v=1751186934","width":4000},{"alt":null,"id":29168425238667,"position":3,"preview_image":{"aspect_ratio":0.75,"height":4000,"width":3000,"src":"\/\/australiantactical.com.au\/cdn\/shop\/files\/20250615_151135.jpg?v=1751186944"},"aspect_ratio":0.75,"height":4000,"media_type":"image","src":"\/\/australiantactical.com.au\/cdn\/shop\/files\/20250615_151135.jpg?v=1751186944","width":3000}],"requires_selling_plan":false,"selling_plan_groups":[],"content":"\u003cp\u003e\u003cstrong data-start=\"76\" data-end=\"140\"\u003eStay on Target with Precision – Aussie-Made Data Card Holder\u003c\/strong\u003e\u003cbr data-start=\"140\" data-end=\"143\"\u003eDesigned for PRS and NRL22 competitors, this rugged, resin-printed data card holder keeps your dope right where you need it. Built tough in Australia to handle the harshest conditions, each holder comes with \u003cstrong data-start=\"351\" data-end=\"376\"\u003e5 reusable data cards\u003c\/strong\u003e—perfect for stage planning and quick reference. Compact, durable, and made for shooters who don’t miss the details.\u003c\/p\u003e"}
Translation missing: en.products.product.regular_price
$45.00

-
{"id":7575920410763,"title":"MANAEL Action Wrench Tool","handle":"man_acw","description":"\u003cp\u003e\u003cspan\u003eAction Wrench made by MANAEL Easily change barrels on your bolt action rifle with these 100% Australian Made action wrenches. No cheap imported junk. Billet machined from cromo steel. Made by Aussie shooters for Aussie shooters seeking quality and strength in their gear. The MANAEL Action Wrench is compatible for both long and short actions. Remington 700 model features a universal fit design, meaning its also fully compatible with leading clone rifle action brands such as Defiance, Zermatt, Curtis, Impact Precision, Bighorn, Stiller, Surgeon, Ultimatum, etc.\u003c\/span\u003e\u003c\/p\u003e\n\u003cp\u003e\u003cspan\u003e\u003cstrong\u003ePlease note that many Manael items are drop-shipped, so stock levels may change without notice. I’ll do my best to keep you informed promptly if any issues arise.\u003c\/strong\u003e\u003c\/span\u003e\u003c\/p\u003e","published_at":"2024-11-07T11:34:34+11:00","created_at":"2024-11-01T15:50:42+11:00","vendor":"My Store","type":"","tags":[],"price":15000,"price_min":15000,"price_max":15000,"available":true,"price_varies":false,"compare_at_price":null,"compare_at_price_min":0,"compare_at_price_max":0,"compare_at_price_varies":false,"variants":[{"id":42874498023563,"title":"Default Title","option1":"Default Title","option2":null,"option3":null,"sku":"MAN_ACW-1","requires_shipping":true,"taxable":true,"featured_image":null,"available":true,"name":"MANAEL Action Wrench Tool","public_title":null,"options":["Default Title"],"price":15000,"weight":0,"compare_at_price":null,"inventory_management":"shopify","barcode":"","requires_selling_plan":false,"selling_plan_allocations":[]}],"images":["\/\/australiantactical.com.au\/cdn\/shop\/files\/mainimage_582e5d84-e11f-4af4-9b68-8920d6d413a1.png?v=1730879088","\/\/australiantactical.com.au\/cdn\/shop\/files\/2_2a30c9c6-81e7-4c43-9736-f55c4cff3aa2.png?v=1730879088","\/\/australiantactical.com.au\/cdn\/shop\/files\/3_acc0ee56-8850-4922-a58e-9a7502aa80ef.png?v=1730879088","\/\/australiantactical.com.au\/cdn\/shop\/files\/4_fd56eb24-2c38-40e0-9ce6-eb95e701c887.png?v=1730879088"],"featured_image":"\/\/australiantactical.com.au\/cdn\/shop\/files\/mainimage_582e5d84-e11f-4af4-9b68-8920d6d413a1.png?v=1730879088","options":["Title"],"media":[{"alt":null,"id":27731419988107,"position":1,"preview_image":{"aspect_ratio":1.0,"height":1023,"width":1023,"src":"\/\/australiantactical.com.au\/cdn\/shop\/files\/mainimage_582e5d84-e11f-4af4-9b68-8920d6d413a1.png?v=1730879088"},"aspect_ratio":1.0,"height":1023,"media_type":"image","src":"\/\/australiantactical.com.au\/cdn\/shop\/files\/mainimage_582e5d84-e11f-4af4-9b68-8920d6d413a1.png?v=1730879088","width":1023},{"alt":null,"id":27731420020875,"position":2,"preview_image":{"aspect_ratio":1.0,"height":1023,"width":1023,"src":"\/\/australiantactical.com.au\/cdn\/shop\/files\/2_2a30c9c6-81e7-4c43-9736-f55c4cff3aa2.png?v=1730879088"},"aspect_ratio":1.0,"height":1023,"media_type":"image","src":"\/\/australiantactical.com.au\/cdn\/shop\/files\/2_2a30c9c6-81e7-4c43-9736-f55c4cff3aa2.png?v=1730879088","width":1023},{"alt":null,"id":27731420053643,"position":3,"preview_image":{"aspect_ratio":1.0,"height":1023,"width":1023,"src":"\/\/australiantactical.com.au\/cdn\/shop\/files\/3_acc0ee56-8850-4922-a58e-9a7502aa80ef.png?v=1730879088"},"aspect_ratio":1.0,"height":1023,"media_type":"image","src":"\/\/australiantactical.com.au\/cdn\/shop\/files\/3_acc0ee56-8850-4922-a58e-9a7502aa80ef.png?v=1730879088","width":1023},{"alt":null,"id":27731419955339,"position":4,"preview_image":{"aspect_ratio":1.0,"height":1024,"width":1024,"src":"\/\/australiantactical.com.au\/cdn\/shop\/files\/4_fd56eb24-2c38-40e0-9ce6-eb95e701c887.png?v=1730879088"},"aspect_ratio":1.0,"height":1024,"media_type":"image","src":"\/\/australiantactical.com.au\/cdn\/shop\/files\/4_fd56eb24-2c38-40e0-9ce6-eb95e701c887.png?v=1730879088","width":1024}],"requires_selling_plan":false,"selling_plan_groups":[],"content":"\u003cp\u003e\u003cspan\u003eAction Wrench made by MANAEL Easily change barrels on your bolt action rifle with these 100% Australian Made action wrenches. No cheap imported junk. Billet machined from cromo steel. Made by Aussie shooters for Aussie shooters seeking quality and strength in their gear. The MANAEL Action Wrench is compatible for both long and short actions. Remington 700 model features a universal fit design, meaning its also fully compatible with leading clone rifle action brands such as Defiance, Zermatt, Curtis, Impact Precision, Bighorn, Stiller, Surgeon, Ultimatum, etc.\u003c\/span\u003e\u003c\/p\u003e\n\u003cp\u003e\u003cspan\u003e\u003cstrong\u003ePlease note that many Manael items are drop-shipped, so stock levels may change without notice. I’ll do my best to keep you informed promptly if any issues arise.\u003c\/strong\u003e\u003c\/span\u003e\u003c\/p\u003e"}
Translation missing: en.products.product.regular_price
$150.00

-
{"id":7575920017547,"title":"MANAEL Arca Swiss Rail - 10cm \/ 3.9″ (1 Mlok slot)","handle":"man_acr-rail-10cm","description":"\u003cp\u003e\u003cspan\u003eTougher than the rest. MANAEL don’t muck around. We were sick of gear that couldn’t stand up to what we were throwing at it. So we made our own. Run your hard gear into competition knowing MANAEL Arca Swiss Rails have your back. Thicker and stronger, they are available in 5 sizes to suit every set up. Being 100% Aussie made you’re guaranteed best quality and better aftermarket care than imports. Universal fit for all rifles Every rail is built to the RRS standards and quality checked so you can mount your gear with confidence. MANAEL Arca Rails are compatible with almost every rifle stock and chassis, thanks to long M-lok slots and all fitting hardware. 100% Aussie Tough Billet machined from premium materials, proudly 100% Australian made and quality tested in-house at our specialist Australian workshop. Our products go through endless testing to make sure they deliver on its promise to handle anything you throw at it.\u003c\/span\u003e\u003c\/p\u003e\n\u003cp\u003e\u003cspan\u003e\u003cstrong\u003ePlease note that many Manael items are drop-shipped, so stock levels may change without notice. I’ll do my best to keep you informed promptly if any issues arise.\u003c\/strong\u003e\u003c\/span\u003e\u003c\/p\u003e","published_at":"2024-11-07T11:35:04+11:00","created_at":"2024-11-01T15:50:32+11:00","vendor":"My Store","type":"","tags":[],"price":10500,"price_min":10500,"price_max":10500,"available":true,"price_varies":false,"compare_at_price":null,"compare_at_price_min":0,"compare_at_price_max":0,"compare_at_price_varies":false,"variants":[{"id":42874505527435,"title":"Default Title","option1":"Default Title","option2":null,"option3":null,"sku":"MAN_ACR-Rail-10cm-1","requires_shipping":true,"taxable":true,"featured_image":null,"available":true,"name":"MANAEL Arca Swiss Rail - 10cm \/ 3.9″ (1 Mlok slot)","public_title":null,"options":["Default Title"],"price":10500,"weight":1000,"compare_at_price":null,"inventory_management":"shopify","barcode":"","requires_selling_plan":false,"selling_plan_allocations":[]}],"images":["\/\/australiantactical.com.au\/cdn\/shop\/files\/mainimage_8f217d2f-b465-4921-9544-c326f77e311f.png?v=1730877672","\/\/australiantactical.com.au\/cdn\/shop\/files\/2_33539023-2e85-4c1c-bea1-cb2225850470.png?v=1730877672","\/\/australiantactical.com.au\/cdn\/shop\/files\/3_d7bb5deb-a4dd-405c-bd34-dec5f9c2f768.png?v=1730877672","\/\/australiantactical.com.au\/cdn\/shop\/files\/4_27c2ac65-a182-4b42-94a0-a937e7c9c0c6.png?v=1730877672","\/\/australiantactical.com.au\/cdn\/shop\/files\/5_0fe47006-b0c0-45c8-9414-eec05709040d.png?v=1730877672","\/\/australiantactical.com.au\/cdn\/shop\/files\/6_74e680c9-93d7-4935-993b-6e5529c90970.png?v=1730877672"],"featured_image":"\/\/australiantactical.com.au\/cdn\/shop\/files\/mainimage_8f217d2f-b465-4921-9544-c326f77e311f.png?v=1730877672","options":["Title"],"media":[{"alt":null,"id":27731323551883,"position":1,"preview_image":{"aspect_ratio":1.0,"height":1024,"width":1024,"src":"\/\/australiantactical.com.au\/cdn\/shop\/files\/mainimage_8f217d2f-b465-4921-9544-c326f77e311f.png?v=1730877672"},"aspect_ratio":1.0,"height":1024,"media_type":"image","src":"\/\/australiantactical.com.au\/cdn\/shop\/files\/mainimage_8f217d2f-b465-4921-9544-c326f77e311f.png?v=1730877672","width":1024},{"alt":null,"id":27731323388043,"position":2,"preview_image":{"aspect_ratio":1.0,"height":1024,"width":1024,"src":"\/\/australiantactical.com.au\/cdn\/shop\/files\/2_33539023-2e85-4c1c-bea1-cb2225850470.png?v=1730877672"},"aspect_ratio":1.0,"height":1024,"media_type":"image","src":"\/\/australiantactical.com.au\/cdn\/shop\/files\/2_33539023-2e85-4c1c-bea1-cb2225850470.png?v=1730877672","width":1024},{"alt":null,"id":27731323420811,"position":3,"preview_image":{"aspect_ratio":1.0,"height":1024,"width":1024,"src":"\/\/australiantactical.com.au\/cdn\/shop\/files\/3_d7bb5deb-a4dd-405c-bd34-dec5f9c2f768.png?v=1730877672"},"aspect_ratio":1.0,"height":1024,"media_type":"image","src":"\/\/australiantactical.com.au\/cdn\/shop\/files\/3_d7bb5deb-a4dd-405c-bd34-dec5f9c2f768.png?v=1730877672","width":1024},{"alt":null,"id":27731323453579,"position":4,"preview_image":{"aspect_ratio":1.0,"height":1024,"width":1024,"src":"\/\/australiantactical.com.au\/cdn\/shop\/files\/4_27c2ac65-a182-4b42-94a0-a937e7c9c0c6.png?v=1730877672"},"aspect_ratio":1.0,"height":1024,"media_type":"image","src":"\/\/australiantactical.com.au\/cdn\/shop\/files\/4_27c2ac65-a182-4b42-94a0-a937e7c9c0c6.png?v=1730877672","width":1024},{"alt":null,"id":27731323486347,"position":5,"preview_image":{"aspect_ratio":1.0,"height":1024,"width":1024,"src":"\/\/australiantactical.com.au\/cdn\/shop\/files\/5_0fe47006-b0c0-45c8-9414-eec05709040d.png?v=1730877672"},"aspect_ratio":1.0,"height":1024,"media_type":"image","src":"\/\/australiantactical.com.au\/cdn\/shop\/files\/5_0fe47006-b0c0-45c8-9414-eec05709040d.png?v=1730877672","width":1024},{"alt":null,"id":27731323519115,"position":6,"preview_image":{"aspect_ratio":1.0,"height":1023,"width":1023,"src":"\/\/australiantactical.com.au\/cdn\/shop\/files\/6_74e680c9-93d7-4935-993b-6e5529c90970.png?v=1730877672"},"aspect_ratio":1.0,"height":1023,"media_type":"image","src":"\/\/australiantactical.com.au\/cdn\/shop\/files\/6_74e680c9-93d7-4935-993b-6e5529c90970.png?v=1730877672","width":1023}],"requires_selling_plan":false,"selling_plan_groups":[],"content":"\u003cp\u003e\u003cspan\u003eTougher than the rest. MANAEL don’t muck around. We were sick of gear that couldn’t stand up to what we were throwing at it. So we made our own. Run your hard gear into competition knowing MANAEL Arca Swiss Rails have your back. Thicker and stronger, they are available in 5 sizes to suit every set up. Being 100% Aussie made you’re guaranteed best quality and better aftermarket care than imports. Universal fit for all rifles Every rail is built to the RRS standards and quality checked so you can mount your gear with confidence. MANAEL Arca Rails are compatible with almost every rifle stock and chassis, thanks to long M-lok slots and all fitting hardware. 100% Aussie Tough Billet machined from premium materials, proudly 100% Australian made and quality tested in-house at our specialist Australian workshop. Our products go through endless testing to make sure they deliver on its promise to handle anything you throw at it.\u003c\/span\u003e\u003c\/p\u003e\n\u003cp\u003e\u003cspan\u003e\u003cstrong\u003ePlease note that many Manael items are drop-shipped, so stock levels may change without notice. I’ll do my best to keep you informed promptly if any issues arise.\u003c\/strong\u003e\u003c\/span\u003e\u003c\/p\u003e"}
Translation missing: en.products.product.regular_price
$105.00

-
{"id":7575920050315,"title":"MANAEL Arca Swiss Rail - 17.5cm \/ 6.8″ (2 Mlok slots)","handle":"man_acr-rail-17cm","description":"\u003cp\u003e\u003cspan\u003eTougher than the rest. MANAEL don’t muck around. We were sick of gear that couldn’t stand up to what we were throwing at it. So we made our own. Run your hard gear into competition knowing MANAEL Arca Swiss Rails have your back. Thicker and stronger, they are available in 5 sizes to suit every set up. Being 100% Aussie made you’re guaranteed best quality and better aftermarket care than imports. Universal fit for all rifles Every rail is built to the RRS standards and quality checked so you can mount your gear with confidence. MANAEL Arca Rails are compatible with almost every rifle stock and chassis, thanks to long M-lok slots and all fitting hardware. 100% Aussie Tough Billet machined from premium materials, proudly 100% Australian made and quality tested in-house at our specialist Australian workshop. Our products go through endless testing to make sure they deliver on its promise to handle anything you throw at it.\u003c\/span\u003e\u003c\/p\u003e\n\u003cp\u003e\u003cspan\u003e\u003cstrong\u003ePlease note that many Manael items are drop-shipped, so stock levels may change without notice. I’ll do my best to keep you informed promptly if any issues arise.\u003c\/strong\u003e\u003c\/span\u003e\u003c\/p\u003e","published_at":"2024-11-07T11:35:11+11:00","created_at":"2024-11-01T15:50:33+11:00","vendor":"My Store","type":"","tags":[],"price":11800,"price_min":11800,"price_max":11800,"available":true,"price_varies":false,"compare_at_price":null,"compare_at_price_min":0,"compare_at_price_max":0,"compare_at_price_varies":false,"variants":[{"id":42874506215563,"title":"Default Title","option1":"Default Title","option2":null,"option3":null,"sku":"MAN_ACR-Rail-17cm-1","requires_shipping":true,"taxable":true,"featured_image":null,"available":true,"name":"MANAEL Arca Swiss Rail - 17.5cm \/ 6.8″ (2 Mlok slots)","public_title":null,"options":["Default Title"],"price":11800,"weight":1000,"compare_at_price":null,"inventory_management":"shopify","barcode":"","requires_selling_plan":false,"selling_plan_allocations":[]}],"images":["\/\/australiantactical.com.au\/cdn\/shop\/files\/mainimage_65fe32ba-f213-41b8-beb4-5959db9353a8.png?v=1730877819","\/\/australiantactical.com.au\/cdn\/shop\/files\/2_9bcf8816-7832-42b7-a560-71b8dcbbe98f.png?v=1730877819","\/\/australiantactical.com.au\/cdn\/shop\/files\/3_fe568e22-35bf-4bad-ab31-4a7750c07e6b.png?v=1730877819","\/\/australiantactical.com.au\/cdn\/shop\/files\/4_174d4c56-73d1-41e3-b392-c9f16a29409a.png?v=1730877819","\/\/australiantactical.com.au\/cdn\/shop\/files\/5_7f9af915-fc8a-4b6f-a8c2-4a060665fa11.png?v=1730877819","\/\/australiantactical.com.au\/cdn\/shop\/files\/6_8f5d2581-a600-4206-8031-41c431fd9404.png?v=1730877819"],"featured_image":"\/\/australiantactical.com.au\/cdn\/shop\/files\/mainimage_65fe32ba-f213-41b8-beb4-5959db9353a8.png?v=1730877819","options":["Title"],"media":[{"alt":null,"id":27731352715403,"position":1,"preview_image":{"aspect_ratio":1.0,"height":1024,"width":1024,"src":"\/\/australiantactical.com.au\/cdn\/shop\/files\/mainimage_65fe32ba-f213-41b8-beb4-5959db9353a8.png?v=1730877819"},"aspect_ratio":1.0,"height":1024,"media_type":"image","src":"\/\/australiantactical.com.au\/cdn\/shop\/files\/mainimage_65fe32ba-f213-41b8-beb4-5959db9353a8.png?v=1730877819","width":1024},{"alt":null,"id":27731352486027,"position":2,"preview_image":{"aspect_ratio":1.0,"height":1024,"width":1024,"src":"\/\/australiantactical.com.au\/cdn\/shop\/files\/2_9bcf8816-7832-42b7-a560-71b8dcbbe98f.png?v=1730877819"},"aspect_ratio":1.0,"height":1024,"media_type":"image","src":"\/\/australiantactical.com.au\/cdn\/shop\/files\/2_9bcf8816-7832-42b7-a560-71b8dcbbe98f.png?v=1730877819","width":1024},{"alt":null,"id":27731352518795,"position":3,"preview_image":{"aspect_ratio":1.0,"height":1024,"width":1024,"src":"\/\/australiantactical.com.au\/cdn\/shop\/files\/3_fe568e22-35bf-4bad-ab31-4a7750c07e6b.png?v=1730877819"},"aspect_ratio":1.0,"height":1024,"media_type":"image","src":"\/\/australiantactical.com.au\/cdn\/shop\/files\/3_fe568e22-35bf-4bad-ab31-4a7750c07e6b.png?v=1730877819","width":1024},{"alt":null,"id":27731352584331,"position":4,"preview_image":{"aspect_ratio":1.0,"height":1024,"width":1024,"src":"\/\/australiantactical.com.au\/cdn\/shop\/files\/4_174d4c56-73d1-41e3-b392-c9f16a29409a.png?v=1730877819"},"aspect_ratio":1.0,"height":1024,"media_type":"image","src":"\/\/australiantactical.com.au\/cdn\/shop\/files\/4_174d4c56-73d1-41e3-b392-c9f16a29409a.png?v=1730877819","width":1024},{"alt":null,"id":27731352617099,"position":5,"preview_image":{"aspect_ratio":1.0,"height":1024,"width":1024,"src":"\/\/australiantactical.com.au\/cdn\/shop\/files\/5_7f9af915-fc8a-4b6f-a8c2-4a060665fa11.png?v=1730877819"},"aspect_ratio":1.0,"height":1024,"media_type":"image","src":"\/\/australiantactical.com.au\/cdn\/shop\/files\/5_7f9af915-fc8a-4b6f-a8c2-4a060665fa11.png?v=1730877819","width":1024},{"alt":null,"id":27731352649867,"position":6,"preview_image":{"aspect_ratio":1.0,"height":1023,"width":1023,"src":"\/\/australiantactical.com.au\/cdn\/shop\/files\/6_8f5d2581-a600-4206-8031-41c431fd9404.png?v=1730877819"},"aspect_ratio":1.0,"height":1023,"media_type":"image","src":"\/\/australiantactical.com.au\/cdn\/shop\/files\/6_8f5d2581-a600-4206-8031-41c431fd9404.png?v=1730877819","width":1023}],"requires_selling_plan":false,"selling_plan_groups":[],"content":"\u003cp\u003e\u003cspan\u003eTougher than the rest. MANAEL don’t muck around. We were sick of gear that couldn’t stand up to what we were throwing at it. So we made our own. Run your hard gear into competition knowing MANAEL Arca Swiss Rails have your back. Thicker and stronger, they are available in 5 sizes to suit every set up. Being 100% Aussie made you’re guaranteed best quality and better aftermarket care than imports. Universal fit for all rifles Every rail is built to the RRS standards and quality checked so you can mount your gear with confidence. MANAEL Arca Rails are compatible with almost every rifle stock and chassis, thanks to long M-lok slots and all fitting hardware. 100% Aussie Tough Billet machined from premium materials, proudly 100% Australian made and quality tested in-house at our specialist Australian workshop. Our products go through endless testing to make sure they deliver on its promise to handle anything you throw at it.\u003c\/span\u003e\u003c\/p\u003e\n\u003cp\u003e\u003cspan\u003e\u003cstrong\u003ePlease note that many Manael items are drop-shipped, so stock levels may change without notice. I’ll do my best to keep you informed promptly if any issues arise.\u003c\/strong\u003e\u003c\/span\u003e\u003c\/p\u003e"}
Translation missing: en.products.product.regular_price
$118.00
-
{"id":7575920083083,"title":"MANAEL Arca Swiss Rail - 24cm \/ 9.4″ (3 Mlok slots)","handle":"man_acr-rail-24cm","description":"\u003cp\u003e\u003cspan\u003eTougher than the rest. MANAEL don’t muck around. We were sick of gear that couldn’t stand up to what we were throwing at it. So we made our own. Run your hard gear into competition knowing MANAEL Arca Swiss Rails have your back. Thicker and stronger, they are available in 5 sizes to suit every set up. Being 100% Aussie made you’re guaranteed best quality and better aftermarket care than imports. Universal fit for all rifles Every rail is built to the RRS standards and quality checked so you can mount your gear with confidence. MANAEL Arca Rails are compatible with almost every rifle stock and chassis, thanks to long M-lok slots and all fitting hardware. 100% Aussie Tough Billet machined from premium materials, proudly 100% Australian made and quality tested in-house at our specialist Australian workshop. Our products go through endless testing to make sure they deliver on its promise to handle anything you throw at it.\u003c\/span\u003e\u003c\/p\u003e\n\u003cp\u003e\u003cspan\u003e\u003cstrong\u003ePlease note that many Manael items are drop-shipped, so stock levels may change without notice. I’ll do my best to keep you informed promptly if any issues arise.\u003c\/strong\u003e\u003c\/span\u003e\u003c\/p\u003e","published_at":"2024-11-07T11:35:19+11:00","created_at":"2024-11-01T15:50:33+11:00","vendor":"My Store","type":"","tags":[],"price":12800,"price_min":12800,"price_max":12800,"available":true,"price_varies":false,"compare_at_price":null,"compare_at_price_min":0,"compare_at_price_max":0,"compare_at_price_varies":false,"variants":[{"id":42874506870923,"title":"Default Title","option1":"Default Title","option2":null,"option3":null,"sku":"MAN_ACR-Rail-24cm-1","requires_shipping":true,"taxable":true,"featured_image":null,"available":true,"name":"MANAEL Arca Swiss Rail - 24cm \/ 9.4″ (3 Mlok slots)","public_title":null,"options":["Default Title"],"price":12800,"weight":1000,"compare_at_price":null,"inventory_management":"shopify","barcode":"","requires_selling_plan":false,"selling_plan_allocations":[]}],"images":["\/\/australiantactical.com.au\/cdn\/shop\/files\/mainimage_143622bf-5f02-4ee3-abb6-766997c28a57.png?v=1730877891","\/\/australiantactical.com.au\/cdn\/shop\/files\/2_a08eb784-6310-4b3d-94bf-9da05035f941.png?v=1730877892","\/\/australiantactical.com.au\/cdn\/shop\/files\/3_f058e970-605f-476d-8634-8b382dae7a1f.png?v=1730877891","\/\/australiantactical.com.au\/cdn\/shop\/files\/4_256fb9a6-5553-4c8a-8243-ca3659e0a370.png?v=1730877892","\/\/australiantactical.com.au\/cdn\/shop\/files\/5_71f038ed-0816-4d9c-8f38-bf2832ef1715.png?v=1730877892","\/\/australiantactical.com.au\/cdn\/shop\/files\/6_788ee43e-e096-4e9d-9f2a-34df63b2bcf1.png?v=1730877891"],"featured_image":"\/\/australiantactical.com.au\/cdn\/shop\/files\/mainimage_143622bf-5f02-4ee3-abb6-766997c28a57.png?v=1730877891","options":["Title"],"media":[{"alt":null,"id":27731363823755,"position":1,"preview_image":{"aspect_ratio":1.0,"height":1024,"width":1024,"src":"\/\/australiantactical.com.au\/cdn\/shop\/files\/mainimage_143622bf-5f02-4ee3-abb6-766997c28a57.png?v=1730877891"},"aspect_ratio":1.0,"height":1024,"media_type":"image","src":"\/\/australiantactical.com.au\/cdn\/shop\/files\/mainimage_143622bf-5f02-4ee3-abb6-766997c28a57.png?v=1730877891","width":1024},{"alt":null,"id":27731363856523,"position":2,"preview_image":{"aspect_ratio":1.0,"height":1024,"width":1024,"src":"\/\/australiantactical.com.au\/cdn\/shop\/files\/2_a08eb784-6310-4b3d-94bf-9da05035f941.png?v=1730877892"},"aspect_ratio":1.0,"height":1024,"media_type":"image","src":"\/\/australiantactical.com.au\/cdn\/shop\/files\/2_a08eb784-6310-4b3d-94bf-9da05035f941.png?v=1730877892","width":1024},{"alt":null,"id":27731363692683,"position":3,"preview_image":{"aspect_ratio":1.0,"height":1024,"width":1024,"src":"\/\/australiantactical.com.au\/cdn\/shop\/files\/3_f058e970-605f-476d-8634-8b382dae7a1f.png?v=1730877891"},"aspect_ratio":1.0,"height":1024,"media_type":"image","src":"\/\/australiantactical.com.au\/cdn\/shop\/files\/3_f058e970-605f-476d-8634-8b382dae7a1f.png?v=1730877891","width":1024},{"alt":null,"id":27731363725451,"position":4,"preview_image":{"aspect_ratio":1.0,"height":1024,"width":1024,"src":"\/\/australiantactical.com.au\/cdn\/shop\/files\/4_256fb9a6-5553-4c8a-8243-ca3659e0a370.png?v=1730877892"},"aspect_ratio":1.0,"height":1024,"media_type":"image","src":"\/\/australiantactical.com.au\/cdn\/shop\/files\/4_256fb9a6-5553-4c8a-8243-ca3659e0a370.png?v=1730877892","width":1024},{"alt":null,"id":27731363758219,"position":5,"preview_image":{"aspect_ratio":1.0,"height":1024,"width":1024,"src":"\/\/australiantactical.com.au\/cdn\/shop\/files\/5_71f038ed-0816-4d9c-8f38-bf2832ef1715.png?v=1730877892"},"aspect_ratio":1.0,"height":1024,"media_type":"image","src":"\/\/australiantactical.com.au\/cdn\/shop\/files\/5_71f038ed-0816-4d9c-8f38-bf2832ef1715.png?v=1730877892","width":1024},{"alt":null,"id":27731363790987,"position":6,"preview_image":{"aspect_ratio":1.0,"height":1023,"width":1023,"src":"\/\/australiantactical.com.au\/cdn\/shop\/files\/6_788ee43e-e096-4e9d-9f2a-34df63b2bcf1.png?v=1730877891"},"aspect_ratio":1.0,"height":1023,"media_type":"image","src":"\/\/australiantactical.com.au\/cdn\/shop\/files\/6_788ee43e-e096-4e9d-9f2a-34df63b2bcf1.png?v=1730877891","width":1023}],"requires_selling_plan":false,"selling_plan_groups":[],"content":"\u003cp\u003e\u003cspan\u003eTougher than the rest. MANAEL don’t muck around. We were sick of gear that couldn’t stand up to what we were throwing at it. So we made our own. Run your hard gear into competition knowing MANAEL Arca Swiss Rails have your back. Thicker and stronger, they are available in 5 sizes to suit every set up. Being 100% Aussie made you’re guaranteed best quality and better aftermarket care than imports. Universal fit for all rifles Every rail is built to the RRS standards and quality checked so you can mount your gear with confidence. MANAEL Arca Rails are compatible with almost every rifle stock and chassis, thanks to long M-lok slots and all fitting hardware. 100% Aussie Tough Billet machined from premium materials, proudly 100% Australian made and quality tested in-house at our specialist Australian workshop. Our products go through endless testing to make sure they deliver on its promise to handle anything you throw at it.\u003c\/span\u003e\u003c\/p\u003e\n\u003cp\u003e\u003cspan\u003e\u003cstrong\u003ePlease note that many Manael items are drop-shipped, so stock levels may change without notice. I’ll do my best to keep you informed promptly if any issues arise.\u003c\/strong\u003e\u003c\/span\u003e\u003c\/p\u003e"}
Translation missing: en.products.product.regular_price
$128.00


